Claude Code How to–如何组合CC各种工具
从github项目中学习如果组合官方提供的各种工具–不定版本尽量新版本
1. 背景
前面文章已经学习了如何安装claude colder,如何安装Skills,MCP,Command,Agent,settings等,但是都是独立的模块进行的了解,该如何整合起来形成自己的工作流才是最重要的事情
这里依据luongnv89/claude-howto仓库进行第二步的学习
| 维度 | 官方文档(Official Docs) | 本指南(This Guide) |
|---|---|---|
| 格式 | 参考型文档 | 使用 Mermaid 图的可视化教程 |
| 深度 | 功能说明 | 底层工作原理解析 |
| 示例 | 基础代码片段 | 可直接用于生产的模板 |
| 结构 | 按功能组织 | 渐进式学习路径(从入门到进阶) |
| 入门方式 | 自主学习 | 带时间预估的引导式路线 |
| 自我评估 | 无 | 交互式测验,定位知识缺口并生成个性化路径 |
该仓库主要是下面几个部分:
- 覆盖 Claude Code 所有功能的 10 个教程模块——从斜杠命令到自定义智能体团队
- 可直接复制粘贴的配置——斜杠命令、CLAUDE.md 模板、hook 脚本、MCP 配置、子智能体定义以及完整插件包
- 使用
Mermaid图展示每个功能的内部工作原理,让你不仅知道“怎么用”,还理解“为什么这样设计” - 内置自我评估——可以在 Claude Code 中直接运行
/self-assessment或/lesson-quiz hooks来识别知识盲区
主要是介绍了10个模块和上手容易程度
| 顺序 | 模块 | 等级 |
|---|---|---|
| 1 | Slash Commands(斜杠命令) | Beginner(初级) |
| 2 | Memory(记忆) | Beginner+(初级+) |
| 3 | Checkpoints(检查点) | Intermediate(中级) |
| 4 | CLI Basics(命令行基础) | Beginner+(初级+) |
| 5 | Skills(技能) | Intermediate(中级) |
| 6 | Hooks(钩子) | Intermediate(中级) |
| 7 | MCP | Intermediate+(中级+) |
| 8 | Subagents(子智能体) | Intermediate+(中级+) |
| 9 | Advanced Features(高级功能) | Advanced(高级) |
| 10 | Plugins(插件) | Advanced(高级) |
不同版本的claude code会发生变化,有可能大版本之后会有大的逻辑变化,所以要紧跟版本
2. Claude Code How To
将项目从github克隆下来之后,挨个进行复制,前面的claude code learn已经介绍了不同工具安装的目录路径,这里将不同的文件夹拷贝到目标文件夹即可
# 1. Clone the guide,克隆当前的仓库
git clone https://github.com/luongnv89/claude-howto.git
cd claude-howto

# 2. Copy your first slash command,启动第一个命令
mkdir -p /path/to/your-project/.claude/commands
cp 01-slash-commands/optimize.md /path/to/your-project/.claude/commands/

# 3. Try it — in Claude Code, type: 尝试第一个命令
# /optimize

# 4. Ready for more? Set up project memory: 设置项目记忆
cp 02-memory/project-CLAUDE.md /path/to/your-project/CLAUDE.md

# 5. Install a skill: skill的安装
cp -r 03-skills/code-review-specialist ~/.claude/skills/

# 6. MCP
export GITHUB_TOKEN="token"
claude mcp add github -- npx -y @modelcontextprotocol/server-github

# 7. Hooks
mkdir -p ~/.claude/hooks
cp 06-hooks/*.sh ~/.claude/hooks/
chmod +x ~/.claude/hooks/*.sh

# 8. Plugins
/plugin install pr-review

# checkpoint

# CLI 命令终端使用
更新会随着版本来,所以有的方式会发生变化,有的会淘汰,这个是需要注意的
3 Slash Commands学习
斜杠命令就像你个人访问 AI 助手的快捷方式,可以把slash command想象成你在手机上设置的快捷方式图标,点击一下就能直接打开特定的功能,而不需要每次都输入完整的指令。而slash command可以看作是存储提示的markdown文件,里面包含了你想要AI执行的任务的详细说明和示例。通过使用斜杠命令,你可以快速调用这些预设的提示,节省时间并提高效率
3.1 基础结构
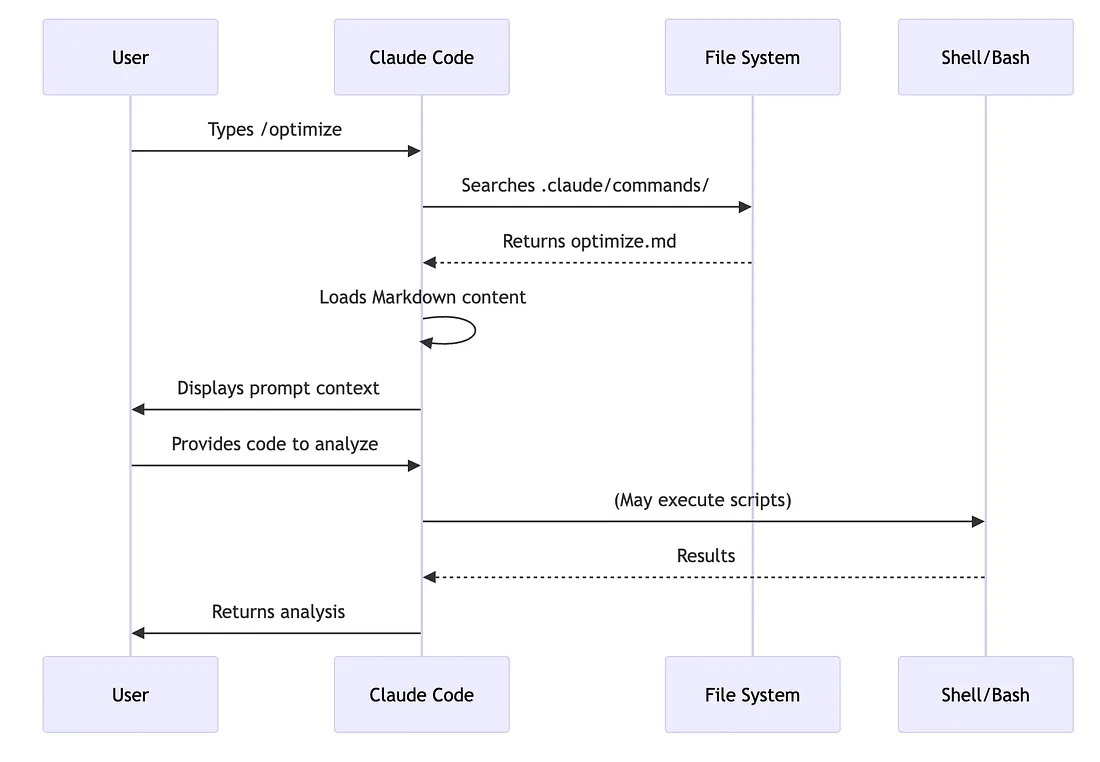
slash command结构
当你使用/commands的时候,其实底层触发的是下面的逻辑
┌─────────────────┐
│ User Input      │
│ /command-name   │
└──────────┬──────┘
           │ Triggers
           ▼
┌─────────────────────────┐
│ Search                  │
│ .claude/commands/       │
└──────────┬──────────────┘
           │ Finds
           ▼
┌─────────────────────────┐
│ command-name.md         │
└──────────┬──────────────┘
           │ Loads
           ▼
┌─────────────────────────┐
│ Markdown Content        │
└──────────┬──────────────┘
           │ Executes
           ▼
┌─────────────────────────┐
│ Claude Processes Prompt │
└──────────┬──────────────┘
           │ Returns
           ▼
┌─────────────────────────┐
│ Result in Context       │
└─────────────────────────┘
现在
command用户体验层面基本合并skills了,但底层概念没有完全合并,Command本质上只是markdown文档,但是Skills增加了比如Tool权限控制,有更好的参数处理,能够与Hook配合等
- 新版命令分类
| 类型 | 来源 | 定义方式 | 示例 | 是否推荐 | 备注 |
|---|---|---|---|---|---|
| Built-in Commands | Claude Code 内置 | 系统提供 | /help, /clear, /model |
✅ 必须 | 不可修改 |
| Skills(新标准) | 用户定义 | .claude/skills/*.md |
/optimize, /pr, /refactor |
⭐⭐⭐⭐⭐ 推荐 | 替代旧 custom commands |
| Plugin Commands | 插件系统 | 插件注册 | /frontend-design:frontend-design |
⭐⭐⭐ | 依赖插件生态 |
| MCP Prompts | MCP Server | MCP tools / prompts | /mcp__github__list_prs |
⭐⭐⭐⭐ | 面向工具/API |
| Legacy Commands(旧) | .claude/commands/ |
Markdown 文件 | /build, /test |
⚠️ 兼容但不推荐 | 已被 Skills 取代 |
不同的类型有了自己的命名规则,方便分类和管理
自定义斜杠命令已合并到技能中。
.claude/commands/目录下的文件仍然有效,但现在推荐使用技能目录 (.claude/skills/), 两者都会创建/commands-name快捷方式。
- 命令示例
[1] Claude Code内置命令
Claude Code内置命令都是绑定在claude code安装过程中的,内置命令的行为通常由 CLI 程序直接实现,而 bundled skills 是通过提示词和技能文件指导 Claude 完成任务。不像自定义的命令需要手动安装到指定目录下
| 命令 | 功能说明 |
|---|---|
/add-dir <path> |
添加工作目录。 |
/advisor [model\|off] |
配置顾问模型。交互式终端中打开对话框;桌面端、远程控制和无头模式中使用文本参数。v2.1.260+ 支持 off。 |
/agents |
已不再是可用的交互式命令。v2.1.198 移除了交互式向导,v2.1.281 起不再显示在命令菜单和帮助中。可让 Claude 创建或管理子代理,也可以直接编辑 .claude/agents/ 文件。 |
/branch [name] |
从当前对话位置创建一个独立的对话分支,同时保留原对话。可通过 /resume 返回原对话。 |
/fork [prompt] |
将当前对话复制为新的后台会话,当前会话可以继续工作。两个会话此后相互独立。v2.1.212+ 支持。 |
/subtask <task> |
启动一个分叉子代理。子代理继承完整对话上下文并执行指定任务,完成后将结果返回当前对话。v2.1.212+ 支持。 |
/btw <question> |
在 Claude 执行主要任务时提出临时问题,不将该问题加入主要对话上下文。 |
/cd <path> |
切换当前会话的工作目录,同时保持提示词缓存不被破坏。v2.1.169+ 支持。 |
/chrome |
配置 Chrome 浏览器集成。 |
/clear |
清空当前对话。别名:/reset、/new。 |
/color [color\|default] |
设置提示栏颜色。直接输入 /color 可随机选择颜色;也可以指定颜色名称或十六进制颜色值。v2.1.128+ 支持。 |
/compact [instructions] |
压缩当前对话上下文,可附加指令指定压缩重点。v2.1.216+ 会在压缩失败时明确显示错误。 |
/config |
打开设置界面。别名:/settings。 |
/context |
以彩色网格显示上下文使用情况;超出上下文窗口限制时会显示明确警告。 |
/copy [N] |
将指定的助手回复复制到剪贴板;w 参数可将内容写入文件。 |
/cost |
打开费用统计页面,是 /usage 的快捷别名之一。v2.1.118+ 支持。 |
/desktop |
切换到 Claude Code 桌面应用。别名:/app。 |
/diff |
打开交互式差异查看器,查看尚未提交的代码变更。在全屏界面中,可打开持续更新的差异面板。v2.1.260+ 支持新的全屏显示方式。 |
/doctor |
检查 Claude Code 安装和运行环境,并显示状态信息;按 f 可尝试自动修复。/doctor prompt-audit 可检查提示词文件、技能、代理和命令中针对旧模型编写的提示词模式。 |
/effort [level] |
设置模型的推理投入程度,可选 low、medium、high、xhigh、max、auto 等级别。具体可用等级取决于模型版本。还可通过 ultracode on/off 控制 Ultracode 模式。 |
/exit |
退出 Claude Code 交互式终端。别名:/quit。 |
/export [filename] |
将当前对话导出到文件或剪贴板。 |
/usage-credits |
配置额外用量,以应对使用限制。由旧命令 /extra-usage 更名而来,旧别名仍可使用。v2.1.144+ 支持新名称。 |
/fast [on\|off] |
开启或关闭快速模式。适用于支持该功能的模型。 |
/feedback |
提交反馈。别名:/bug。v2.1.141+ 支持附加近期会话;v2.1.178+ 要求先填写问题描述。 |
/focus |
切换专注视图。v2.1.110+ 支持,用于替代原先通过 Ctrl+O 切换专注视图的方式。 |
/goal <statement> |
设置当前会话的完成条件,让 Claude 持续工作直到满足目标。使用 /goal clear 清除目标。v2.1.139+ 支持。 |
/help |
显示帮助信息。 |
/hooks |
查看 Hook 配置。 |
/ide |
管理 IDE 集成。 |
/init |
初始化 CLAUDE.md 项目说明文件。设置 CLAUDE_CODE_NEW_INIT=1 可启用交互式初始化流程。 |
/insights |
生成会话分析报告。 |
/install-github-app |
配置 GitHub Actions 应用。 |
/install-slack-app |
安装 Slack 应用。 |
/keybindings |
打开快捷键配置。 |
/fewer-permission-prompts |
分析近期 Bash/MCP 工具调用,并生成优先级排序的允许规则,写入 .claude/settings.json,以减少权限确认提示。v2.1.111+ 支持。 |
/login |
切换 Anthropic 账户。 |
/logout |
退出当前 Anthropic 账户。 |
/mcp |
管理 MCP 服务器和 OAuth 授权。 |
/memory |
编辑 CLAUDE.md,并管理自动记忆功能。 |
/mobile |
显示用于移动端的二维码。别名:/ios、/android。 |
/model [model] |
选择模型,并可调整相应的推理投入程度。v2.1.153+ 会将模型选择保存为新会话的默认值;也可选择仅应用于当前会话。 |
/output-style [name] |
列出并切换输出风格。不带参数时列出可用风格,并标记当前风格。选择会保存到 .claude/settings.local.json。 |
/passes |
分享 Claude Code 免费试用周。 |
/permissions |
查看或更新权限设置。别名:/allowed-tools。 |
/plan [description] |
进入计划模式,可附加任务描述。 |
/plugin |
管理插件。 |
/proactive |
/loop 的别名。v2.1.105+ 支持。 |
/powerup |
通过带动画演示的交互式课程了解 Claude Code 的功能。 |
/privacy-settings |
打开隐私设置。仅适用于 Pro/Max 计划。 |
/release-notes |
查看版本更新说明。 |
/recap |
恢复会话时查看会话摘要。v2.1.108+ 支持。 |
/reload-plugins |
重新加载已启用的插件。通常只在安装提示要求重新加载时使用。v2.1.221+ 起,大多数插件安装可立即生效。 |
/reload-skills |
重新扫描技能目录,无需重启会话。v2.1.152+ 支持。 |
/remote-control |
启用来自 claude.ai 的远程控制。别名:/rc。 |
/remote-env |
配置默认远程环境。 |
/rename [name] |
重命名当前会话。 |
/resume [session] |
恢复之前的会话。别名:/continue。 |
/review [level] [options] |
代码审查命令 /code-review 的别名。可以审查当前差异、指定 PR、分支或路径,并可使用 --fix、--comment 等选项。v2.1.223+ 支持。 |
/rewind |
回退对话或代码状态。别名:/checkpoint。 |
/sandbox |
切换沙箱模式。 |
/schedule [description] |
创建或管理云端计划任务。 |
/scroll-speed <+N\|-N> |
调整终端界面中鼠标滚轮的滚动速度,并实时预览。设置保存在本机。v2.1.139+ 支持。 |
/security-review |
检查当前分支中的安全漏洞。 |
/skill-doctor |
显示已加载但未使用的技能,以及各技能的上下文开销,帮助决定是否关闭某些技能。需要 v2.1.252+。 |
/skills |
列出可用技能。 |
/stats |
打开使用统计页面,是 /usage 的快捷别名之一。v2.1.118+ 支持。 |
/stickers |
订购 Claude Code 贴纸。 |
/status |
显示版本、模型、账户和会话类型等状态信息。v2.1.221+ 会显示后台任务及其连接状态。 |
/statusline |
配置状态栏。 |
/tasks |
查看和管理后台任务。 |
/team-onboarding |
根据项目中的 Claude Code 配置生成团队成员入门指南。v2.1.101+ 支持。 |
/teleport |
在当前终端中恢复 Claude Code 网页会话。别名:/tp。需要 claude.ai 订阅。 |
/terminal-setup |
配置终端快捷键。 |
/theme |
打开主题选择器并管理自定义主题。可通过 ~/.claude/themes/<name>.json 定义主题。v2.1.118+ 支持。 |
/tui |
切换全屏终端用户界面模式,提供更平滑的显示效果。v2.1.110+ 支持。 |
/ultrareview |
执行云端多代理综合代码审查。优先使用 /code-review ultra;/ultrareview 仍作为别名保留。 |
/upgrade |
打开升级页面,查看更高等级的订阅计划。 |
/usage |
打开使用情况仪表板,汇总计划用量、速率限制、费用和每日会话统计。/cost、/stats 是其快捷别名。 |
/voice |
开启或关闭按住说话的语音输入功能。 |
/workflows |
查看正在运行和已完成的动态工作流。 |
不同的版本会有不同的命令迭代更新,核心是知道有什么命令,在需要的时候调用即可,有的命令是针对桌面版的Claude Code; 有些功能必须是原版的claude code订阅claude才能使用,需要注意
[2] Code Quality Command (/optimize)
Command现在并入了skills中,当前学习还是放置在commands文件夹中
# 1. 克隆仓库
git clone https://github.com/luongnv89/claude-howto.git
cd claude-howto

# 2. 创建项目文件夹或者直接复制到个人目录下的.claude
mkdir -p /path/to/your-project/.claude/commands

# 3. 复制命令文件
cp 01-slash-commands/optimize.md /path/to/your-project/.claude/commands/
下面是Optimization的markdown文件内容:
---
description: Analyze code for performance issues and suggest optimizations
---

# Code Optimization

Review the provided code for the following issues in order of priority:

1. **Performance bottlenecks** - identify O(n²) operations, inefficient loops
2. **Memory leaks** - find unreleased resources, circular references- 已经不需要name字段了,文件名就是命令名
- description字段是可选的,但建议添加,方便在命令列表中快速了解
在Claude Code中输入/optimize,就会触发这个命令,Claude会根据markdown文件中的提示分析代码并给出优化建议。
 /optimize 是一个代码性能优化分析技能。它会扫描代码并按优先级检
  查以下问题:

  1. 性能瓶颈 — O(n²) 操作、低效循环
  2. 内存泄漏 — 未释放的资源、循环引用
  3. 算法改进 — 更优的算法或数据结构建议
  4. 缓存机会 — 重复计算的可缓存点
  5. 并发问题 — 竞态条件、线程安全问题

  每个发现会标注严重程度(Critical/High/Medium/Low)、代码位置、
  解释和修复建议。

  用法: 对当前工作目录中的代码运行分析。你可以在后面指定要分析
  的文件或代码范围,比如 /optimize src/utils.ts。

  需要我对当前项目跑一次优化分析吗?
[3] Bundled Skills
Claude Code中有几个命令是以Skills的形式打包然后以/command命令调用,方便直接使用,后续介绍Skills的时候会详细介绍
| 技能命令 | 用途说明 |
|---|---|
/batch <instruction> |
使用 Worktree 编排和执行大规模并行代码修改任务。 |
/claude-api |
加载当前项目所使用编程语言对应的 Claude API 参考文档。 |
/debug [description] |
启用调试日志,并可附带调试说明。 |
/loop [interval] <prompt> |
按指定时间间隔重复执行同一个 Prompt。 |
/code-review [effort] |
对当前 Diff 进行代码审查,重点查找正确性和潜在 Bug。可指定审查强度,如 low、medium、high。在 v2.1.146 中曾吸收 /simplify 功能,但后来重新拆分。 |
/simplify |
执行仅针对代码清理和优化的审查,包括代码复用、简化、效率提升和结构优化,并自动应用修改;不会主动查找 Bug。如需 Bug 检查,应使用 /code-review。曾在 v2.1.152 中作为 /code-review --fix 的别名,v2.1.154 后恢复为独立命令。 |
/dataviz [description] |
创建或分析数据可视化内容。可根据描述生成图表、可视化方案,并结合当前项目中的数据进行探索和展示。适用于数据分析、结果展示和报告/论文图表制作。 |
/design [description] |
进入设计任务模式,根据描述进行 UI/UX、网页、组件或视觉设计,并可结合当前项目代码实现设计方案。适用于 Web 页面、界面组件、交互和视觉风格设计。 |
3.1 新增命令
team-onboarding2.1.1之后获得
使用 /team-onboarding 命令可以根据项目本地 Claude Code 使用情况生成团队成员快速上手指南。该命令会检查您的 CLAUDE.md 文件、已安装的技能、子代理、钩子以及最近的工作流,然后生成一份入职文档,帮助新开发人员快速提高工作效率。
- 项目目的和关键约定(摘自 CLAUDE.md)
- 可用技能及其自动调用时机
- Hooks that run on common events
- 新手应该了解的常见工作流程
- 新版command全部并入skills中,旧版的命令依然能用
旧版: .claude/commands/optimize.md 命令处于command文件夹中的md文档 新版: .claude/skills/optimize/SKILL.md 命令处于sklls文件夹,然后在SKILL.md中定义命令
- 参数
命令可以接收参数,当写命令的时候把$ARGUMENTS放入skills中,然后调用命令的时候写上参数,即可把参数传递到skills中.例如/review-pr 456 high, $0=“456”, $1=“high”
skills文件中,或者命令文件中,也可以写入
!command``,相当于执行命令/goal 命令
/goal 命令用于设置当前会话的目标,帮助 Claude 更好地理解您的需求。它允许您指定一个目标,Claude 将在对话中始终尝试满足这个目标。例如,您可以使用 /goal "optimize the code" 来告诉 Claude 您希望优化代码。
/goal
   ↓
定义任务目标
   ↓
Claude Code 根据目标进行规划
   ↓
是否实际修改/执行
   ↓
取决于后续指令和权限
如何使用
User: /goal Migrate the payments service from REST to gRPC and get the integration tests passing.
Claude: Goal registered. I'll work toward this until you clear it.
[Goal panel: ⏱ 0s · turns 0 · tokens 0]

User: start by listing the REST endpoints
Claude: [does the work, panel updates]- File Reference
skills或command中可以使用@来定义使用的文件位置
Review the implementation in @src/utils/helpers.js
Compare @src/old-version.js with @src/new-version.js
3.2 几个复杂命令的深度学习
- /fork
/fork [prompt] 可以理解成 “从当前对话分叉出一个新的 Claude Code 会话”, 原来的会话不被破坏
/fork不是把当前会话变成两个同时在屏幕上运行的 Claude,而是创建一个新的会话上下文
原会话 A
   │
   │ /fork
   ↓
新会话 B  ← 你现在就在这里
fork可以叠加fork的,每次fork都会有序列ID,可以用来追溯返回
- /branch
/branch 更偏向“在当前会话历史上切换/创建一个分支
Claude Code 不同版本对 /branch 的支持和具体行为可能变化
- /goal
给 Claude 设置一个“完成条件”,然后让它自己连续工作,直到这个条件被判断为满足。 例如/goal 所有测试通过,并且 lint 检查没有错误,claude code会一直循环知道完成设定的任务
4 Memory学习
记忆功能使 Claude 能够在会话和对话之间保留上下文。它以两种形式存在:claude.ai 中的自动合成,以及 Claude Code 中基于文件系统的 CLAUDE.md 文件。
在 Claude.ai(网页端 Claude)中,Claude 会自动从你和它的长期对话里提炼出一些有价值的信息,形成 Memory,而不是让你手动维护一个文件
Claude Code中的记忆系统提供了永久的上下文保存,可以多重的会话.不像临时的上下文窗口,记忆文件有优势:
- 能够在team中分享项目标准
- 存储个人开发偏好
- 保持项目规则和设置
- 导入额外文档
- 项目的版本控制
| Command | 作用(Purpose) | 用法(Usage) | 适用场景(When to Use) |
|---|---|---|---|
/init |
初始化项目记忆,创建或更新 CLAUDE.md |
/init |
新项目开始时;首次创建项目记忆 |
/memory |
编辑和管理记忆文件 | /memory |
大规模修改、整理、查看项目记忆 |
# 前缀 |
快速添加单行记忆(已废弃) | 已移除 | 现在使用 /memory 或直接对话告诉 Claude |
@path/to/file |
导入外部文件内容作为上下文 | @README.md@docs/api.md |
引用已有文档、规范、设计说明 |
这里先给一个整体的关系图
                    项目知识管理

                           │
         ┌─────────────────┼─────────────────┐
         │                 │                 │
         ▼                 ▼                 ▼

      /init            /memory          @file

   创建记忆库        编辑记忆库       导入临时上下文

         │                 │                 │
         └──────────┬──────┘                 │
                    ▼                        │

                CLAUDE.md                    │
              (长期项目记忆)

                    ▲                        │
                    └───────────────┬────────┘
                                    ▼

                             Claude 回答问题
4.1 /init命令
/init在Claude Code是设置项目记忆的最快方式,它会初始化一个包含项目基础文档的CLAUDE.md文件
在claude code中输入/init后
- 在您的项目中创建一个新的
CLAUDE.md文件,可以位于项目中的CLAUDE.md,也可以在用户层面的./claude/CLAUDE.md,或者两者都创建 - 制定项目规范和准则
- 为跨会话的上下文持久性奠定基础
- 为项目标准提供模板
增强交互模式(Enhanced interactive mode):设置环境变量
CLAUDE_CODE_NEW_INIT=1后,Claude Code 的/init命令会启用新的多阶段交互流程,引导你一步一步完成项目初始化
./CLAUDE.md和./.claude/CLAUDE.md现在属于平级状态
在bash或zsh中设置:
export CLAUDE_CODE_NEW_INIT=14.2 /memory命令
#快捷键已经弃用,之前还没了解过现在已经弃用了,发展太快学的太慢不知道是好还是坏了..
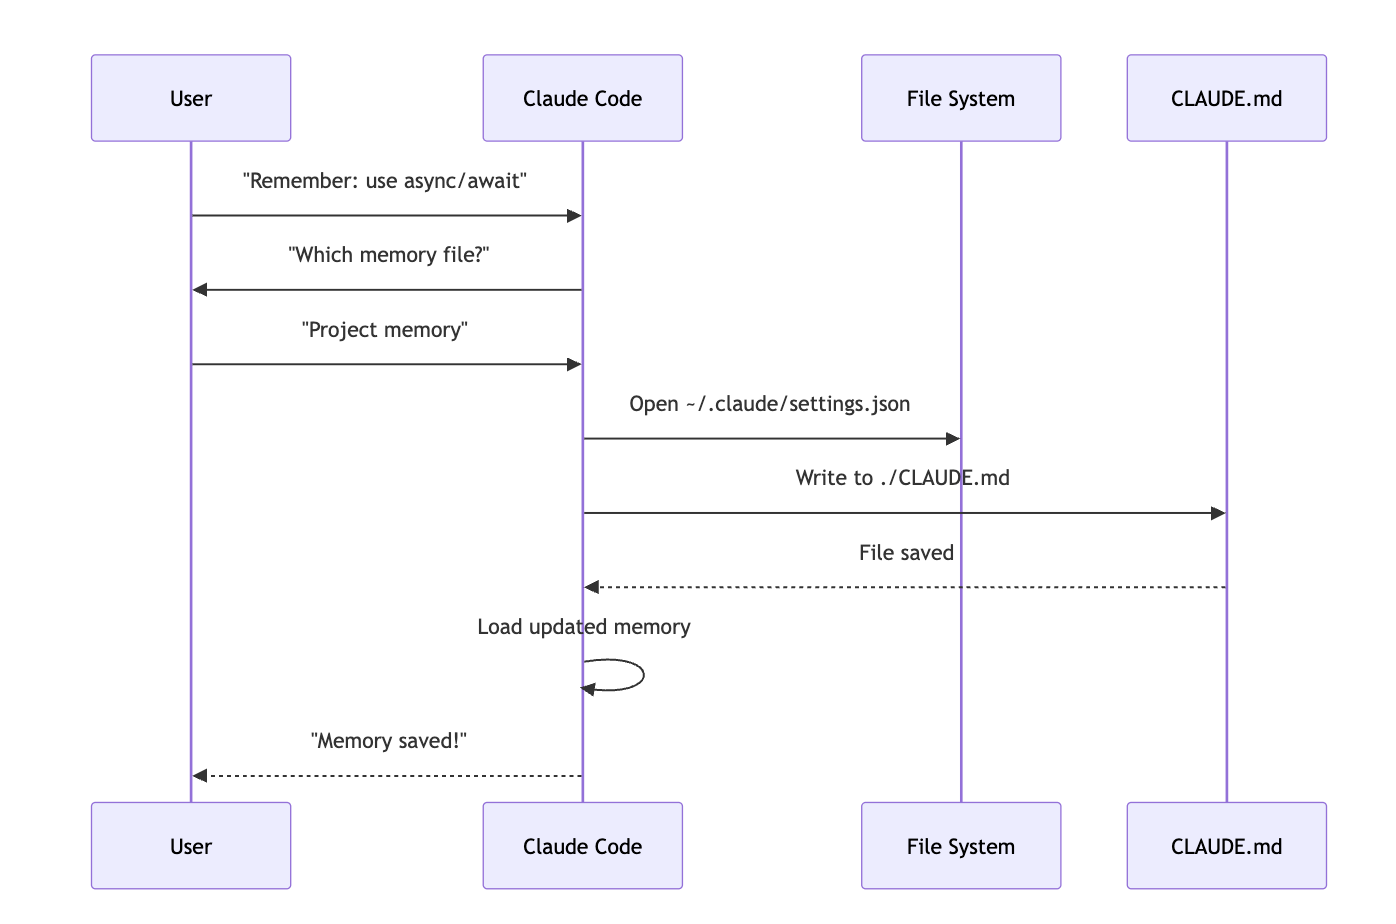
在Claude Code中输入/memory,Claude会提示你选择要编辑的文件,然后确认后会跳转到编辑器去编辑文件,确认即可
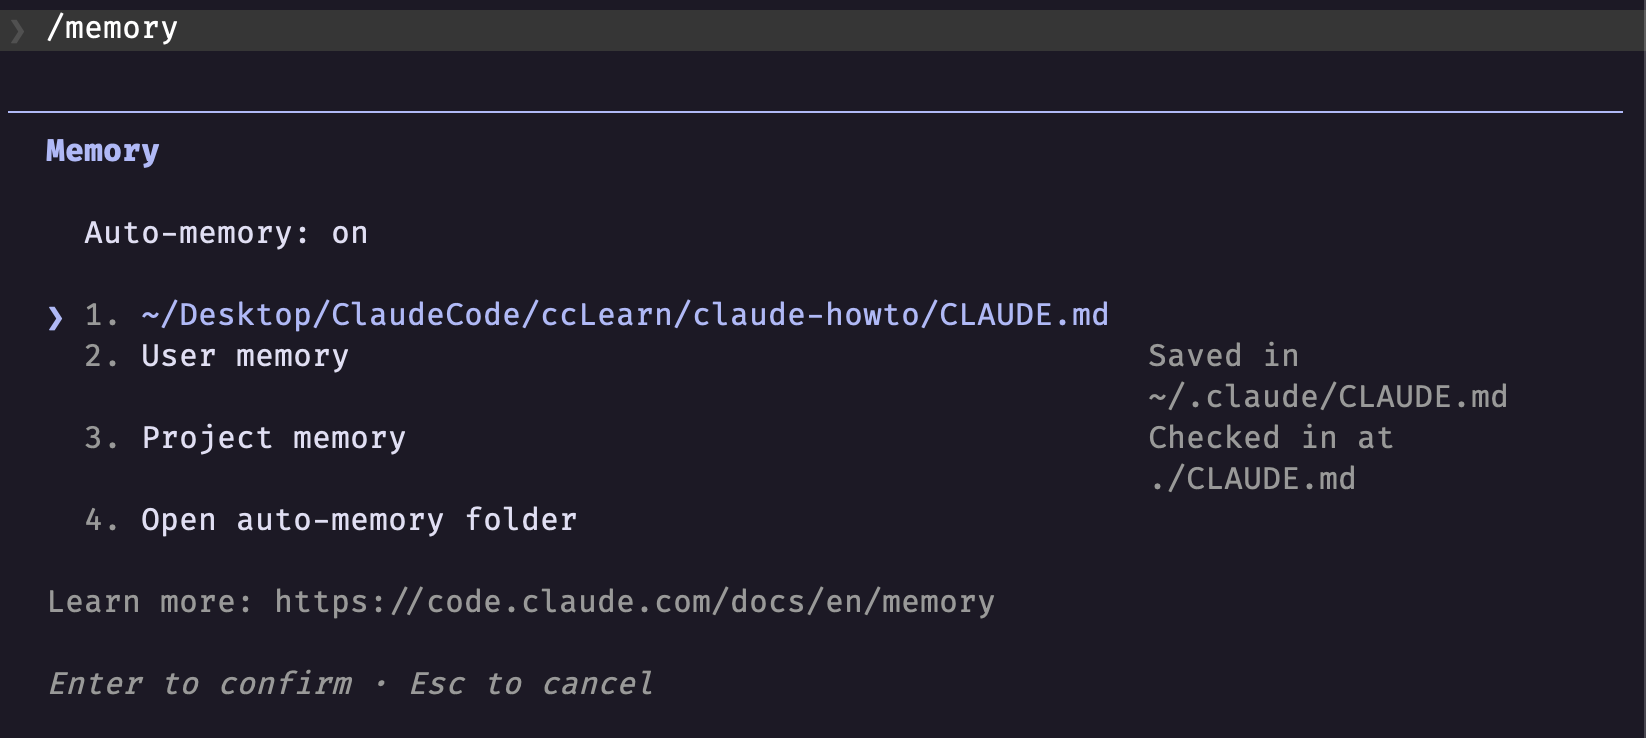
AI Agent现在能做很多,包括你可以直接让AI去修改memory,比如告诉它下面的信息请记住,本项目始终使用 TypeScript 严格模式。 另请注意:优先使用 async/await 而非 Promise 链。
什么时候使用
/memory?
- 审查现有内存内容
- 做大量项目标准的更新
- 重新组织结构
- 添加详细的文档或者指南
- 随着项目的演进,维护和更新内存
4.3 @/path/file功能
这是 Claude Code 中一个很实用的功能,允许你在 CLAUDE.md 里引用其他文件内容,避免把所有内容都堆到一个大文件里
比如在CLAUDE.md文件中可以这么写
# Project Documentation
See @README.md for project overview
See @package.json for available npm commands
See @docs/architecture.md for system design

# Import from home directory using absolute path
@~/.claude/my-project-instructions.md
有点类似
Ghostty中的设置文件,可以引用别的位置的文件来补充设置,放置一个文件内容过多导致的信息爆炸
- 相对路径和绝对路径都是可以的
- 文件深度最大是5层,相当于5个子文件夹
- 首次从外部位置导入数据时,会触发安全审批对话框。
- 在 Markdown 代码 span 或代码块中,导入指令不会被执行
- 通过引用现有文档,有助于避免重复工作。
claude加载memory的完整流程
4.4 记忆架构和层级管理
Claude Code 有两套“记忆系统”,它们都会在每次启动一个新的 session(会话)时加载,并且会在使用过程中持续更新,而不 是按照某个固定时间间隔更新。
- CLAUDE.md / Memory:保存项目、用户偏好、工作规范等相对稳定的信息
- Auto Memory:Claude Code 自动积累的一些经验,例如某个项目的特殊结构、你经常遇到的问题、哪些操作有效等
| CLAUDE.md | Auto Memory | |
|---|---|---|
| 谁产生 | 你/项目 | Claude 自动积累 |
| 内容 | 明确的规则、要求 | 工作过程中形成的经验 |
| 例子 | “所有 Python 使用 uv” | “这个项目的测试需要先启动 PostgreSQL” |
| 是否每次 session 加载 | ✅ | ✅ |
| 是否持续更新 | 可以修改 | ✅ 自动积累 |
| 更像什么 | 项目说明书 | 工作笔记/经验库 |
Claude Code 每次开始工作时,会同时读取两类长期信息;工作过程中又会不断把新的、值得保留的信息写回去。
Auto Memory 的核心就是 Claude Code 自动维护的 MEMORY.md(或 memory.md)文件及其所在的 memory 目录
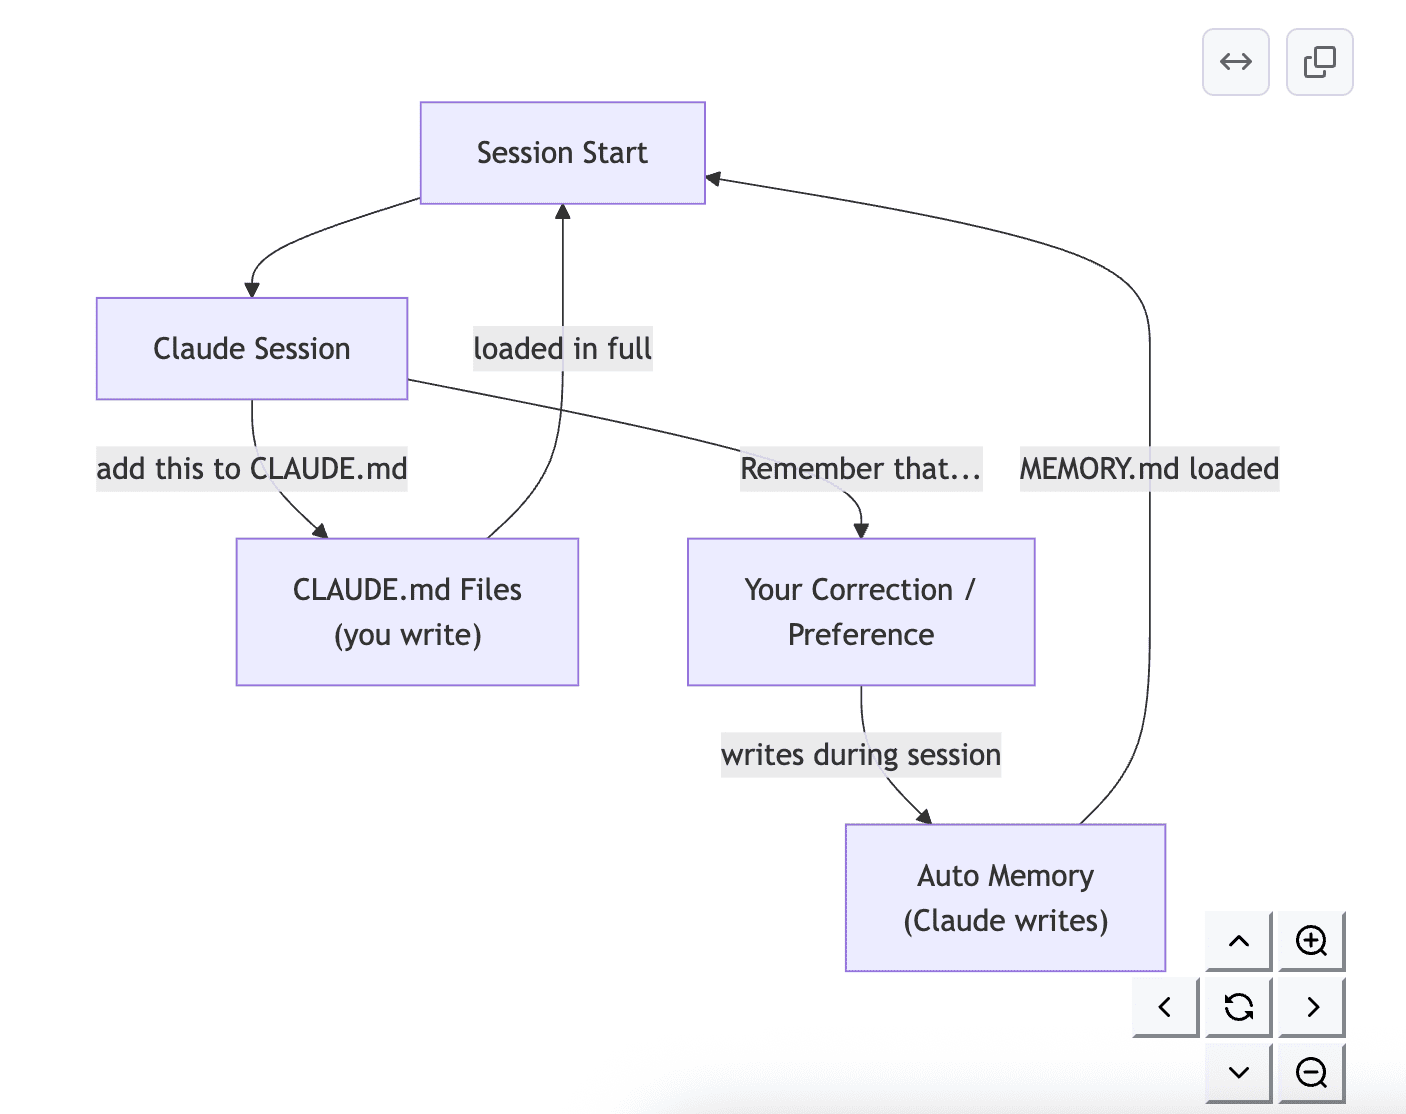
Claude Code 使用多层级Memory系统。Memory文件会在 Claude Code 启动时自动加载,级别较高的文件优先级更高
CLAUDE.md 文件会串联起来形成上下文,而不是相互覆盖——这并非严格的优先级链,即高层级不会覆盖低层级。.claude/rules/*.md 文件是另一种独立的机制,用于处理主题或路径范围的指令。
claude/rules/*.md针对某个主题,或者某些路径,应该怎么工作。
                         Claude Code
                              │
                    启动一个新的 Session
                              │
             ┌────────────────┴────────────────┐
             │                                 │
        Instructions                       Memory
             │                                 │
      “应该怎么工作”                    “以前学到了什么”
             │                                 │
     ┌───────┴────────┐              ┌─────────┴─────────┐
     │                │              │                   │
 CLAUDE.md       .claude/rules/   Auto Memory       其他记忆文件
     │                │              │                   │
     │          ┌─────┴─────┐     MEMORY.md          *.md
     │          │           │         │
     │       topic/path   rules       │
     │          │           │         │
     └──────────┴───────────┘         │
                │                     │
                └──────────┬──────────┘
                           ↓
                    Claude 当前 Context
                           │
                           ↓
                    开始执行你的任务
                           │
                           ↓
                 工作过程中发现新经验
                           │
                           ↓
Auto Memory 更新- Claude Code 企业级集中管理(Managed Policy) 的功能,类似公司 IT 管理员统一下发配置和规则,让所有开发者使用 Claude Code 时自动遵守相同的规范
| 系统 | 路径 |
|---|---|
| macOS | /Library/Application Support/ClaudeCode/CLAUDE.md |
| Linux / WSL | /etc/claude-code/CLAUDE.md |
| Windows | C:\Program Files\ClaudeCode\CLAUDE.md |
当claude启动的时候,是父目录的CLAUDE.md先加载,然后子目录再加载;换种说法就是离你启动位置越近的规则,越晚进入上下文,并且不是传统配置文件中那种后面的覆盖前面的, 主要是防止上下文的爆炸,做到按需加载
Managed Policy 一般写什么?
- 安全限制:禁止将源代码、密钥、凭证或内部数据发送到未经批准的外部服务;禁止读取指定的敏感目录;禁止执行高风险系统操作
- 权限/工具限制: 禁止 Claude Code 自动执行某些 shell 命令; 修改生产环境前必须人工确认
- 企业合规要求
- 统一的模型/服务限制
- 审计要求
- Managed Drop-ins 以前只能写有一个巨大的
CLAUDE.md从v2.1.83 开始新增,可以拆分多个文件,大型组织经常有很多的团队,如安全团队,开发规范团队,AI平台团队,所有人都修改同一个CLAUDE.md会造成冲突
Managed CLAUDE.md
└── 同目录下的 managed-settings.d/

01-security.md
02-compliance.md
03-devops.md
04-python.md
05-web.mdmanaged-settings.d这种写法来自Unix/Linux设计了灵感,.d表示directory(目录)
- Project Memory–团队共享上下文(版本控制)
./.claude/CLAUDE.md or ./CLAUDE.md (in repository root)
这里的./非常容易让人误解,文档里的./CLAUDE.md并不是当前Shell工作目录,而是指Repository Root(git仓库根目录)
/etc/claude-code/CLAUDE.md     (系统级)
        ↓
项目根目录 CLAUDE.md            (项目级)
        ↓
.claude/CLAUDE.md             (本项目附加规则)
        ↓
memory- 项目规则 - 模块化、主题特定的项目说明
.claude/rules/*.md:把项目规则拆成多个主题文件,按需组织和维护- 项目里的
CLAUDE.md:写一个总规则文件
my-project/

├── CLAUDE.md
└── .claude/
└──     rules/
├──     python.md
├──     testing.md
├──     git.md
├──     architecture.md
└── security.md以前是把规则按主题一起塞入到CLAUDE.md,文件越来越大,越来越难维护,现在加入rules/*.md之后,团队协作项目,每个关键流程都是一个单独的文件,方便维护和更新
| 特性 | .claude/rules/*.md |
Managed Drop-ins |
|---|---|---|
| 作用范围 | 当前项目 | 整台机器 / 整个组织 |
| 位置 | 项目目录内 | 系统目录 |
| 管理者 | 项目开发者 | IT管理员 / 企业管理员 |
| 是否提交 Git | 通常是 | 通常不是 |
| 是否随项目传播 | 是 | 否 |
| 优先级 | 较低 | 较高 |
| 目标 | 项目规范 | 企业强制策略 |
- 个人记忆 - 个人偏好(所有项目)
~/.claude/CLAUDE.md (in user home directory)
- User-Level Rules - Personal rules (all projects)
~/.claude/rules/*.md
- 本地项目记忆(Local Project Memory)
专门解决:同一个项目里,团队共享规则和我个人习惯不一样怎么办
./CLAUDE.local.md
- Auto Memory - Claude’s automatic notes and learnings
自动记忆库是一个持久目录,Claude 会在项目运行过程中自动记录学习成果、模式和见解。与您手动编写和维护的 CLAUDE.md 文件不同,自动记忆库由 Claude 在运行过程中自动生成。
Claude 在使用过程中自动积累的项目记忆
- Location:
~/.claude/projects/<project>/memory/ - 入口点:MEMORY.md 是自动内存目录中的主文件
- 主题文件:针对特定主题的可选附加文件(例如,debuging.md、api-conventions.md)
- 加载行为:会话启动时,MEMORY.md 的前 200 行(或前 25KB,以先到者为准)会被加载到上下文中。主题文件按需加载,而非在启动时加载。
- 读/写:Claude 在会话期间会读取和写入内存文件,以便发现模式和项目特定知识。 前言:以 YAML 开头的文件
- Frontmatter:以 YAML frontmatter 开头的文件会有一个 modified 字段——这是 Claude Code 每次写入文件时记录的 ISO 8601 时间戳(v2.1.214)。
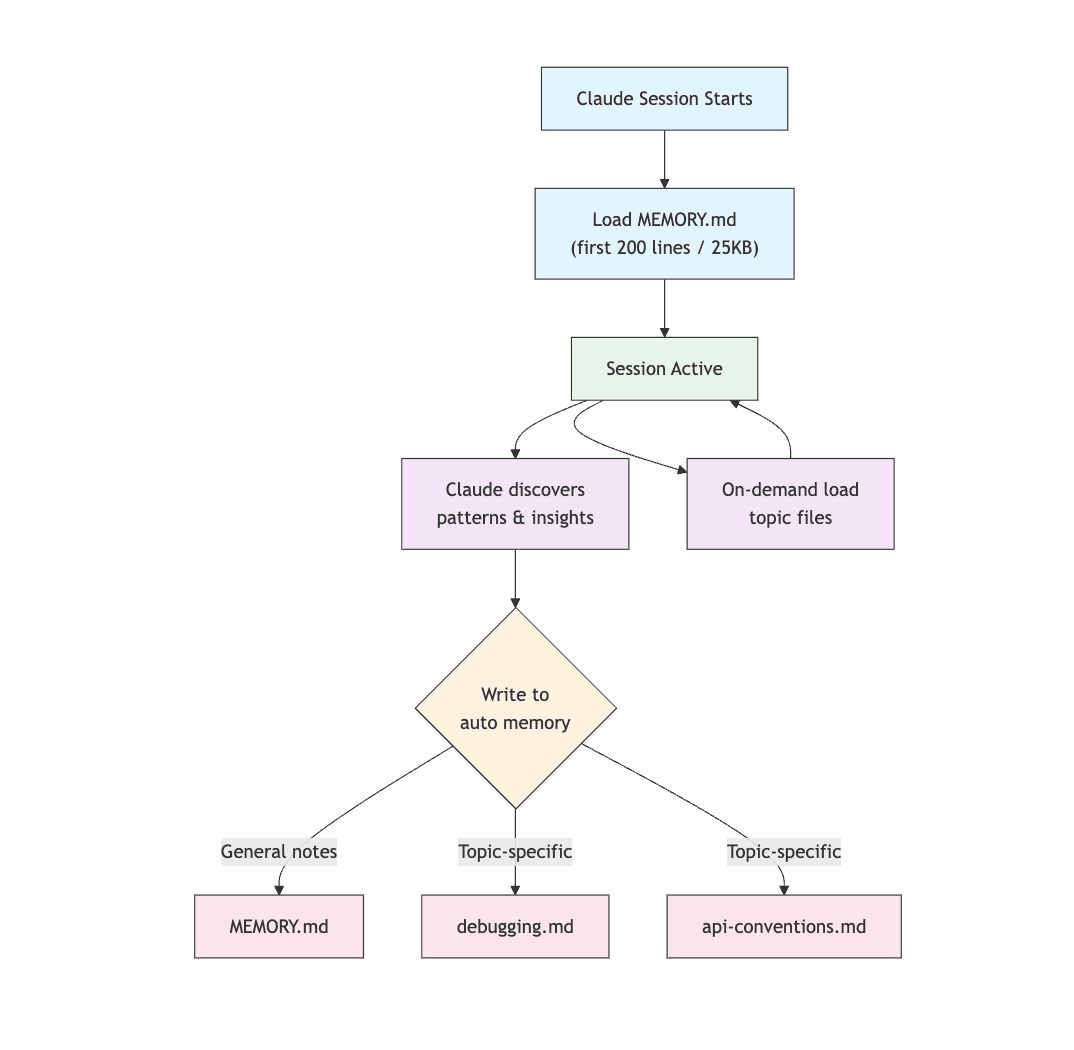
Claude Code 对于memory搜索是有顺序的
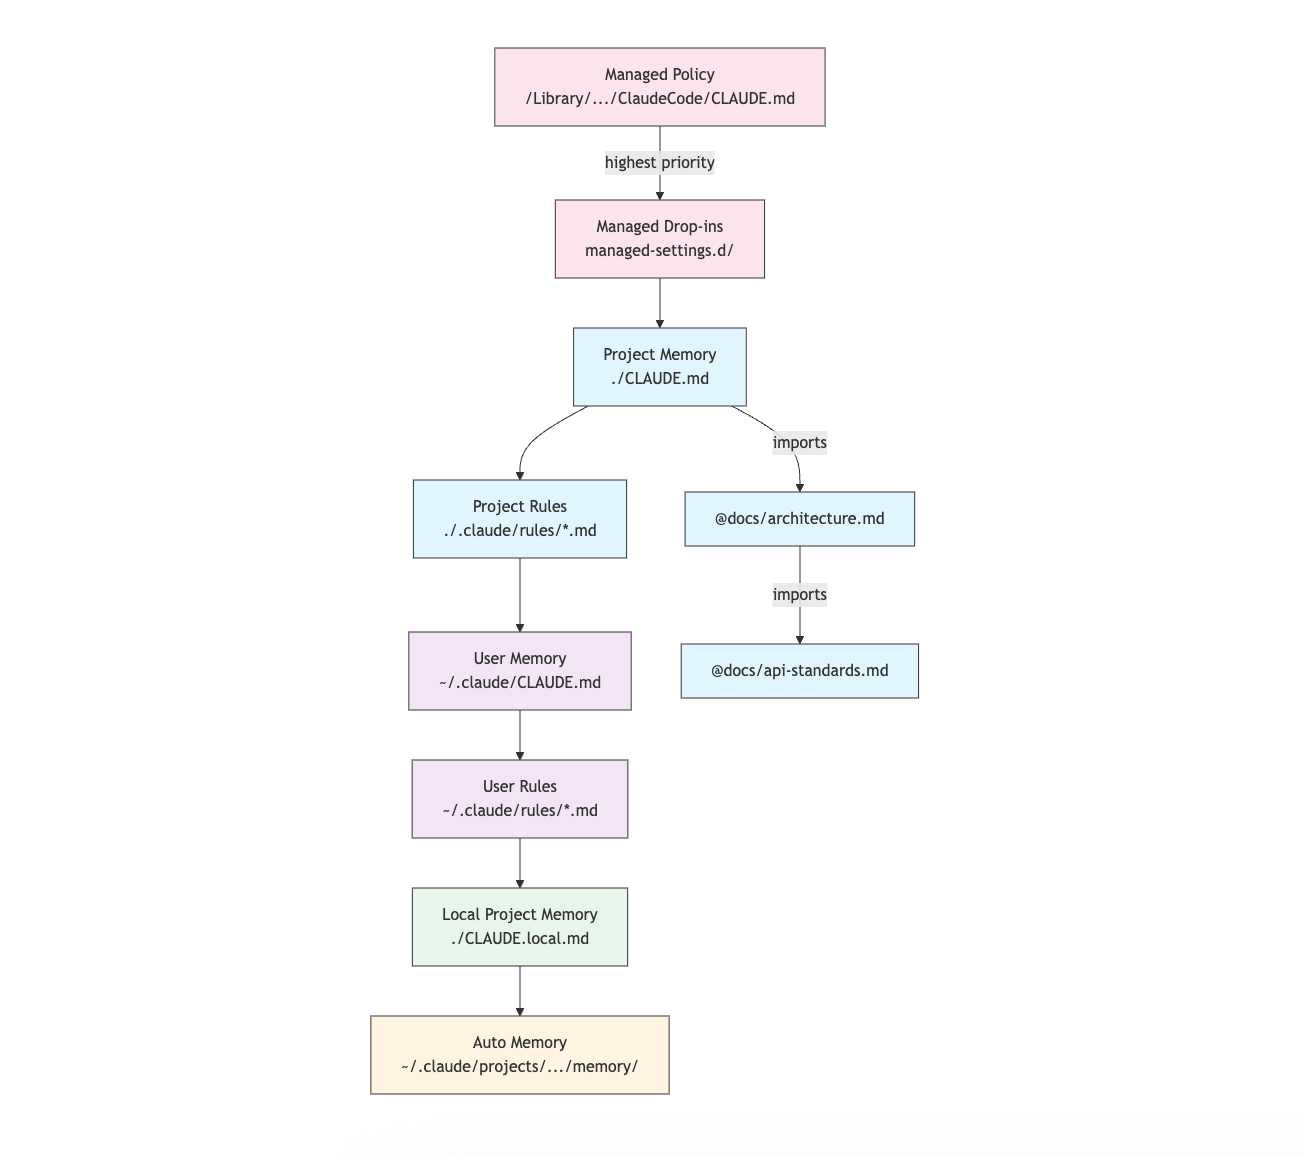
4.4.1 AGENTS.md
AGENTS.md 是一个跨工具的项目上下文文件:与 CLAUDE.md 属于同一文档类别,其编写目的是为了让多个编码代理能够共享一套项目规范。自 v2.1.277 版本起,Claude Code 可以直接将其读取为项目指令,而无需用户导入。
AI 编程工具越来越多,而项目规则不应该绑定在某一个 AI 工具上, 把“项目本身的 AI 编程规范”从“某一个 AI 工具”中抽离出来。
| 项目中的文件情况 | Claude Code 实际读取的内容 |
|---|---|
只有 AGENTS.md,没有 CLAUDE.md |
AGENTS.md |
同时存在 AGENTS.md 和 CLAUDE.md |
只读取 CLAUDE.md |
CLAUDE.md 中通过 @AGENTS.md 导入 AGENTS.md |
读取 CLAUDE.md,并展开其中导入的 AGENTS.md 内容 |
Claude Code 会从当前工作目录开始,一直检查到上级目录
| 检查位置 / 文件 | 是否会抑制 AGENTS.md |
说明 |
|---|---|---|
CLAUDE.md |
✅ 是 | 当前工作目录或上级目录中存在时,AGENTS.md 不再读取 |
.claude/CLAUDE.md |
✅ 是 | 同样会抑制 AGENTS.md |
CLAUDE.local.md |
✅ 是 | 同样会抑制 AGENTS.md |
~/.claude/CLAUDE.md |
❌ 否 | 不参与这个检查,会与项目级配置一起加载 |
Managed CLAUDE.md |
❌ 否 | 不会抑制 AGENTS.md |
.claude/rules/ |
❌ 否 | 不参与这个抑制判断,会继续加载 |
读取的项目范围决定AGENT.md是不能全部被读取的
- 设置
可以在/config中设置,也可以让AI进行设置
{
  "pluginConfigs": {
    "agents-md@builtin": {
      "options": {
        "instructionFiles": "claude-md-and-agents-md"
      }
    }
  }
}
instructionFiles 值 |
行为 |
|---|---|
claude-md-or-agents-md |
默认:只有在找不到 CLAUDE.md 系列文件时,才读取 AGENTS.md |
claude-md-and-agents-md |
CLAUDE.md 和 AGENTS.md 同时读取 |
claude-md |
只读取 CLAUDE.md,忽略 AGENTS.md |
managed-only |
只读取 Managed Policy Instructions |
把 AGENTS.md 的内容导入到当前的 CLAUDE.md 中,让 Claude Code 按照 CLAUDE.md 的 instructions 一起读取。
# Project Instructions

@AGENTS.md
4.5 使用 claudeMdExcludes 排除 CLAUDE.md 文件
在大型单体仓库中,某些 CLAUDE.md 文件可能与您当前工作无关。claudeMdExcludes 设置允许您跳过特定的 CLAUDE.md 文件,使其不被加载到上下文中
// In ~/.claude/settings.json or .claude/settings.json
{
  "claudeMdExcludes": [
    "packages/legacy-app/CLAUDE.md",
    "vendors/**/CLAUDE.md"
  ]
}
或者直接让AI去写入到文件中去
- Setting 文件的层级
Claude Code 设置(包括 autoMemoryDirectory、claudeMdExcludes 和其他配置)是根据五级层次结构解析的,级别越高优先级越高:
| Level | Location | Scope | 说明 |
|---|---|---|---|
| 1 (Highest) | Managed policy (system-level) | Organization-wide enforcement | 组织级强制策略(最高优先级,无法被覆盖) |
| 2 | 命令行参数 | 命令行加入的参数 | 临时会话覆盖 |
| 3 | .claude/settings.local.json |
Local overrides | 本地覆盖配置(通常被 git ignore) |
| 4 | .claude/settings.json |
Project-level | 项目级配置(会提交到 git 仓库) |
| 5 (Lowest) | ~/.claude/settings.json |
User preferences | 用户全局偏好设置(最低优先级) |
在claude code输入
/config同样会修改当前用户下的setting.json文件,选择之后都会保存
优先级不等于覆盖等级,个人local设计覆盖project是为了防止个人的设置与团队的设置冲突
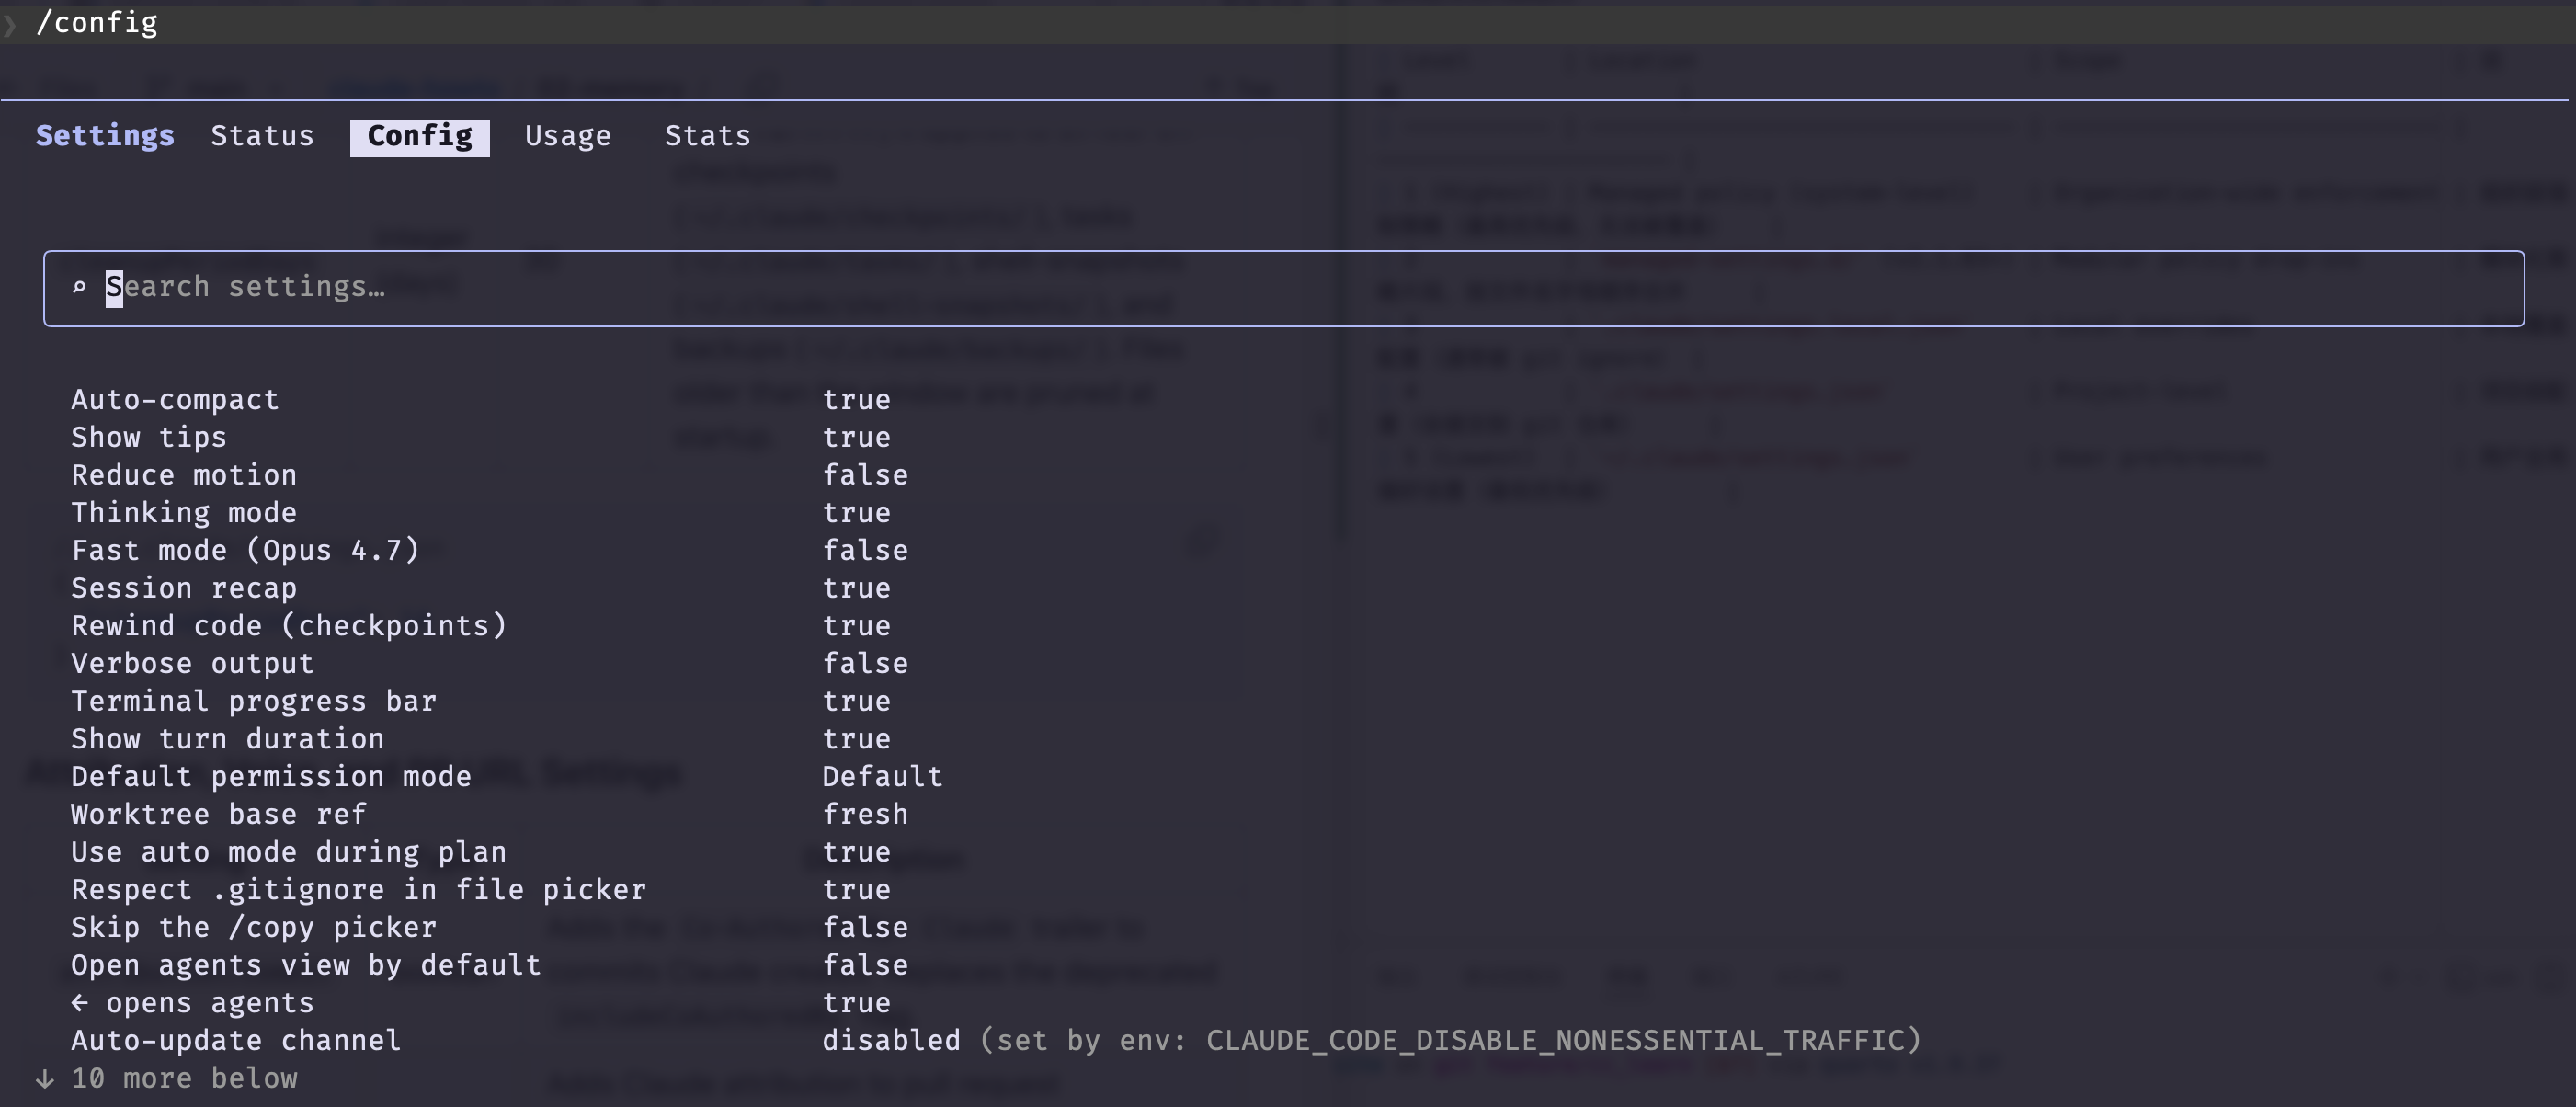
- 本地缓存文件清理
{
  "cleanupPeriodDays": 14
}
Claude Code 启动时,会删除 14 天前的本地历史文件,会清理下面的目录
| 目录 | 用途 |
|---|---|
~/.claude/checkpoints/ |
Checkpoint 历史快照 |
~/.claude/tasks/ |
Task 执行记录 |
~/.claude/shell-snapshots/ |
Shell 命令快照 |
~/.claude/backups/ |
Claude 自动备份文件 |
对于用户和项目推荐的CLAUDE.md写法和结构,更加合理的管控项目和个人偏好
其他设置setting.json中的设置
| Setting | Type | Description |
|---|---|---|
attribution.commit |
boolean | 在 Claude 创建的 Git commit 中添加 Co-Authored-By: Claude 标记。替代已废弃的 includeCoAuthoredBy 配置项。 |
attribution.pr |
boolean | 在 Pull Request(PR)描述中添加 Claude 署名信息。替代 PR 场景中已废弃的 includeCoAuthoredBy 配置项。 |
attribution.sessionUrl |
boolean | 在 Web 和 Remote Control 会话(v2.1.183+)创建的 commit 和 PR 中,隐藏 claude.ai 会话链接。 |
voice.enabled |
boolean | 启用按键通话式语音输入功能(/voice)。替代已废弃的 voiceEnabled 配置项。 |
prUrlTemplate |
string | v2.1.119 新增。自定义 PR 页脚徽章(footer PR badge)的 URL 模板,适用于 GitLab、Bitbucket 或内部代码审查平台。支持 {owner}、{repo} 和 {number} 占位符。 |
例子
// ~/.claude/settings.json
{
  "attribution": {
    "commit": false,
    "pr": true
  },
  "voice": {
    "enabled": true
  },
  "prUrlTemplate": "https://gitlab.internal/{{owner}}/{{repo}}/-/merge_requests/{{number}}"
}
新的目录层级:
your-project/
├── .claude/
│   ├── CLAUDE.md
│   └── rules/
│       ├── code-style.md
│       ├── testing.md
│       ├── security.md
│       └── api/                  # Subdirectories supported
│           ├── conventions.md
│           └── validation.md

~/.claude/
├── CLAUDE.md
└── rules/                        # User-level rules (all projects)
    ├── personal-style.md
└── preferred-patterns.md~/.claude中放长期不变的个人习惯your-project/.claude中放项目级别的规则- 这两个是可以共存的,但是
~/.claude下面的会覆盖项目里面的
- 在Rules中指定文件
Path-Specific Rules with YAML Frontmatter 的作用是: > 让某条规则只对特定目录、文件类型或路径生效,而不是整个项目都生效
不使用特定路径的话,Rules会应用到整个项目,使用YAML Frontmatter会指定文件
---
paths: src/api/**/*.ts
---

# API Development Rules

- All API endpoints must include input validation
- Use Zod for schema validation
- Document all parameters and response types
- Include error handling for all operations
还可以使用全局模式:
**/*.ts- All TypeScript filessrc/**/*- All files under src/src/**/*.{ts,tsx}- Multiple extensions{src,lib}/**/*.ts, tests/**/*.test.ts- Multiple patterns
.claude/rules/ 的两个组织能力增强功能:子目录递归 + 符号链接(symlink)复用规则
- Subdirectories(子目录)
- Symlinks(符号链接): 允许你在多个项目之间共享同一份规则文件
4.6 Auto Memory
自动记忆库是一个持久目录,Claude 会在项目运行过程中自动记录学习成果、模式和见解。与您手动编写和维护的 CLAUDE.md 文件不同,自动记忆库由 Claude 在运行过程中自动生成。
- 自动记忆库中的内容会根据项目需求自动更新,无需手动干预。
- 自动记忆库的位置在
~/.claude/projects/<project>/memory/ - 入口点:
MEMORY.md是自动内存目录中的主文件 - 会话启动时,MEMORY.md 文件的前 200 行(或前 25KB,以先到者为准)会被加载到上下文中。主题文件是按需加载的,而不是在启动时加载的。
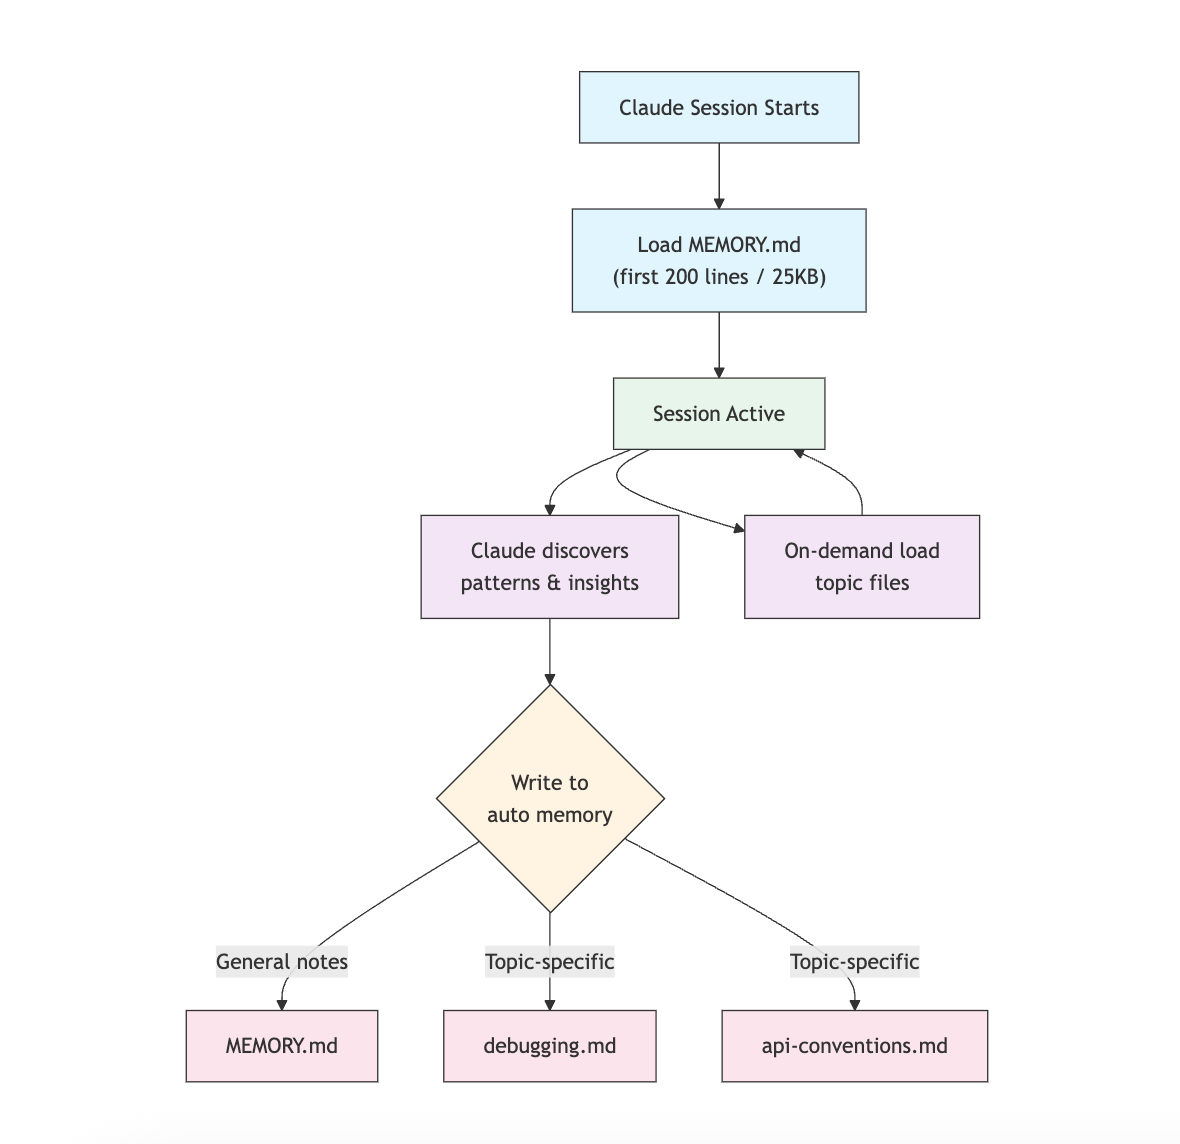
常见的目录结构:
~/.claude/projects/<project>/memory/
├── MEMORY.md              # Entrypoint (first 200 lines / 25KB loaded at startup)
├── debugging.md           # Topic file (loaded on demand)
├── api-conventions.md     # Topic file (loaded on demand)
└── testing-patterns.md    # Topic file (loaded on demand)
自动记忆功能需要 Claude Code v2.1.59 或更高版本
默认情况下,自动内存存储在 ~/.claude/projects/<项目>/memory/ 目录中。您可以使用 autoMemoryDirectory 设置(自 v2.1.74 版本起可用)更改此位置
// In ~/.claude/settings.json or .claude/settings.local.json (user/local settings only)
{
  "autoMemoryDirectory": "/path/to/custom/memory/directory"
}
[2] Worktree and Repository Sharing
同一个 Git 仓库中的所有工作树和子目录共享同一个自动内存目录。这意味着在不同的工作树之间切换,或者在同一个仓库的不同子目录中工作,都会读写同一个内存文件。
subagents有自己独立的memory 上下文,在子代理定义中使用内存前置信息字段来指定要加载的内存范围
memory: user      # Load user-level memory only
memory: project   # Load project-level memory only
memory: local     # Load local memory only
[3] Additional Directories with --add-dir
--add-dir 标志允许 Claude Code 从当前工作目录之外的其他目录加载 CLAUDE.md 文件。这对于单体仓库或多项目架构非常有用,因为在这些情况下,其他目录的上下文信息也很重要。
你现在在项目 A 里运行 Claude Code,但你希望 Claude 同时读取项目 B 里的 CLAUDE.md,就可以用 –add-dir
有两种方法来允许claude code读取子目录
~/work/
├── project-A/
│   ├── CLAUDE.md
│   └── src/
│
└── project-B/
    ├── CLAUDE.md
└── src/- 临时生效,在终端直接写
CLAUDE_CODE_ADDITIONAL_DIRECTORIES_CLAUDE_MD=1 claude,只对这一次claude启动生效 export CLAUDE_CODE_ADDITIONAL_DIRECTORIES_CLAUDE_MD=1写在.bashrc或者.zshrc中,永久生效
同样的控制是否启动自动记忆也是这样子的
# Disable auto memory for a session
CLAUDE_CODE_DISABLE_AUTO_MEMORY=1 claude

# Force auto memory on explicitly
CLAUDE_CODE_DISABLE_AUTO_MEMORY=0 claude
4.7 实际例子
[1] 个人偏好定位等,写在~/.claude/CLAUDE.md中,可以用来参考:
# My Development Preferences

## About Me
- **Experience Level**: 8 years full-stack development
- **Preferred Languages**: TypeScript, Python
- **Communication Style**: Direct, with examples
- **Learning Style**: Visual diagrams with code

## Code Preferences

### Error Handling
I prefer explicit error handling with try-catch blocks and meaningful error messages.
Avoid generic errors. Always log errors for debugging.

### Comments
Use comments for WHY, not WHAT. Code should be self-documenting.
Comments should explain business logic or non-obvious decisions.

### Testing
I prefer TDD (test-driven development).
Write tests first, then implementation.
Focus on behavior, not implementation details.

### Architecture
I prefer modular, loosely-coupled design.
Use dependency injection for testability.
Separate concerns (Controllers, Services, Repositories).

## Debugging Preferences
- Use console.log with prefix: `[DEBUG]`
- Include context: function name, relevant variables
- Use stack traces when available
- Always include timestamps in logs

## Communication
- Explain complex concepts with diagrams
- Show concrete examples before explaining theory
- Include before/after code snippets
- Summarize key points at the end

## Project Organization
I organize my projects as:

   project/
   ├── src/
   │   ├── api/
   │   ├── services/
   │   ├── models/
   │   └── utils/
   ├── tests/
   ├── docs/
   └── docker/

## Tooling
- **IDE**: VS Code with vim keybindings
- **Terminal**: Zsh with Oh-My-Zsh
- **Format**: Prettier (100 char line length)
- **Linter**: ESLint with airbnb config
- **Test Framework**: Jest with React Testing Library
[2] 个人项目下的./CLAUDE.md文件
# Project Configuration

## Project Overview
- **Name**: E-commerce Platform
- **Tech Stack**: Node.js, PostgreSQL, React 18, Docker
- **Team Size**: 5 developers
- **Deadline**: Q4 2025

## Architecture
@docs/architecture.md
@docs/api-standards.md
@docs/database-schema.md

## Development Standards

### Code Style
- Use Prettier for formatting
- Use ESLint with airbnb config
- Maximum line length: 100 characters
- Use 2-space indentation

### Naming Conventions
- **Files**: kebab-case (user-controller.js)
- **Classes**: PascalCase (UserService)
- **Functions/Variables**: camelCase (getUserById)
- **Constants**: UPPER_SNAKE_CASE (API_BASE_URL)
- **Database Tables**: snake_case (user_accounts)

### Git Workflow
- Branch names: `feature/description` or `fix/description`
- Commit messages: Follow conventional commits
- PR required before merge
- All CI/CD checks must pass
- Minimum 1 approval required

### Testing Requirements
- Minimum 80% code coverage
- All critical paths must have tests
- Use Jest for unit tests
- Use Cypress for E2E tests
- Test filenames: `*.test.ts` or `*.spec.ts`

### API Standards
- RESTful endpoints only
- JSON request/response
- Use HTTP status codes correctly
- Version API endpoints: `/api/v1/`
- Document all endpoints with examples

### Database
- Use migrations for schema changes
- Never hardcode credentials
- Use connection pooling
- Enable query logging in development
- Regular backups required

### Deployment
- Docker-based deployment
- Kubernetes orchestration
- Blue-green deployment strategy
- Automatic rollback on failure
- Database migrations run before deploy

## Common Commands

| Command | Purpose |
|---------|---------|
| `npm run dev` | Start development server |
| `npm test` | Run test suite |
| `npm run lint` | Check code style |
| `npm run build` | Build for production |
| `npm run migrate` | Run database migrations |

## Team Contacts
- Tech Lead: Sarah Chen (@sarah.chen)
- Product Manager: Mike Johnson (@mike.j)
- DevOps: Alex Kim (@alex.k)

## Known Issues & Workarounds
- PostgreSQL connection pooling limited to 20 during peak hours
- Workaround: Implement query queuing
- Safari 14 compatibility issues with async generators
- Workaround: Use Babel transpiler

## Related Projects
- Analytics Dashboard: `/projects/analytics`
- Mobile App: `/projects/mobile`
- Admin Panel: `/projects/admin`
4.8 在会话中更新memory
通过在claude code会话中,通过对话来更新CLAUDE.md文档
User: Remember that I prefer using React hooks instead of class components
     for all new components.

Claude: I'm adding that to your memory. Which memory file should this go in?
        1. Project memory (./CLAUDE.md)
        2. Personal memory (~/.claude/CLAUDE.md)

User: Project memory

Claude: ✅ Memory saved!

Added to ./CLAUDE.md:
5. Agent Skills
Agent 技能是可重用的、基于文件系统的功能,可以扩展 Claude 的功能。他们将特定领域的专业知识、工作流程和最佳实践打包成可发现的组件,Claude 会在相关时自动使用这些组件。
Agent 技能是模块化功能,可以将常规的agent转变为领域专家,与提示词工程(针对一次性任务的对话指令)不同,skills按需加载,无需在多次对话中重复提供相同的指导
- 定制化Claude: 特定任务定制化能力
- 减少重复:自动交叉使用
- 组合能力:结合各种技能构建复杂的工作流程
- 扩展工作流程:在多个项目和团队中重用技能
- 保持质量:将最佳实践直接融入您的工作流程。
Agent skills现在已经成为一个被行业采用的开发标准(Open Standed),是由Anthropic提出并开源的,已经被claude code,cusor,github copilot,opencode共同使用,Claude Code 在标准基础上增加了调用控制、子代理执行和动态上下文注入等功能。
自定义的
slash commands已经被合并到.claude/commands/,commands依然是可以用的,现在推荐使用skills
5.1 Skill工作原理–渐进式揭露
该功能利用渐进式披露架构——Claude 会根据需要分阶段加载信息,而不是预先获取上下文。这既能实现高效的上下文管理,又能保持无限的可扩展性
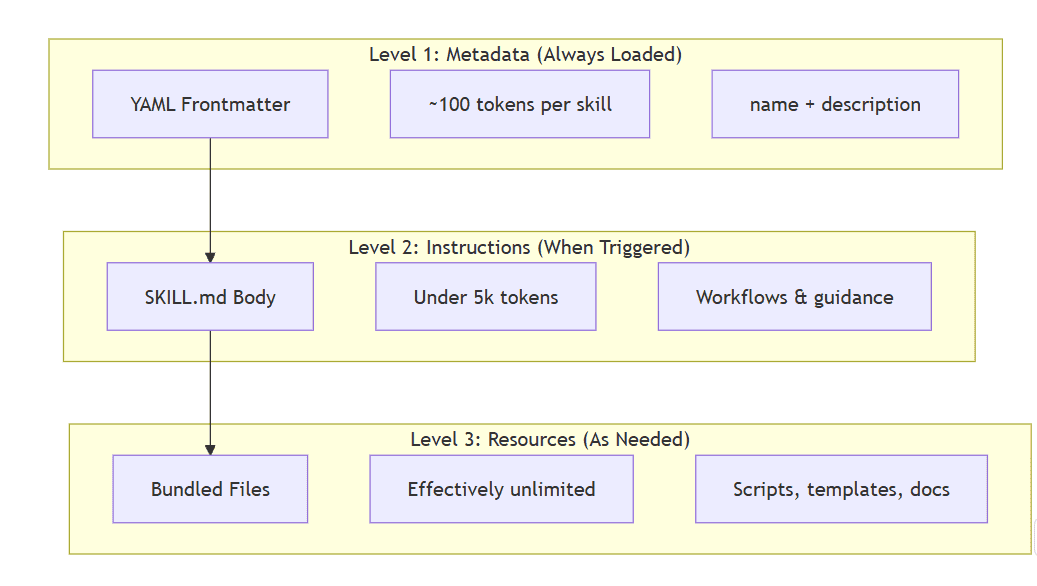
| Level | 加载时机 | Token 开销 | 内容 |
|---|---|---|---|
| Level 1:元数据(Metadata) | 始终加载(启动时) | 每个 Skill 约 100 Tokens | YAML Frontmatter 中的 name 和 description |
| Level 2:指令(Instructions) | Skill 被触发时 | 小于 5k Tokens | SKILL.md 主体内容,包括操作说明和使用指导 |
| Level 3+:资源(Resources) | 按需加载 | 理论上无限制 | Skill 附带的资源文件,通过 Bash 直接执行,无需将文件内容加载到上下文中 |
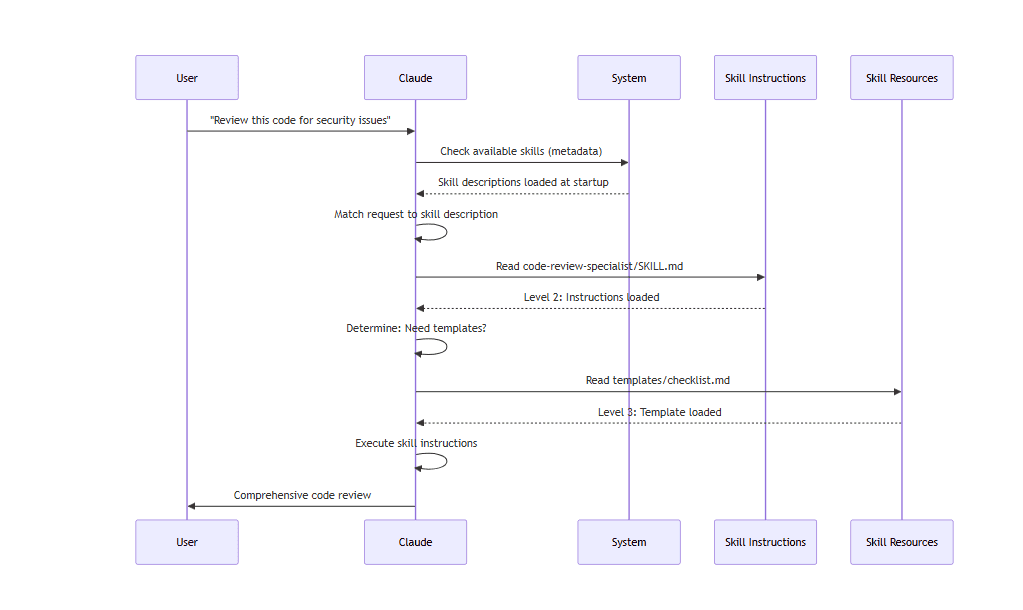
Skill Type & Location
| 类型(Type) | 位置(Location) | 作用范围(Scope) | 是否共享(Shared) | 最适用场景(Best For) |
|---|---|---|---|---|
| Enterprise(企业级) | Managed settings(集中管理设置) | 所有组织用户 | 是 | 组织级标准与规范 |
| Personal(个人级) | ~/.claude/skills/<skill-name>/SKILL.md |
个人用户 | 否 | 个人工作流 |
| Project(项目级) | .claude/skills/<skill-name>/SKILL.md |
项目团队 | 是(通过 Git 共享) | 团队标准与规范 |
| Plugin(插件级) | <plugin>/skills/<skill-name>/SKILL.md |
插件启用范围内 | 取决于插件 | 随插件打包分发的技能 |
当skill名称相同时,会有不同的层级触发,enterprise > personal > project.插件的skill比较特殊,是使用
plugin-name:skill-name,所以不会冲突
5.2 Skills自动发现机制
嵌套目录: 当您处理子目录中的文件时,Claude Code 会自动从嵌套的 .claude/skills/ 目录中发现技能.例如你在一个项目里project/A,claude code将在project/A/.claude/skills寻找.
从 v2.1.178 版本开始,当嵌套的
.claude/skills/目录中出现技能名称冲突时,将以距离当前工作目录最近的目录命名——包级技能会覆盖仓库根目录下同名技能。
--add-dir目录: 当你使用--add-dir参数时,Claude Code 会从指定的目录中发现技能。例如,--add-dir /path/to/dir 将从 /path/to/dir/.claude/skills/ 中发现技能。会立即生效,而不用重新启动claude code
Reloading skills:/reload-skills命令(在版本2.1.152)之后提供了,能够不退出claude code直接扫描当前所有技能目录. 在Hook中使用SessionStart 钩子可以通过返回 reloadSkills: true 来触发相同的重新扫描
预算说明: 技能描述(1 级元数据)限制为上下文窗口的 1%(备用:8,000 个字符),如果安装了多个技能,技能描述可能会被缩短。所有技能名称都会保留,但描述会根据文本长度进行精简.在终端使用SLASH_COMMAND_TOOL_CHAR_BUDGET更改预算
5.3 自定义Skills
- 基础文件结构
my-skill/
├── SKILL.md           # Main instructions (required)
├── template.md        # Template for Claude to fill in
├── examples/
│   └── sample.md      # Example output showing expected format
└── scripts/
└── validate.sh # Script Claude can execute- SKILL.md格式
---
name: your-skill-name
description: Brief description of what this Skill does and when to use it
---

# Your Skill Name

## Instructions
Provide clear, step-by-step guidance for Claude.

## Examples
Show concrete examples of using this Skill.name和description是必须的元数据字段,它们会显示在技能列表中。name:仅限小写字母,数字和连字符(最大64字符),不能包含“anthropic”或“claude”description:描述技能的作用和适用场景(最大1024字符),主要是为了让claude能知道怎么激活skill
64 个字符(64 characters) 指的是总共 64 个字符,不是 64 个单词
| 内容类型 | 64字符大约能写多少 |
|---|---|
| 英文单词 | 10~15 个单词 |
| 中文 | 64 个汉字 |
| 中英混合 | 视具体情况而定 |
| 代码 | 1~3 行短代码 |
- Skills可选的YAML字段
---
name: my-skill
description: What this skill does and when to use it
argument-hint: "[filename] [format]"        # Hint for autocomplete
disable-model-invocation: true              # Only user can invoke
user-invocable: false                       # Hide from slash menu
allowed-tools: Read, Grep, Glob             # Restrict tool access
disallowed-tools: Write, Edit               # Remove specific tools while active (v2.1.152)
model: opus                                 # Specific model to use
effort: high                                # Effort level override (low, medium, high, xhigh, max)
context: fork                               # Run in isolated subagent
agent: Explore                              # Which agent type (with context: fork)
background: false                           # Fork skills run in background (default true); false = foreground
shell: bash                                 # Shell for commands: bash (default) or powershell
hooks:                                      # Skill-scoped hooks
  PreToolUse:
    - matcher: "Bash"
      hooks:
        - type: command
          command: "./scripts/validate.sh"
paths: "src/api/**/*.ts"               # Glob patterns limiting when skill activates
---| 字段 | 中文说明 |
|---|---|
name |
名称:只能使用小写字母、数字和连字符 -,最多 64 个字符。不能包含 "anthropic" 或 "claude"。 |
description |
描述:说明这个 Skill 做什么,以及什么时候使用。会与 when_to_use 合并,并在 Skill 列表中最多显示 1,536 个字符(可通过 skillListingMaxDescChars 配置)。 |
when_to_use |
使用时机:进一步说明 Claude 在什么情况下应该调用这个 Skill。会追加到 description 后面,并共同计算 1,536 字符的限制。 |
argument-hint |
参数提示:显示在 / 自动补全菜单中的参数提示,例如 "[filename] [format]"。 |
disable-model-invocation |
禁止模型自动调用:设置为 true 后,只能由用户通过 /name 手动调用,Claude 不会自动调用。 |
user-invocable |
是否允许用户调用:设置为 false 后,该 Skill 不会显示在 / 菜单中,只能由 Claude 自动调用。 |
allowed-tools |
允许使用的工具:用逗号分隔,指定 Skill 激活期间可以直接使用、无需额外权限确认的工具。 |
disallowed-tools |
禁止使用的工具:指定 Skill 激活期间不能使用的工具,与 allowed-tools 配合使用。v2.1.152 新增。 |
model |
模型:指定 Skill 激活期间使用的模型,例如 opus、sonnet。 |
effort |
推理强度:指定模型的工作强度,可选 low、medium、high、xhigh、max。支持 Opus 5、Sonnet 5、Opus 4.8 和 Opus 4.7。 |
context |
上下文模式:设置为 fork 时,在独立的子 Agent 上下文中运行 Skill,拥有独立的上下文窗口。 |
agent |
子 Agent 类型:当 context: fork 时指定使用哪一种 Agent,例如 Explore、Plan、general-purpose。 |
background |
后台运行:仅在 context: fork 时有效。默认为 true,表示后台运行;设置为 false 则前台运行。v2.1.218 新增。 |
shell |
Shell 类型:用于 ! 命令替换和脚本执行。默认是 bash,也可以使用 powershell。 |
hooks |
钩子:定义只作用于该 Skill 生命周期的 Hooks,格式与全局 Hooks 相同。 |
paths |
路径限制:使用 Glob 模式限制 Skill 在哪些文件路径下自动激活,可以写成逗号分隔的字符串或 YAML 列表。 |
arguments |
参数定义:声明 Skill 接受哪些参数,用于 / 自动补全以及参数替换。 |
metadata |
元数据:用于自定义记录,例如版本号、作者等。Claude Code 会将其传递给 Skill。 |
license |
许可证:指定 Skill 使用的许可证,例如 MIT。 |
compatibility |
兼容性说明:最多 500 个字符的自由文本,用于描述兼容环境。Claude Code 会接受该字段,但不会根据它执行特殊操作。 |
例子: argument-hint: “[filename] [format]” # Hint for autocomplete
paths: “src/api/**/*.ts”: 用来指定哪些文件路径与这个skill有关
- Skill内容类型
| 类型 | 作用 | 类比 |
|---|---|---|
| Reference Content | 提供知识、规范、约定 | 像一本参考手册 |
| Task Content | 提供操作步骤、执行流程 | 像一份SOP(标准操作流程) |
- Reference Content:参考内容,用于提供知识、规范、约定。这些内容通常不会频繁变动,且在 Skill 的生命周期内保持不变。例如,API 文档、代码规范、项目文档等。
- Task Content:任务内容,用于提供操作步骤、执行流程。这些内容可能需要根据上下文或用户输入进行调整,且在 Skill 的生命周期内可能会发生变化。例如,代码生成、文档编写、数据提取等。
[1] Reference Content
添加claude用于当前工作的知识——惯例、模式、风格指南、领域知识。
---
name: api-conventions
description: API design patterns for this codebase
---

When writing API endpoints:
- Use RESTful naming conventions
- Return consistent error formats
- Include request validation
[2] 任务内容
针对特定操作的分步说明。通常直接使用 /skill-name 命令调用
---
name: deploy
description: Deploy the application to production
context: fork
disable-model-invocation: true
---

Deploy the application:
1. Run the test suite
2. Build the application
3. Push to the deployment target- 控制skill调用
默认情况下,用户和claude都可以使用任何技能。两个前置元数据字段控制着三种技能使用模式:
| Frontmatter 配置 | 用户可调用(You can invoke) | Claude 可自动调用(Claude can invoke) |
|---|---|---|
| (默认) | ✅ 是 | ✅ 是 |
disable-model-invocation: true |
✅ 是 | ❌ 否 |
user-invocable: false |
❌ 否 | ✅ 是 |
对于无法作为命令执行的背景知识,请使用
user-invocable: false。例如,遗留系统上下文技能可以解释旧系统的工作原理——这对 Claude 很有用,但对用户来说没有实际意义
- 字符串替换
Skill 支持动态变量(Dynamic Values),这些变量会在 Skill 内容发送给 Claude 之前先被解析(替换成实际值)
SKILL.md 原始内容
      ↓
变量解析(Resolve)
      ↓
生成最终内容
      ↓
发送给 Claude| 变量 / 语法 | 中文说明 | 示例 |
|---|---|---|
$ARGUMENTS |
获取调用 Skill 时传入的全部参数(原样拼接)。 | /report sales.xlsx pdf → $ARGUMENTS = sales.xlsx pdf |
$ARGUMENTS[N] |
获取指定位置的参数(从 0 开始计数)。 | $ARGUMENTS[0] = sales.xlsx$ARGUMENTS[1] = pdf |
$N |
$ARGUMENTS[N] 的简写形式。 |
$0 = sales.xlsx$1 = pdf |
${CLAUDE_SESSION_ID} |
当前 Claude 会话(Session)的唯一 ID。可用于日志记录、缓存目录、临时文件命名等。 | session_abc123... |
${CLAUDE_SKILL_DIR} |
当前 Skill 所在目录(包含 SKILL.md 的目录)。便于引用同目录下的脚本、模板和资源文件。 |
/project/.claude/skills/api-review |
${CLAUDE_EFFORT} |
当前 Skill 运行时的推理强度(Effort Level)。可用于根据推理等级动态调整行为。支持:low、medium、high、xhigh、max。新增于 v2.1.120+。 |
high 或 max |
!`command` |
动态上下文注入(Dynamic Context Injection)。执行 Shell 命令,并将命令输出直接插入到 Skill 内容中。 | !`git branch --show-current` → main |
举个例子
用户执行/analyze data.csv pdf summary,
| 变量 | 值 |
|---|---|
$ARGUMENTS |
data.csv pdf summary |
$0 |
data.csv |
$1 |
pdf |
$2 |
summary |
${CLAUDE_SKILL_DIR} 示例:
.claude/
└── skills/
    └── api-review/
        ├── SKILL.md
        ├── standards.md
└── review.sh在skill中写Read:${CLAUDE_SKILL_DIR}/standards.md,会解析出来绝对路径
实际的例子:
---
name: fix-issue
description: Fix a GitHub issue
---

Fix GitHub issue $ARGUMENTS following our coding standards.
1. Read the issue description
2. Implement the fix
3. Write tests
4. Create a commit
当运行
/fix-issue 123,参数就会$ARGUMENTS替换成123
堆叠skills
更新的claude code能够多重使用skills,比如/code-review /fix-issue 123,之前只加载第一个技能。如果同一个技能被多次调用,则重复加载相同的内容
5.4 在subagents中运行skills
添加context: fork以在隔离的子代理上下文中运行技能。技能内容由一个具有独立上下文窗口的专用子代理负责处理,从而保持主要对话的简洁性
当 Skill 使用 context: fork 创建 Subagent 时,可以选择什么类型的 Agent 来执行任务。
context: fork
agent: Explore

不要在 Main Agent 中执行
而是创建一个 Explore 类型的 Subagent 来执行| Agent Type | 中文含义 | 最适合的场景 |
|---|---|---|
Explore |
探索型 Agent | 只读研究、代码库分析、信息收集 |
Plan |
规划型 Agent | 制定实施方案、设计路线图 |
general-purpose |
通用型 Agent | 需要多种工具和综合能力的任务 |
Custom agents |
自定义 Agent | 用户或团队配置的专用 Agent |
如果你要使用真正的 Custom Agent,通常需要先定义 Agent 文件
如果你要在skill中使用自定义的agent,就需要自己定义好agent
常规的Skills文档可以包含下面的部分,包括templates, examples, scripts, reference documents
my-skill/
├── SKILL.md              # Main instructions (required, keep under 500 lines)
├── templates/            # Templates for Claude to fill in
│   └── output-format.md
├── examples/             # Example outputs showing expected format
│   └── sample-output.md
├── references/           # Domain knowledge and specifications
│   └── api-spec.md
└── scripts/              # Scripts Claude can execute
└── validate.sh- 保证
SKILL.md低于500行 -使用相对路径从 SKILL.md 引用其他文件(例如,[API 参考](references/api-spec.md)
5.5 Claude code内置Skills
每次claude code更新都可能变动和内置skills,这里先介绍当前版本内置的skills
Claude Code 内置 Skills / Commands(中文说明)
| Skill / Command | 中文说明 | 用途 |
|---|---|---|
/batch <instruction> |
批量并行代码修改工具 | 使用 git worktree 在整个代码库中并行执行大规模修改(适合重构、迁移、批量修复) |
/claude-api |
Claude API/SDK 文档加载器 | 加载 Anthropic API / SDK 参考文档;当检测到 anthropic 或 @anthropic-ai/sdk 时会自动触发 |
/debug [description] |
调试当前会话 | 读取调试日志,帮助定位当前会话中的问题或异常行为 |
/fewer-permission-prompts |
权限优化建议工具 | 分析历史操作记录,生成一个更少权限弹窗的 allowlist(偏只读工具优先) |
/loop [interval] <prompt> |
循环执行任务 | 按时间间隔重复执行某个 prompt,例如每 5 分钟检查一次部署状态 |
/run (v2.1.145+) |
运行项目应用 | 启动当前项目并观察运行效果;会优先使用 project skill,否则使用内置项目识别规则 |
/run-skill-generator (v2.1.145+) |
生成项目运行 Skill | 自动学习当前项目结构,生成用于 /run 和 /verify 的项目专用 Skill |
/code-review [effort] |
代码审查工具 | 对当前 diff 做系统性代码审查,可指定审查强度(low/medium/high 等),支持 --comment 直接在 PR 中写评论 |
/verify (v2.1.145+) |
运行验证工具 | 构建 + 运行 + 实际观察应用行为,用于验证修复是否真正生效(比单元测试更完整) |
后续增加了
/deep-research <topic>,/dataviz命令
5.6 其他细节
- Controlling Skill Override Behavior (skillOverrides)
当项目技能和用户技能名称相同时,默认情况下项目技能优先。skillOverrides 设置(v2.1.129+)允许您调整此设置。将其添加到 ~/.claude/settings.json 或项目 .claude/settings.json 中:
{
  "skillOverrides": "name-only"
}| ValueBehavior | |
|---|---|
"on" (default) |
A repo skill can override a user skill of the same name. |
"off" |
Disable overriding entirely — user skills always win. |
"name-only" |
Match overrides only on skill name (ignore description / source). |
"user-invocable-only" |
Only user-invocable skills can be overridden — model-invoked skills always come from their original location. 做成中文表格 |
6. Subagents
Subagents主要用来在claude code中被委托处理任务
- 创建具有独立上下文窗口的隔离式 AI 助手
- 为专业知识提供定制化系统提示
- 强制执行工具访问控制以限制其功能
- 防止复杂任务中上下文的污染
- 支持并行执行多个专门任务
每个子agent都独立运行,从零开始,只接收完成任务所需的特定上下文,然后将结果返回给主代理进行综合
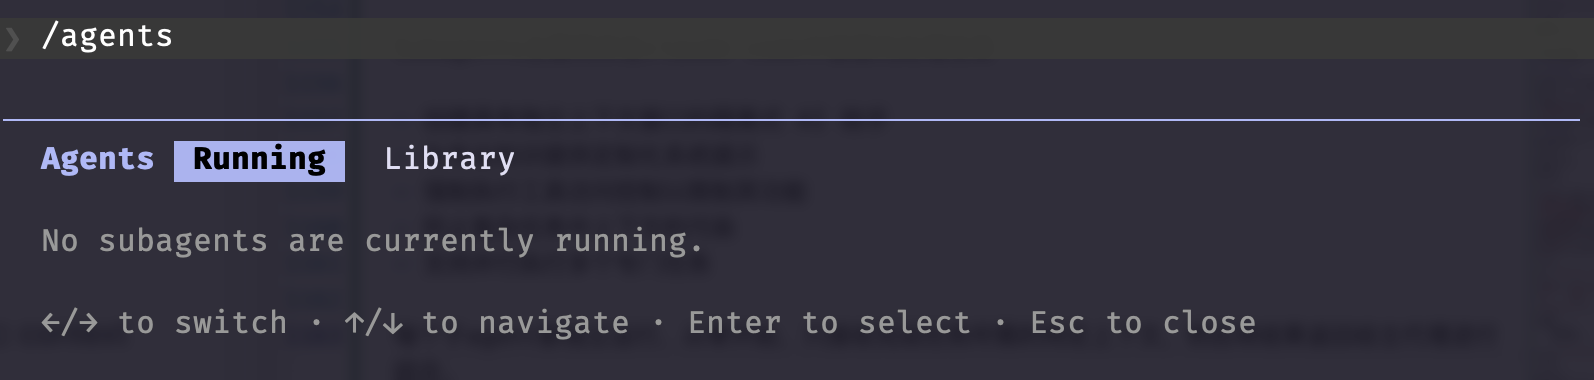
使用
/agents命令能够创建,查看,编辑和管理子agent
6.1 Agent文件位置
Claude 在加载同名 Subagent 时,会按照以下优先级顺序查找和覆盖,数字越小优先级越高:
| 优先级 | 类型 (Type) | 位置 (Location) | 作用范围 (Scope) | 说明 |
|---|---|---|---|---|
| 1(最高) | CLI-defined | 通过 --agents 参数传入的 JSON |
当前会话(Session Only) | 仅对本次 Claude 运行有效,会覆盖所有其他来源的同名 Agent。适合临时测试或动态生成 Agent。 |
| 2 | Project Subagents | .claude/agents/ |
当前项目(Current Project) | 项目专属 Agent,仅在当前仓库或项目中生效。通常提交到 Git,与团队共享。 |
| 3 | User Subagents | ~/.claude/agents/ |
所有项目(All Projects) | 用户级 Agent,对该用户的所有 Claude 项目生效。适合个人常用助手。 |
| 4(最低) | Plugin Agents | 插件提供的 agents/ 目录 |
通过插件加载 | 来自 Claude 插件(Plugin)的 Agent。如果其他位置存在同名 Agent,会被更高优先级覆盖。 |
同样的如果名字重复,高优先级的处于优先地位;如果同一位置的agent重复,越早定义的处于优先地位
启动 Claude Code 时,通过 CLI 临时指定一组 Agent 配置”,但不完全等于“启动一个 Agent. CLI-defined(命令行定义) 是指:你在启动命令中直接传入 Agent 的配置,优先级最高
6.2 设置
- 文件格式
子agent在 YAML 前置元数据中定义,后面跟着 Markdown 格式的系统提示
---
name: your-sub-agent-name
description: Description of when this subagent should be invoked
tools: tool1, tool2, tool3  # Optional - inherits all tools if omitted
disallowedTools: tool4  # Optional - explicitly disallowed tools
model: sonnet  # Optional - sonnet, opus, haiku, or inherit
permissionMode: default  # Optional - permission mode
maxTurns: 20  # Optional - limit agentic turns
skills: skill1, skill2  # Optional - skills to preload into context
mcpServers: server1  # Optional - MCP servers to make available
memory: user  # Optional - persistent memory scope (user, project, local)
background: false  # Optional - run as background task
effort: high  # Optional - reasoning effort (low, medium, high, max)
isolation: worktree  # Optional - git worktree isolation
initialPrompt: "Start by analyzing the codebase"  # Optional - auto-submitted first turn
experimental:  # Optional - experimental settings block
  cacheTtl: "1h"  # Cache TTL for this subagent: "5m" or "1h" (v2.1.248+)
hooks:  # Optional - component-scoped hooks
  PreToolUse:
    - matcher: "Bash"
      hooks:
        - type: command
          command: "./scripts/security-check.sh"
---

Your subagent's system prompt goes here. This can be multiple paragraphs
and should clearly define the subagent's role, capabilities, and approach
to solving problems.| 字段 (Field) | 必需 | 说明 | 示例 |
|---|---|---|---|
name |
✅ 是 | Agent 唯一标识符,只能使用小写字母和连字符(-)。 |
python-expert |
description |
✅ 是 | Agent 功能描述。建议包含 “use PROACTIVELY”,让 Claude 更倾向于自动调用该 Agent。 | Python code expert. Use PROACTIVELY for code review. |
tools |
❌ 否 | 限制 Agent 可使用的工具。省略时继承主会话所有工具。支持 Agent(agent_name) 语法限制可调用的子 Agent。 |
Read,Edit,Bash |
disallowedTools |
❌ 否 | 明确禁止使用的工具,即使主会话拥有这些工具。 | Bash |
model |
❌ 否 | 指定 Agent 使用的模型。可选 haiku、sonnet、opus、完整模型 ID 或 inherit。默认继承配置。 |
sonnet |
permissionMode |
❌ 否 | Agent 的权限模式。控制是否自动接受修改、跳过权限确认等。 | dontAsk |
maxTurns |
❌ 否 | Agent 最多允许进行的自主推理轮数(Agentic Turns)。达到后自动停止。 | 10 |
skills |
❌ 否 | 启动时预加载的 Skills。会把 Skill 内容直接注入 Agent 上下文。 | python,testing |
mcpServers |
❌ 否 | 指定 Agent 可访问的 MCP(Model Context Protocol)服务器。 | filesystem,github |
hooks |
❌ 否 | 为该 Agent 配置专属 Hook。可在工具调用前后或结束时执行逻辑。 | PreToolUse,PostToolUse |
memory |
❌ 否 | 指定 Agent 使用的记忆范围。 | project |
background |
❌ 否 | 设置为 true 时,该 Agent 默认作为后台任务运行。 |
true |
effort |
❌ 否 | 推理深度等级。可选:low、medium、high、max。 |
high |
isolation |
❌ 否 | 设置为 worktree 时,为 Agent 创建独立 Git Worktree,避免影响主工作区。 |
worktree |
initialPrompt |
❌ 否 | 当该 Agent 作为主 Agent 运行时,自动提交的第一条提示词。 | "Analyze the repository structure" |
你可以通过环境变量统一指定 Subagent 使用哪个模型,但从 v2.1.251 开始,Agent 自己的 model: 配置优先;如果想强制统一模型,需要额外开启 FORCE
cacheTtl: TTL = Time To Live(生存时间), 这个 subagent 的缓存可以保留多久
| 情况 | 最终使用哪个模型? |
|---|---|
没有环境变量,Agent 写 model: opus |
Opus |
环境变量 sonnet,Agent 写 model: opus,v2.1.251+ |
Opus |
环境变量 sonnet,Agent 写 model: inherit,v2.1.251+ |
继承主 Agent 的模型 |
环境变量 sonnet + FORCE=1,Agent 写 model: opus |
Sonnet |
环境变量 sonnet + FORCE=1,Agent 写 model: inherit |
Sonnet |
Claude Code 启动后,就已经有一个负责整个会话的 Main Agent。你不需要自己创建它,
启动 claude
    ↓
创建 / 初始化当前会话的 Main Agent
    ↓
Main Agent 开始接收你的指令
    ↓
需要时再调用 Subagent| 启动方式 | 是否有 Main Agent | 谁担任 Main Agent |
|---|---|---|
claude |
✅ 有 | 默认 Main Agent |
claude --agent researcher |
✅ 有 | researcher |
Main Agent 调用 researcher |
✅ 有 | researcher 是 Subagent |
而每个subagent都能够有自己的MCP,tools等
| 字段 | 版本 | 中文说明 |
|---|---|---|
mcpServers |
v2.1.117+ | MCP 服务器配置。当 Agent 通过 claude --agent <name> 作为主 Agent 启动时,会加载这些 MCP 服务器。 |
permissionMode |
v2.1.119+ | 权限模式。当通过 --agent <name> 使用内置 Agent 时,会遵守该字段的权限设置。 |
tools / disallowedTools |
v2.1.119+ | 允许 / 禁止使用的工具。在 --print 模式(非交互式 / 脚本化运行)下会生效。 |
例子
---
name: secure-researcher
description: Research agent with scoped MCP access and restricted permissions
permissionMode: acceptEdits
mcpServers:
  notion:
    type: http
    url: https://mcp.notion.com/mcp
  github:
    type: http
    url: https://api.github.com/mcp
tools: Read, Grep, Glob
---

You are a research agent. You may query Notion and GitHub through the
configured MCP servers, and read local files, but you cannot write or
execute commands outside of accepted edits.| 配置 | 含义 |
|---|---|
Read |
允许 Agent 读取文件 |
Bash(npm:*) |
允许 Agent 执行 以 npm 开头的 Bash 命令 |
Bash(test:*) |
允许 Agent 执行 以 test 开头的 Bash 命令 |
- CLI-based 设置
自定义单会话的子代理,通过 --agents 参数传入 JSON 格式定义,常见的格式有
claude --agents '{
  "code-reviewer": {
    "description": "Expert code reviewer. Use proactively after code changes.",
    "prompt": "You are a senior code reviewer. Focus on code quality, security, and best practices.",
    "tools": ["Read", "Grep", "Glob", "Bash"],
    "model": "sonnet"
  }
}'然后使用claude --agents xxx.json
6.3 内置的subagents
新版本的Claude code包含了一些内置的subagent
| Agent | Model | Purpose |
|---|---|---|
| general-purpose | Inherits | 复杂、多步骤任务处理(规划 + 执行 + 综合分析) |
| Plan | Inherits | Plan mode 专用,用于研究、拆解任务并生成执行计划 |
| Explore | Haiku | 代码库探索(只读),支持快速 / 中等 / 深度三种探索模式 |
| statusline-setup | Sonnet | 配置 Claude Code 的 status line(状态栏) |
| Claude Code Guide | Haiku | 解答 Claude Code 功能、用法相关问题 |
| Bash | Inherits | 单独的上下文中的终端命令 |
Inherits 指默认继承主会话配置的模型,不同的subagent有不同的Tools调用,为了完成不同的目的
现在添加了Claude Subagent 用于处理不适合更专业代理的任务的通用代理
6.4 文件直接管理agents
1 .创建agents
比如在当前项目的中创建agents,直接创建md文档即可
# Create a project subagent
mkdir -p .claude/agents
cat > .claude/agents/test-runner.md << 'EOF'
---
name: test-runner
description: Use proactively to run tests and fix failures
---

You are a test automation expert. When you see code changes, proactively
run the appropriate tests. If tests fail, analyze the failures and fix
them while preserving the original test intent.
EOF

# Create a user subagent (available in all projects)
mkdir -p ~/.claude/agents- 使用Subagents
自动委托
- 在请求中描述的任务
- 子代理配置中的描述字段
- 当前情况和可用工具
为了鼓励积极使用,请在description里面使用use PROACTIVELY或者必须使用
---
name: code-reviewer
description: Expert code review specialist. Use PROACTIVELY after writing or modifying code.
---- 显式调用
可以明确指定某个子代理
> Use the test-runner subagent to fix failing tests
> Have the code-reviewer subagent look at my recent changes
> Ask the debugger subagent to investigate this error
Claude 现在找 agent 的时候“更聪明了”,不会因为大小写或分隔符不同而找错 agent
- @-Mention调用
使用@前缀去准确调用subagent,从而绕过系统的“自动选择 agent 的规则”
> @"code-reviewer (agent)" review the auth module- 会话范围代理Agent
使用特定代理作为主代理运行整个会话,相当于使用某个agent启动claude
# Via CLI flag
claude --agent code-reviewer

# Via settings.json
{
  "agent": "code-reviewer"
}
这里的
code-reviewer是ecc项目中的subagent,它默认调用了,不用太纠结后续介绍
- 交互式Agents界面
新版本中使用claude agents会进行交互界面,而不是单纯的列出来agents,显示的是旧的agents的会话,用来切换某个agents进行的任务
# Initial invocation
> Use the code-analyzer agent to start reviewing the authentication module
# Returns agentId: "abc123"

# Resume the agent later
> Resume agent abc123 and now analyze the authorization logic as well- 跨多个会期的长期研究
- 在不丢失上下文的情况下进行迭代改进
- 多步骤工作流程,保持上下文
- 多个subagent切换
可以同一句话中分配不同的agents
> First use the code-analyzer subagent to find performance issues,
  then use the optimizer subagent to fix them
6.5 Subagents 细节设定
- Memory文件
每个 Agent 可以有自己独立的一套长期记忆(Agent Memory),通常会在你不停使用agent过程中不断积累你的习惯组成memory
~/.claude/agent-memory/
├── researcher/
│   └── MEMORY.md
│
└── code-reviewer/
    └── MEMORY.md
记忆字段为子代理提供了一个跨对话持久存在的目录。这使得子代理能够随着时间的推移积累知识,存储笔记、发现和上下文信息,这些信息在会话之间得以保留。
memory字段为subagents提供了一个跨对话持久存在的目录。这使得subagents能够随着时间的推移积累知识,存储笔记、发现和上下文信息,这些信息在会话之间得以保留
| Scope | Directory | Use Case |
|---|---|---|
user |
~/.claude/agent-memory/<name>/ |
Personal notes and preferences across all projects |
project |
.claude/agent-memory/<name>/ |
Project-specific knowledge shared with the team |
local |
.claude/agent-memory-local/<name>/ |
Local project knowledge not committed to version control |
- 内存目录中的
MEMORY.md文件的前 200 行会自动加载到子代理的系统提示符中 subagent会自动启用读取、写入和编辑工具,以便管理其内存文件- 子代理可以根据需要在其内存目录中创建其他文件。
---
name: researcher
memory: user
---

You are a research assistant. Use your memory directory to store findings,
track progress across sessions, and build up knowledge over time.

Check your MEMORY.md file at the start of each session to recall previous context.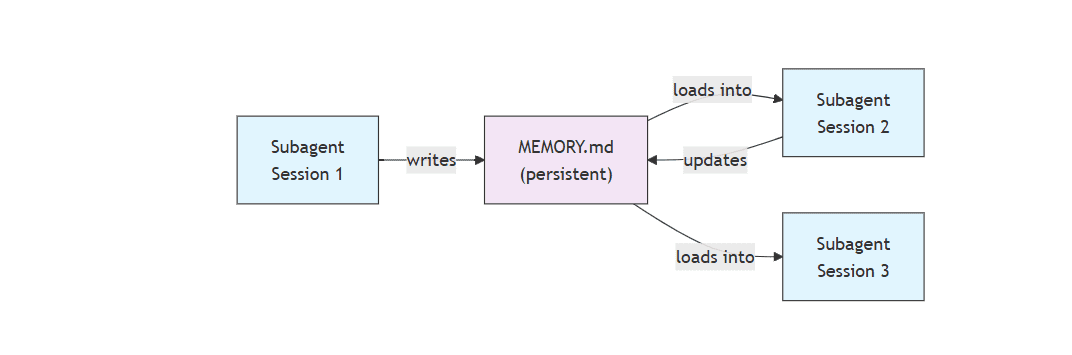
- Background Subagents
subagent 可以在后台运行,让主对话可以用于其他任务。
---
name: long-runner
background: true
description: Performs long-running analysis tasks in the background
---Ctrl+B:背后运行当前正在运行的子代理任务Ctrl+F:消灭所有后台代理(按两次确认)
设置环境变量以完全禁用后台任务支持,同样也是在bash中运行export CLAUDE_CODE_DISABLE_BACKGROUND_TASKS=1
- worktree isolation
为不同任务、Agent 或功能分支创建独立的 Git Worktree,使它们拥有各自隔离的文件系统工作目录,避免互相影响
---
name: feature-builder
isolation: worktree
description: Implements features in an isolated git worktree
tools: Read, Write, Edit, Bash, Grep, Glob
---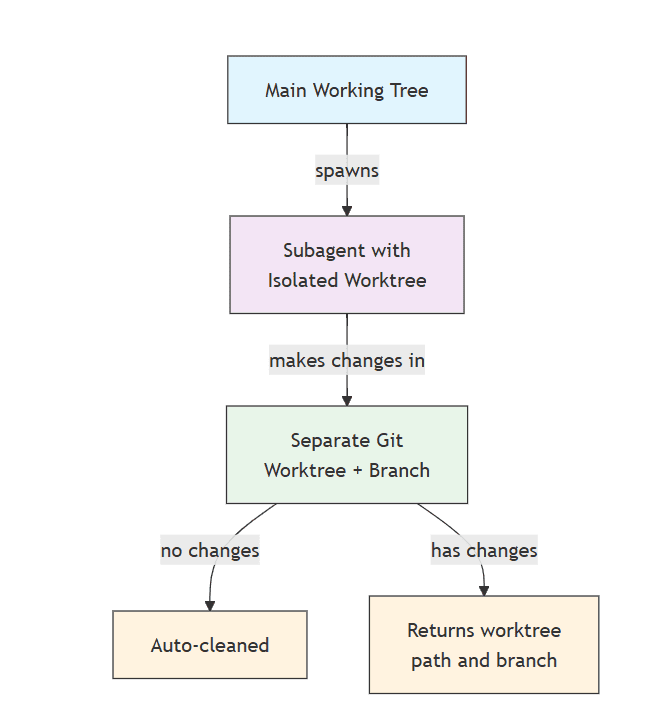
- 子代理在其独立的 Git 工作树中运行,位于单独的分支上
- 如果子代理不做任何更改,工作树将自动清理
- Forked Subagents
分叉的subagents(context: fork)在分叉的一刻继承父代理的完整对话上下文,而不是干净的状态.这种方式是为了不丢失当前的会话
设置
CLAUDE_CODE_FORK_SUBAGENT=1能够确保forking
---
name: alternative-explorer
description: Explore an alternative implementation path while preserving parent context
context: fork
tools: Read, Edit, Bash, Grep, Glob
---

You are a forked subagent. You inherit the parent's full conversation and
may explore an alternative approach. Return your findings and the parent
will decide whether to adopt them.- Restrict Spawnable Subagents
你可以在 tools 字段中使用 Agent(agent_type) 语法,来控制某个子代理允许创建(spawn)哪些其他子代理。这相当于为代理委派(delegation)建立一个白名单(allowlist)机制。
---
name: coordinator
description: Coordinates work between specialized agents
tools: Agent(worker, researcher), Read, Bash
---

You are a coordinator agent. You can delegate work to the "worker" and
"researcher" subagents only. Use Read and Bash for your own exploration.
在这个例子中,
coordinatorsubagent仅仅能够生成worker和researcher两个子代理,它无法生成任何其他子代理,即使这些子代理在其他地方已定义
6.6 Agent Teams
Agent Teams团队协调多个 Claude Code 实例共同完成复杂任务。不像subagents,team各自独立工作,并有自己单独的上下文窗口,能够通过mailbox系统分享信息
传统的Claude Code Agent大多数情况是
   Main
  /  |  \
 A   B   C
而mailbox system是相互沟通的
A ←→ B ↑ ↓ C ←→ D
| 方面(Aspect) | Subagents(子代理) | Agent Teams(代理团队) |
|---|---|---|
| 委派模型(Delegation Model) | 父 Agent 将子任务委派给 Subagent,并等待结果返回 | Team Lead(团队负责人)协调工作,队友 Agent 独立执行任务 |
| 上下文(Context) | 每个子任务获得全新的上下文,完成后将结果提炼并返回给父 Agent | 每个队友 Agent 维护自己的持久上下文窗口(Persistent Context Window) |
| 协调方式(Coordination) | 由父 Agent 管理,可串行或并行执行 | 共享任务列表(Shared Task List),自动管理任务依赖关系 |
| 通信方式(Communication) | 结果只能返回给父 Agent,不支持 Agent 间直接通信 | 队友 Agent 可通过共享邮箱(Mailbox)直接互相发送消息 |
| 会话恢复(Session Resumption) | 支持恢复会话 | 不支持恢复使用进程内队友(In-Process Teammates)的会话 |
| 适用场景(Best For) | 聚焦、边界明确的独立子任务 | 需要 Agent 间协作沟通和大规模并行执行的复杂工作 |
- 设置Agent Teams
临时或者永久的修改环境变量来启动Agent Teams
export CLAUDE_CODE_EXPERIMENTAL_AGENT_TEAMS=1或者在settings.json中
{
  "env": {
    "CLAUDE_CODE_EXPERIMENTAL_AGENT_TEAMS": "1"
  }
}- 开启team
在claude code中输入
User: Build the authentication module. Use a team — one teammate for the API endpoints,
      one for the database schema, and one for the test suite.
Claude 会自动创建团队、分配任务并协调工作。
输入上述命令之后,claude code会根据任务 分配不同的agents 来进行写作
⏺ 环境就绪。现在并行派出三个 teammate —— schema、api、tests —— 各自只负责 SPEC.md
  里指定的文件,互不冲突:

⏺ 3 background agents launched (↓ to manage)
   ├ @schema (implementation-agent)
   ├ @api (implementation-agent)
   + @tests (test-engineer)

  Thought for 5s (ctrl+o to expand)

⏺ 三个 teammate 已并行开工:

  ┌----------┬----------┬-------------------------------------------------------------------┐
  | Teammate |   任务   |                             产出文件                              |
  ├----------┼----------┼-------------------------------------------------------------------┤
  | schema   | 数据库层 | app/database.py, app/models.py                                    |
  ├----------┼----------┼-------------------------------------------------------------------┤
  | api      | 认证接口 | app/schemas.py, app/security.py, app/routers/auth.py, app/main.py |
  ├----------┼----------┼-------------------------------------------------------------------┤
  | tests    | 测试套件 | tests/conftest.py, tests/test_auth.py                             |
  +----------┴----------┴-------------------------------------------------------------------+

  分工设计说明:

- 共享契约先行:我先写好 SPEC.md(模型字段、路由、状态码、token 轮换语义全部固定),三个 agent- 显示模式
控制团队活动的显示模式
| 模式 | 参数 | 说明 |
|---|---|---|
| Auto(自动) | --teammate-mode auto |
根据当前终端环境自动选择最合适的显示模式 |
| In-process(默认) | --teammate-mode in-process |
在当前终端内联显示 Teammate 的输出 |
| Split-panes(分屏) | --teammate-mode tmux |
为每个 Teammate 打开独立的 tmux 或 iTerm2 窗格 |
claude --teammate-mode tmux
同样的也可以在setting.json中进行设置,team的设置在~/.claude/teams/{team-name}/config.json
{
  "teammateMode": "tmux"
}
注意:分屏模式需要 tmux 或 iTerm2。VS Code 终端、Windows Terminal 或 Ghostty 不支持此功能
- 架构
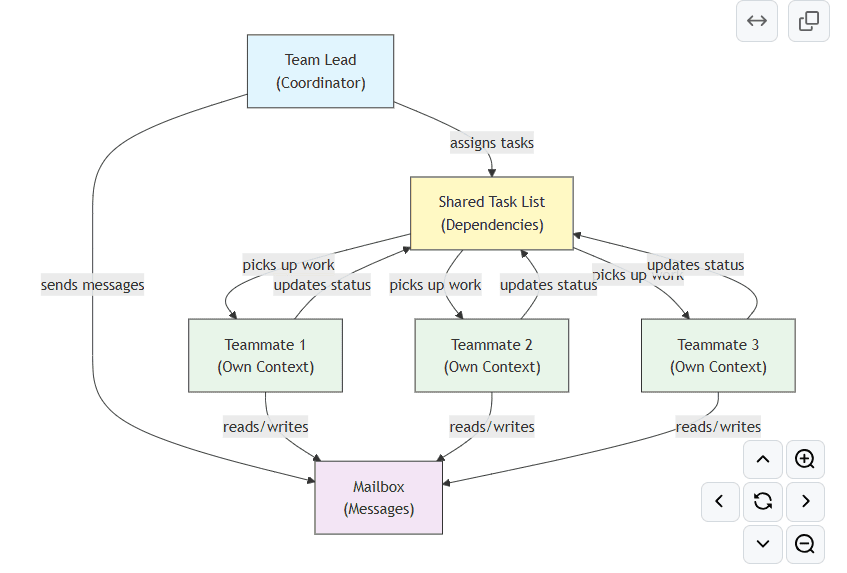
- 团队负责人:Claude Code 的主要会话,负责创建团队、分配任务和协调工作
- 共享任务列表:具有自动依赖关系跟踪功能的同步任务列表
- 邮箱:一个供团队成员沟通状态和协调的代理间消息系统
- Teammates: 独立的 Claude Code 实例,每个实例都有自己的上下文窗口
- 在任务开始前使用
/plan进行计划 - Agent Teams使用Hook events
团队负责人将工作分解成若干任务,并分配给团队成员。共享任务列表用于管理:
- 自动依赖管理——任务等待其依赖项完成
- 状态跟踪——团队成员在工作过程中更新任务状态
- 代理间消息传递——团队成员通过邮箱发送消息进行协调(例如,“数据库架构已准备就绪,您可以开始编写查询”)
- Team 适合的Hook
| 项目 | 内容 |
|---|---|
| Event | TeammateIdle |
| Fires When | A teammate finishes its current task and has no pending work |
| 中文 | 某个 Teammate 完成当前任务后,暂时无事可做 |
| 项目 | 内容 |
|---|---|
| Event | TaskCompleted |
| Fires When | A task in the shared task list is marked complete |
| 中文 | 共享任务列表中的某项任务被标记完成 |
使用Agent Team需要注意的点:
- 团队规模:为达到最佳协调效果,团队人数应保持在 3-5 人之间。
- 任务规模:将工作分解成每个耗时 5-15 分钟的小任务——既要足够小以便并行处理,又要足够大以确保工作的意义。
- 避免文件冲突:将不同的文件或目录分配给不同的团队成员,以防止合并冲突。
- 先从简单的开始:第一个团队使用流程内模式;熟悉之后再切换到分屏模式
- 清晰的任务描述:提供具体、可操作的任务描述,以便团队成员能够独立完成工作
Claude Code 不再完全信任子 Agent(subagent)的最终输出,会扫描它的报告,防止子 Agent 被恶意内容诱导后,把“伪装成 Claude 内部指令”的文本传回主 Agent。
Subagent 输出

       ↓
安全扫描器
       ↓
发现伪造控制格式?
       ↓
标记
       ↓
Parent Agent 接收- Subagent limit
Claude Code 默认将每个会话的子代理生成数量限制为 200 个,以防止出现失控的委托循环。可以使用 CLAUDE_CODE_MAX_SUBAGENTS_PER_SESSION 命令覆盖此限制;运行 /clear 命令后,预算将重置。
export CLAUDE_CODE_MAX_SUBAGENTS_PER_SESSION=200每个会话的子代理生成数量上限已移除。从 v2.1.212 版本开始,Claude Code 将每个会话的子代理生成数量上限设为 200 个,但 v2.1.224 版本移除了该上限——长时间运行的会话不再拒绝创建新的子代理,并且官方的子代理参考文档现在明确指出,Claude 在每个会话中可以生成的子代理总数没有限制。同时,覆盖该上限的变量 CLAUDE_CODE_MAX_SUBAGENTS_PER_SESSION 也随之被移除。
现在是测试阶段,随时可以变更
export CLAUDE_CODE_MAX_CONCURRENT_SUBAGENTS=20
export CLAUDE_CODE_MAX_SUBAGENT_SPAWN_DEPTH=5- 控制并行的agents数量
- 允许 Subagent 最多嵌套调用多少层其他 Subagent
6.7 实际操作
- 系统提示词练习
- 明确角色
You are an expert code reviewer specializing in [specific areas]- 明确优先事项
Review priorities (in order):
1. Security Issues
2. Performance Problems
3. Code Quality- 指定输出格式
For each issue provide: Severity, Category, Location, Description, Fix, Impact- 包含行动步骤
When invoked:
1. Run git diff to see recent changes
2. Focus on modified files
3. Begin review immediately- 工具使用策略
- 限制性起始:一开始只使用必要的工具
- 仅在需要时扩展:根据需求添加工具
- 尽可能使用只读模式:对分析代理使用 Read/Grep 命令。
- 沙盒执行:限制 Bash 命令为特定模式
7. MCP(Model Context Protocol)
MCP(模型上下文协议)是 Claude 访问外部工具、API 和实时数据源的标准化方式。与memory不同,MCP 提供对动态数据的实时访问。
Model Context Protocol (MCP) 让 Claude Code 能够使用超出其内置工具集的工具,例如搜索问题跟踪器、查询数据库或控制网络浏览器。这些工具来自 MCP 服务器,这些服务器在您的机器上运行或作为托管服务运行
- 实时访问外部服务
- 实时数据同步
- 可扩展架构
- 安全认证
- 基于工具的交互
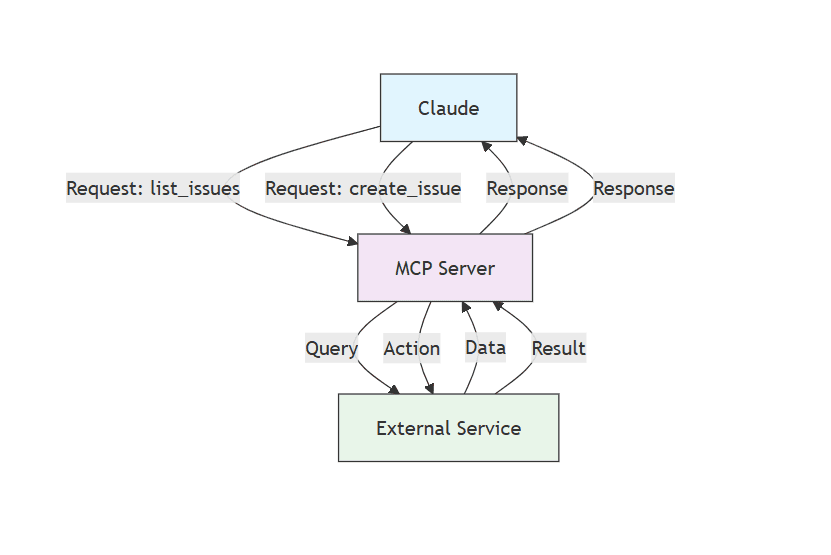
MCP 是一套标准协议,用来规定 AI 如何发现工具、调用工具,以及工具如何返回结果。
- 从问题跟踪器实现功能:“添加 JIRA 问题 ENG-4521 中描述的功能,并在 GitHub 上创建 PR。”
- 分析监控数据:“检查 Sentry 和 Statsig 以检查 ENG-4521 中描述的功能的使用情况。”
- 查询数据库:“根据我们的 PostgreSQL 数据库,查找使用功能 ENG-4521 的 10 个随机用户的电子邮件。”
- 集成设计:“根据在 Slack 中发布的新 Figma 设计更新我们的标准电子邮件模板”
- 自动化工作流:“创建 Gmail 草稿,邀请这 10 个用户参加关于新功能的反馈会议。”
对外部事件做出反应:MCP 服务器也可以充当频道,将消息推送到您的会话中,因此当您不在时,Claude 可以对 Telegram 消息、Discord 聊天或 webhook 事件做出反应。
7.1 MCP架构和生态
架构
MCP 生态
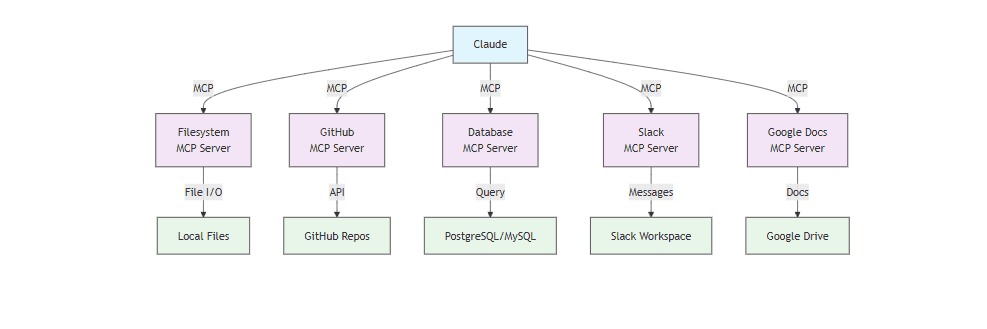
- 文件系统
- Github
- Database数据库
- Slack
- Google文档
MCP Server本质就是一个“给 AI 用的工具 API 服务”,它可以运行在任何地方.可以在本地MCP Server,也可以在远程服务器上运行MCP Server.
                Claude Code

                    |
        -----------------------------
        |                           |
     HTTP MCP                    Stdio MCP
        |                           |
  远程服务器 API              本地启动程序
  (互联网访问)                (你的电脑运行)
7.2 MCP安装方法(注册)
Claude Code 支持多种 MCP 服务器连接的传输协议:
- HTTP 传输(推荐)
# Basic HTTP connection
claude mcp add --transport http notion https://mcp.notion.com/mcp

# HTTP with authentication header 需要链接身份认证的MCP服务
claude mcp add --transport http secure-api https://api.example.com/mcp --header "Authorization: Bearer your-token"
这一步相当于把MCP Server注册到Claude Code中,Claude Code会保存MCP Server的配置信息,比如github提供了token,那么Claude Code就会保存这个token,这样Claude Code就可以使用这个token来访问github提供的github MCP Server.
| 部分 | 含义 |
|---|---|
claude mcp add |
添加一个 MCP Server |
--transport http |
使用 HTTP 方式连接 |
secure-api |
给这个 MCP Server 起的名字 |
https://api.example.com/mcp |
MCP Server 地址 |
--header |
额外添加 HTTP 请求头 |
Authorization: Bearer your-token |
身份认证 Token |
Header 是由于很多 MCP Server 需要身份认证,所以需要添加 Header 信息; Bearer Token = 一张通行证。谁拿着这张通行证,服务器就认为谁有权限访问 API。
API
│
├── API Key
│     └── “这是我的密钥”
│
├── Bearer Token
│     └── “我持有这个访问令牌”
│
└── OAuth
      └── “我通过官方登录授权获得访问令牌”
而Claude Code实际会保存:
{
  "mcpServers": {
    "secure-api": {
      "transport": "http",
      "url": "https://api.example.com/mcp",
      "headers": {
        "Authorization": "Bearer your-token"
      }
    }
  }
}
本质上MCP是:需要远端/本地启动一个 GitHub MCP Server,然后在 Claude Code 里注册它。claude mcp add 做的不是“运行服务”,而是:注册一个“如何启动 MCP server 的方式”
在bash终端中输入这个命令
claude mcp add --transport http github https://api.githubcopilot.com/mcp;你也可以在终端输入claude mcp list查看是否在claude中添加成功在github中create新的Token,
Settings → Developer settings → Personal access tokens,加入描述,名称等创建即可
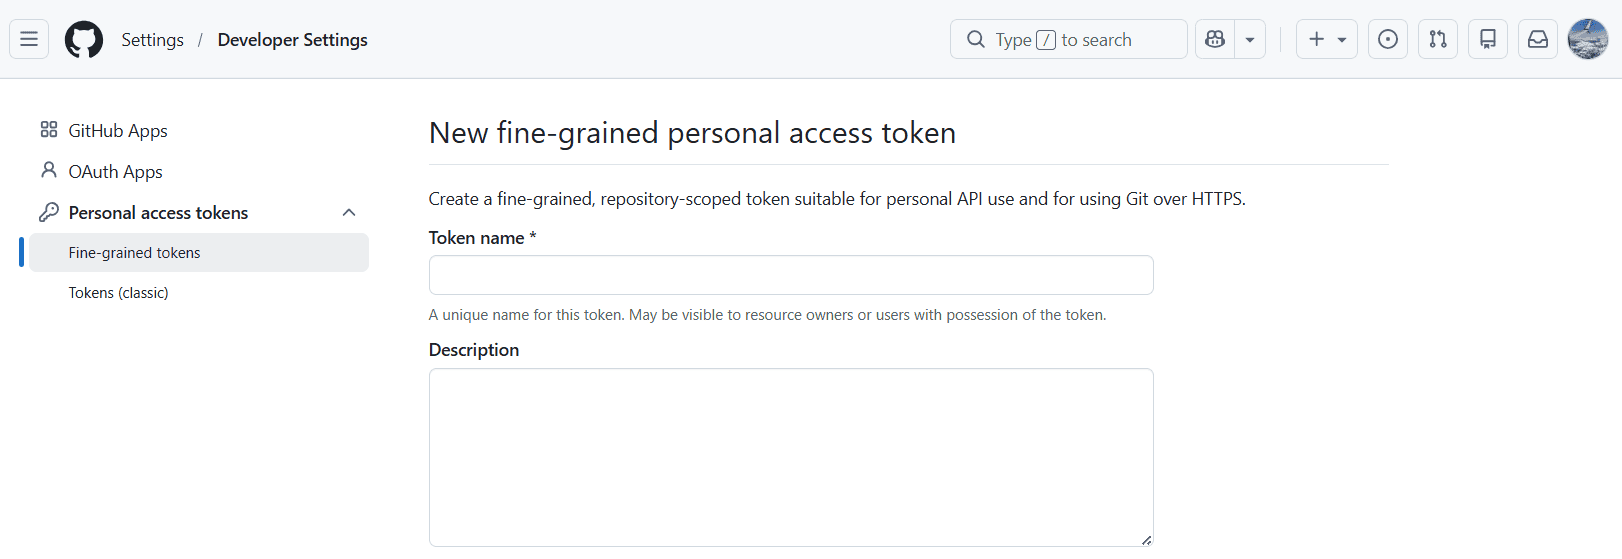
GitHub 现在更推荐 Fine-grained Personal Access Token,因为它可以只允许访问某几个 Repository,可以只给 Read 或 Read/Write和比 Classic Token 更安全
当选择给claude code可以操作哪个仓库之后,进行权限的选择:
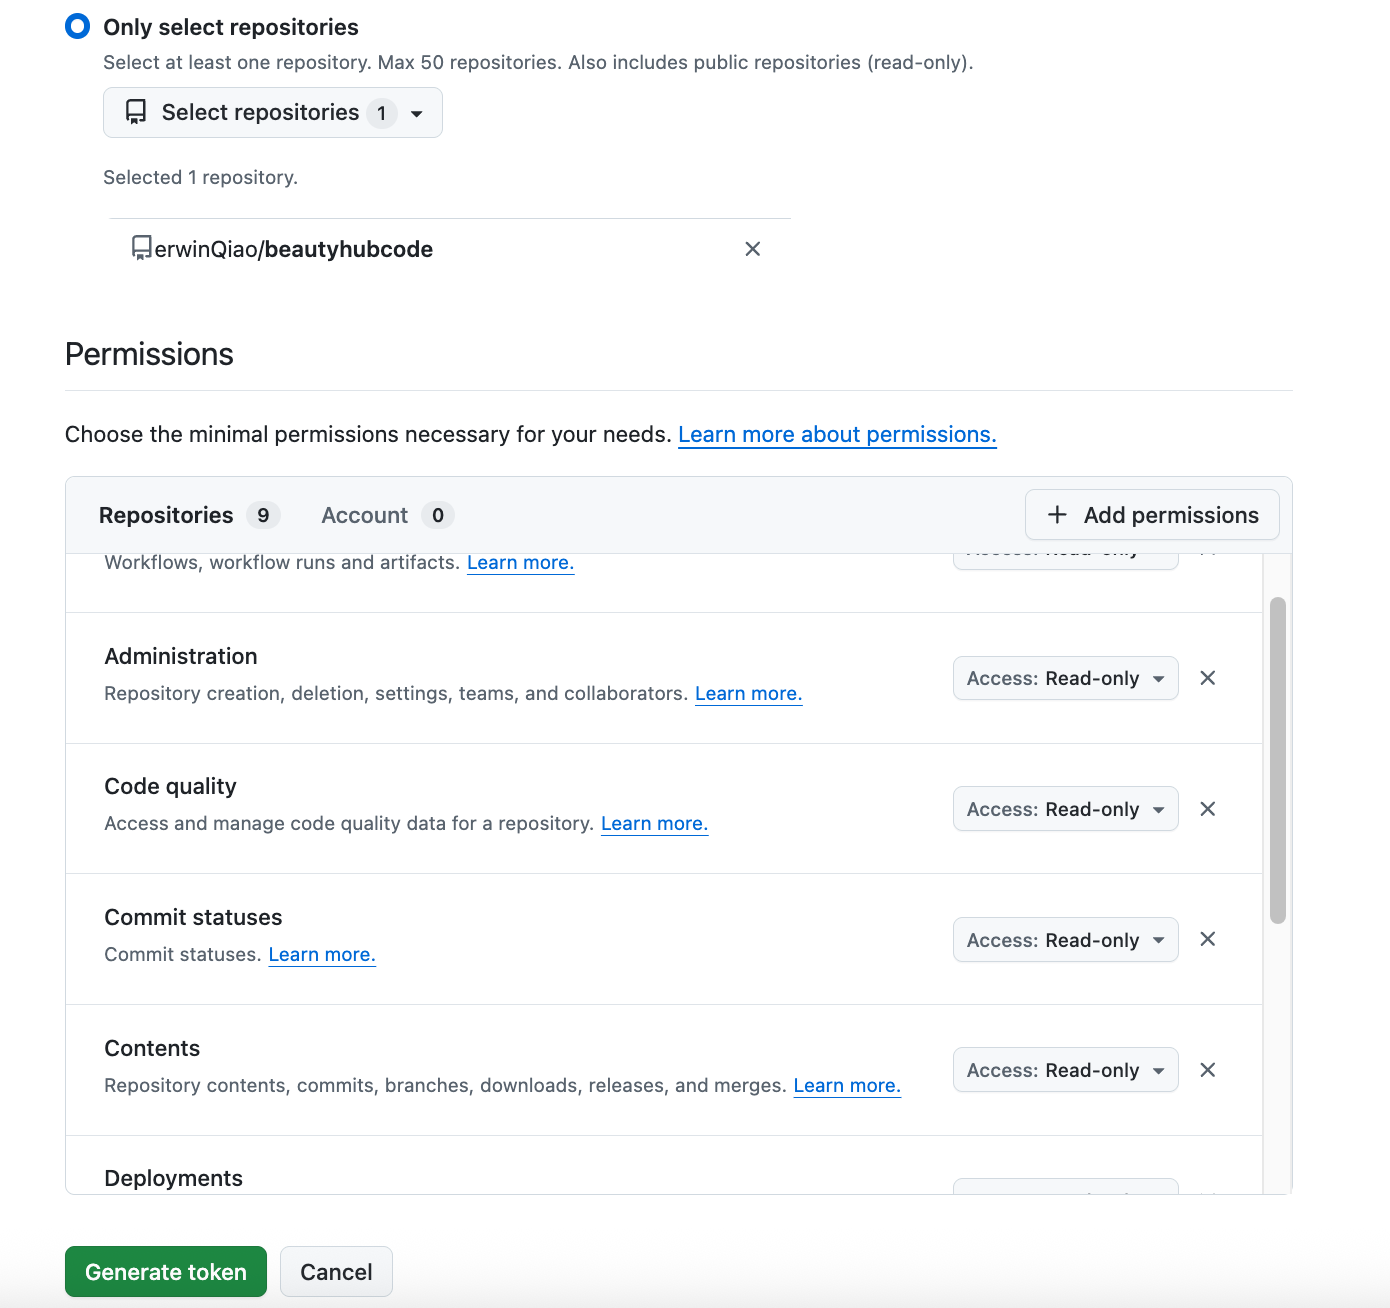
创建好之后记得保存好Tokengithub_pat_xxxxxx
- 在
claude code终端中输入/mcp进行MCP设定github token
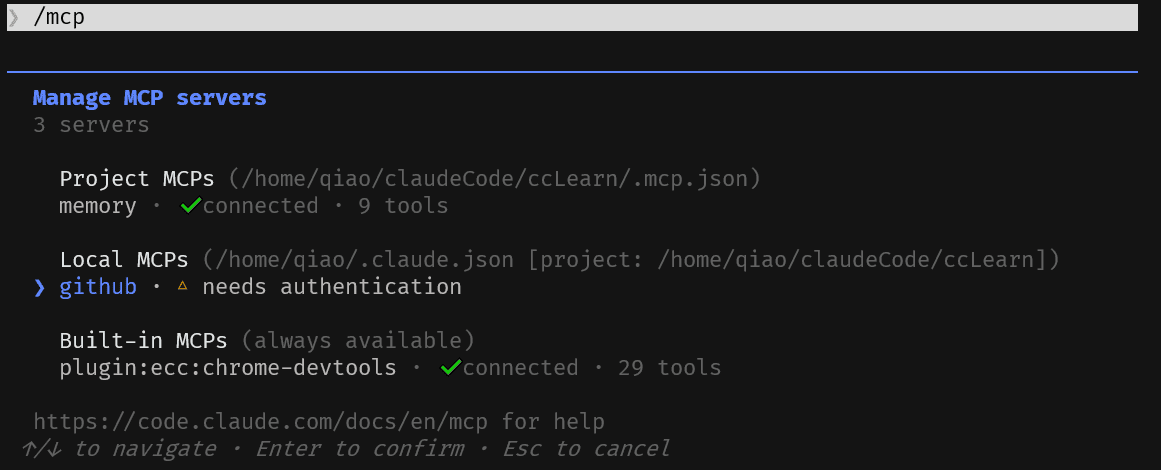
选择github认证,有的GitHub Copilot MCP 不支持 Dynamic Client Registration,所以认证直接失败。Claude 官方文档也说明了:对于不支持 DCR 的 MCP Server,需要使用预先配置好的 OAuth Client,或者其他认证方式,而不是自动注册
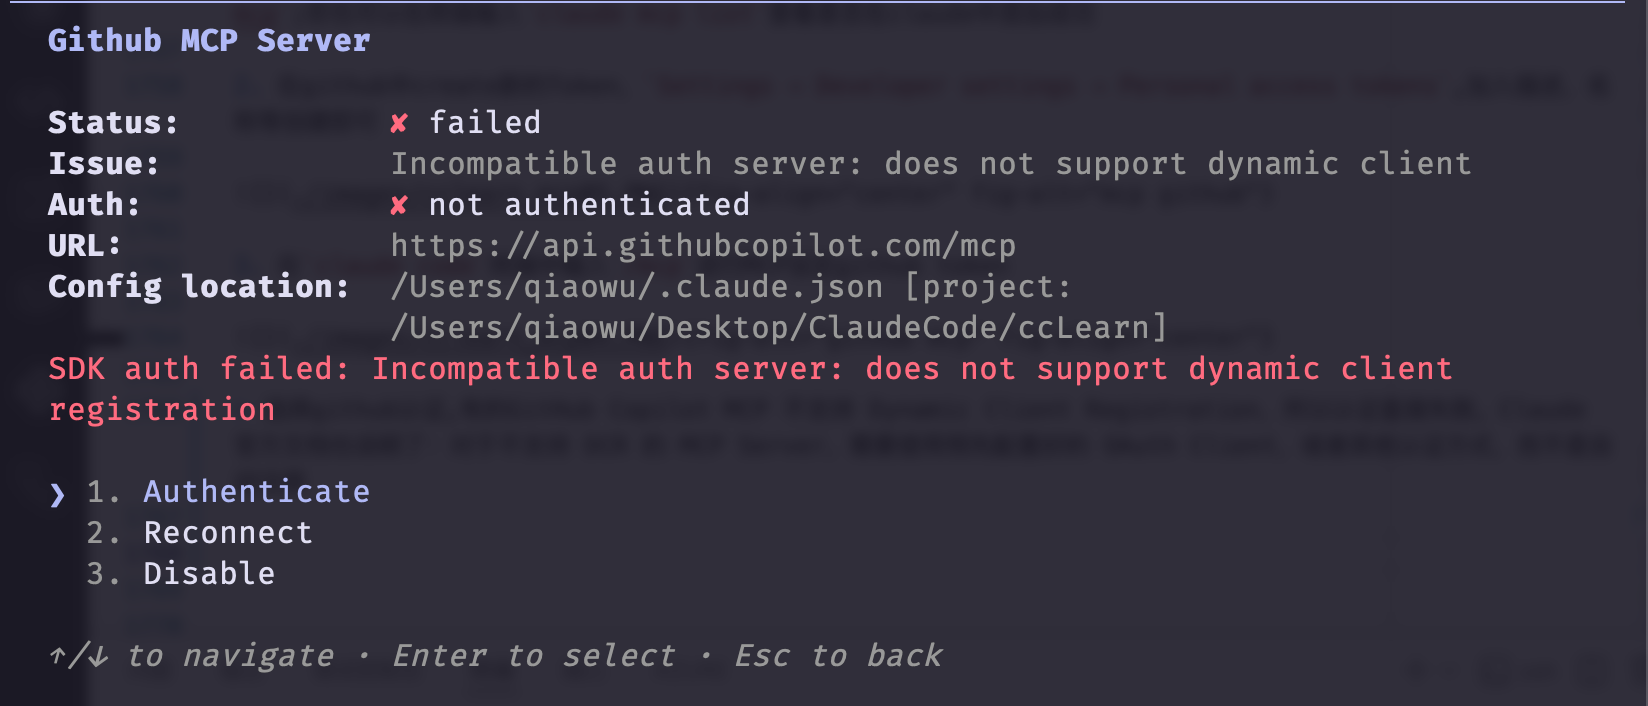
GitHub 官方 Remote MCP 推荐的是使用 GitHub Personal Access Token (PAT) 放到 Authorization Header 中,而不是直接依赖 OAuth 登录
- 先取消刚刚添加的配置
claude mcp remove github - 再添加配置
claude mcp add --transport http github https://api.githubcopilot.com/mcp --header "Authorization: Bearer github_pat_"
| 部分 | 含义 |
|---|---|
Authorization |
HTTP 请求头名称,表示认证信息 |
Bearer |
认证方式,表示后面跟着的是一个 Bearer Token |
YOUR_GITHUB_PAT |
你的 GitHub Personal Access Token,需要替换成真实的 Token |
最方便的就是使用AI 直接告诉它,你要安装什么MCP,安装的Token是什么,上面的方式主要是为了了解MCP注册的底层
- Stdio Transport(Local)
在 MCP 中,Stdio(Standard Input/Output)Transport 是最常见的本地通信方式;换种说法就是如果 AI(客户端)要和一个“本地 MCP Server”通信,最常用的一种方式是——通过标准输入/输出流(stdin/stdout)来传数据
| 方式 | stdio | HTTP |
|---|---|---|
| 是否需要端口 | ❌ 不需要 | ✅ 需要 |
| 是否网络通信 | ❌ 本地进程 | ✅ 网络/本地 |
| 启动方式 | 子进程 | 独立服务 |
| 常见场景 | 本地 MCP server | 远程 MCP server |
# Local Node.js server
claude mcp add --transport stdio myserver -- npx @myorg/mcp-server

# With environment variables
claude mcp add --transport stdio myserver --env KEY=value -- npx server| 部分 | 含义 |
|---|---|
| claude mcp add | 添加一个 MCP Server |
| –transport stdio | 使用 stdin/stdout 通信 |
| myserver | 给这个 Server 起的名字 |
| – | 后面开始是真正启动 Server 的命令 |
| npx @myorg/mcp-server | 启动 MCP Server |
| –env KEY=value | 启动 Server 时传递的环境变量 |
上面的命令等价于: Claude Code:以后要用 myserver,就帮我启动这个进程:npx @myorg/mcp-server; 启动 MCP server 进程时顺便设置环境变量 KEY=value
这里使用本地安装playwright,参考官网的安装方式,能够快速理解本地MCP使用
Playwright MCP Server 是给 Claude Code 装上一双“能操作浏览器的手”
它把 Playwright 的浏览器自动化能力通过 MCP 暴露给 Claude,让 Claude 不只是“看网页代码/告诉你怎么操作”,而是可以实际操作浏览器
Claude Code
    │
    │ MCP
    ▼
Playwright MCP Server
    │
    ▼
浏览器
    │
    ├── 打开网页
    ├── 点击按钮
    ├── 输入文字
    ├── 选择下拉框
    ├── 翻页
    ├── 获取页面内容
    └── 截图/检查页面
(1). 终端添加Playwright服务器
claude mcp add playwright -- npx -y @playwright/mcp@latest- 没有
--transport标志,因为本地服务器使用默认的stdio传输 --分隔符之后的所有内容都是 Claude Code 运行以启动服务器的命令-y告诉 npx 安装包而不提示
该命令打印一个确认信息,如
Added stdio MCP server playwright with command: npx -y @playwright/mcp@latestto local config,后面跟着一个 File modified: 行,显示它写入的配置文件
(2). 检查连接
Add 确认意味着条目已保存,而不是命令运行。检查连接
claude mcp list(3). 检查进程
Playwright服务器只有在claude code启动后才能运行服务器,在claude code启动后切换终端输入
ps aux | grep -E "playwright/mcp|@playwright/mcp" | grep -v grep(4). Claud code使用MCP
在claude code中给claude一个需要浏览器的任务
Use playwright to open https://www.beautyhubcode.com and tell me the page title浏览器窗口打开,以便您可以观看它工作,Claude 输出中的工具调用标有 playwright 服务器名称和操作,如 browser_navigate。
| 项目 | npx / 本地 Stdio | HTTP |
|---|---|---|
| 需要 Node.js | ✅ | ❌ |
| 需要启动进程 | ✅ | ❌ |
| 运行在本机 | ✅ | ❌ |
| 运行在服务器 | ❌ | ✅ |
| 延迟 | 较低 | 网络延迟 |
| 部署难度 | 简单 | 较复杂 |
| 多人共享 | 不方便 | 非常方便 |
| 适合 | 个人工具 | 企业服务 |
- SSE Transport
服务器发送事件 (Server-Sent Events) 传输方式已被弃用,取而代之的是 HTTP 传输方式,但仍然受支持
claude mcp add --transport sse legacy-server https://example.com/sse- WebSocket Transport (ws)
WebSocket 服务器会保持持久的双向连接,这适用于主动向 Claude 推送事件的远程 MCP 服务器。如果您的服务器仅响应请求,则应使用 HTTP,因为 HTTP 支持 OAuth 和 Claude 的 --transport 标志,而 WebSocket 则不支持这两项。
                    MCP Server
                       ▲
                       │
        ┌──────────────┼──────────────┐
        │              │              │
      stdio           HTTP            WebSocket
        │              │              │
     本地程序       HTTP请求       长连接
        │              │              │
   Claude Code     Claude Code     Claude Code
建立连接以后,连接一直保持着,而且双方都可以主动发送消息
{
  "type": "ws",
  "url": "wss://mcp.example.com/socket",
  "headers": {
    "Authorization": "Bearer YOUR_TOKEN"
  }
}| 字段 | 含义 |
|---|---|
type |
Transport 类型,这里是 ws |
url |
MCP Server 地址 |
headers |
HTTP/WebSocket 握手时携带的 Header |
headersHelper |
动态生成 Header 的辅助方式 |
timeout |
超时相关配置 |
alwaysLoad |
是否始终加载这个 MCP Server |
- Windows特殊情况
“Windows-Specific Note” 一般出现在 MCP / Node / CLI 工具文档里,它的意思很简单: > 只针对 Windows 系统的特殊情况或额外注意事项
claude mcp add --transport stdio my-server -- cmd /c npx -y @some/package- OAuth 2.0 Authentication
MCP Server 通过 OAuth 2.0 机制,让 Claude(或 MCP Client)安全地“登录并授权”外部服务( Google / Notion 等),而不需要直接提供账号密码或长期 API key
# Connect to an OAuth-enabled MCP server (interactive flow)
claude mcp add --transport http my-service https://my-service.example.com/mcp

# Pre-configure OAuth credentials for non-interactive setup
claude mcp add --transport http my-service https://my-service.example.com/mcp \
  --client-id "your-client-id" \
  --client-secret "your-client-secret" \
  --callback-port 8080
整体流程
① 用户运行 /mcp
② Claude 发现需要 OAuth
③ 打开浏览器登录
④ 用户授权
⑤ MCP 接收 callback + 换 token
⑥ token 安全存储 + 后续自动使用| 功能 | 描述 |
|---|---|
| Interactive OAuth(交互式 OAuth) | 使用 /mcp 命令触发基于浏览器的 OAuth 授权流程。 |
| Pre-configured OAuth Clients(预配置 OAuth 客户端) | 内置常见服务的 OAuth 客户端配置,例如 :contentReferenceoaicite:0、:contentReferenceoaicite:1 等(v2.1.30+)。 |
| Pre-configured Credentials(预配置凭据) | 支持通过 --client-id、--client-secret 和 --callback-port 参数自动完成 OAuth 客户端配置。 |
| Token Storage(令牌存储) | OAuth Token 会安全地存储在操作系统的 Keychain(密钥链)或凭据管理器中。 |
| Step-up Authentication(权限升级认证) | 支持在执行高权限或敏感操作时触发额外身份验证。 |
| Discovery Caching(发现信息缓存) | OAuth Discovery Metadata(发现元数据)会被缓存,以提高后续连接和认证速度。 |
| Metadata Override(元数据覆盖) | 可在 .mcp.json 中通过 oauth.authServerMetadataUrl 指定 OAuth 元数据地址,覆盖默认的 OAuth Metadata Discovery 机制。 |
                 Claude Code

                     |
          ------------------------
          |                      |
       stdio MCP              HTTP MCP
          |                      |
    本地Python程序          远程服务器
          |                      |
  Obsidian Vault          Notion MCP
                                 |
                                 |
                            OAuth登录
                                 |
Notion API- Claude.ai MCP Connectors
在 Claude.ai 账户中配置的 MCP 服务器会自动在 Claude Code 中可用。这意味着您通过 Claude.ai Web 界面设置的任何 MCP 连接都无需额外配置即可访问
| 项目 | Claude.ai MCP Connectors | Claude Code MCP |
|---|---|---|
| 本质 | Claude.ai 里的「连接器」功能 | Claude Code 里的 MCP 功能 |
| 面向用户 | 普通用户、企业用户 | 开发者 |
| 配置位置 | Claude.ai 网页设置页 | 本地 .mcp.json、claude mcp add |
| MCP Server 类型 | 主要是远程 MCP(Remote MCP) | 本地 MCP + 远程 MCP |
| 使用方式 | 点按钮连接 | 命令行配置 |
| 运行环境 | Claude Web、Mobile | Claude Code CLI |
| 典型场景 | Notion、Slack、Google Drive | GitHub、数据库、本地脚本、终端工具 |
| 权限 | Claude.ai 管理 | 本机完全控制 |
| 技术门槛 | 低 | 高 |
Claude.ai MCP Connectors 是 MCP 的一种产品化形态
7.3 MCP 设置流程
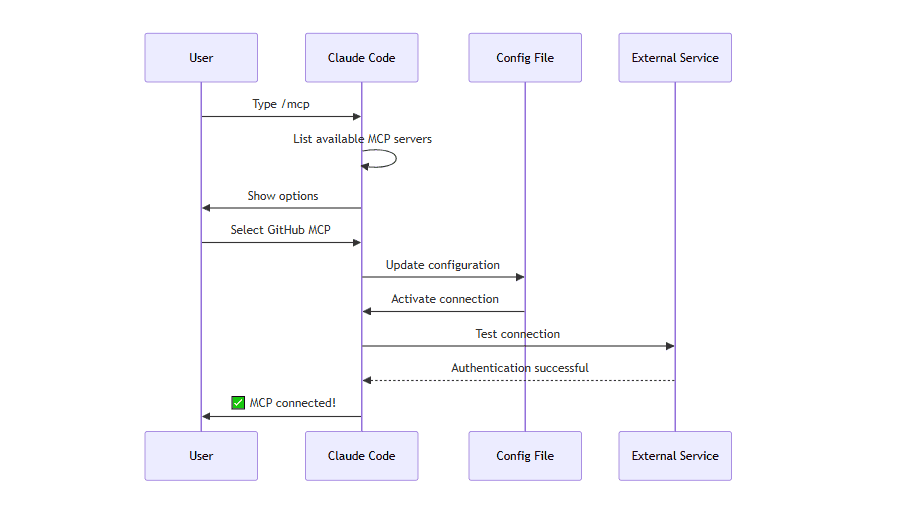
/MCP命令-
在会话中输入
/mcp可以列出已连接的服务器、触发 OAuth 流程并检查连接状态
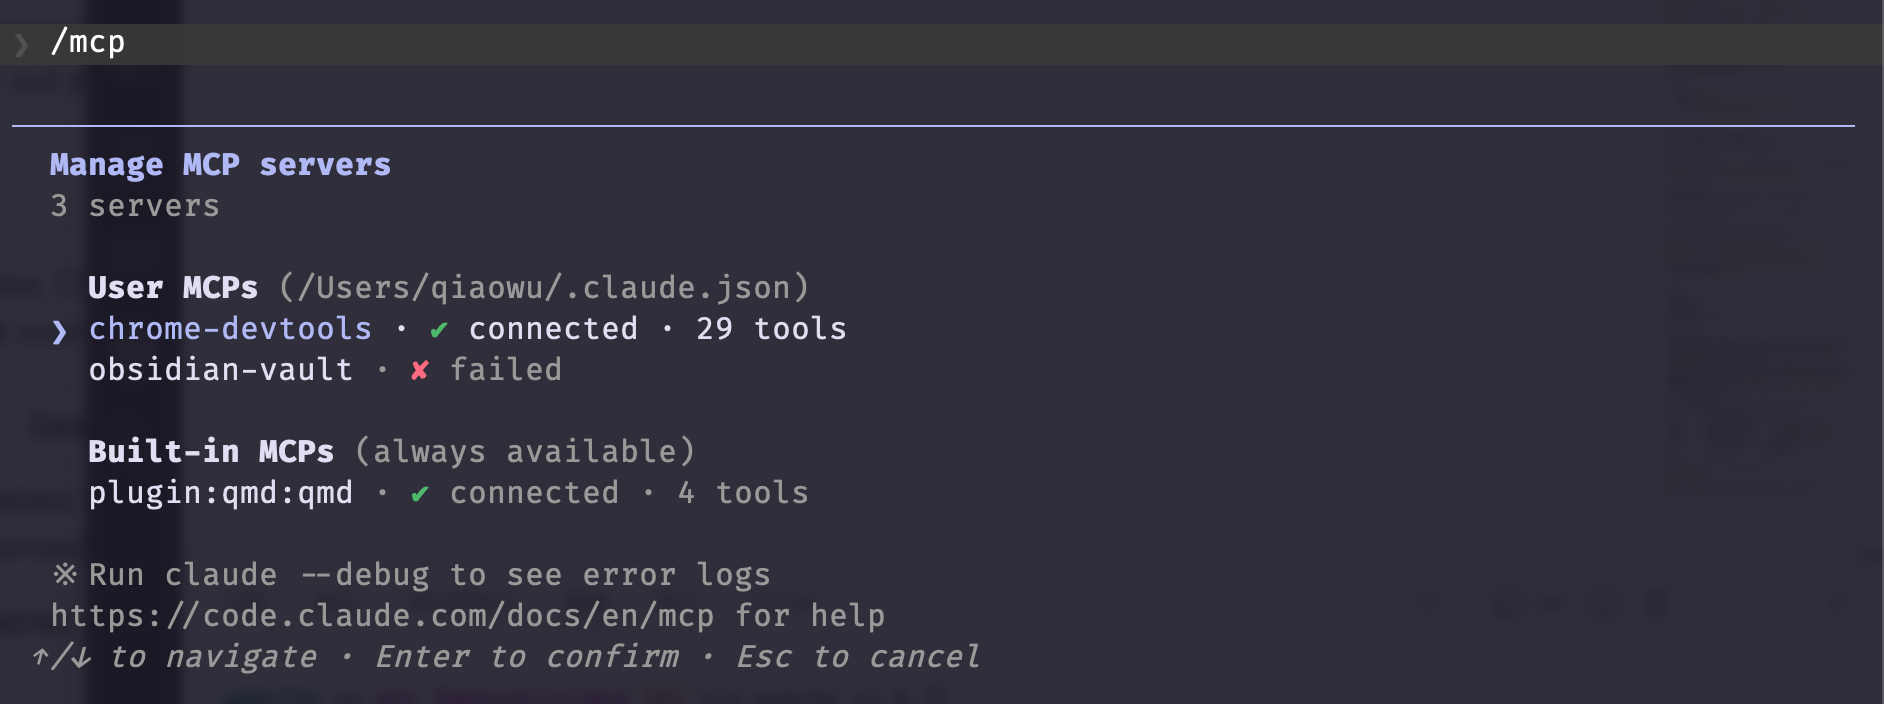
- MCP Tool Search
当 MCP 工具描述超过上下文窗口的 10% 时,Claude Code 会自动启用工具搜索,以便高效地选择合适的工具,而不会使模型上下文过于庞大
默认情况下,Claude Code 不会一开始就把所有 MCP 工具的详细定义塞进模型上下文,而是需要时再发现和加载;但如果你通过非官方的模型服务地址调用模型,这个机制可能会被关闭,因为很多代理不支持它所依赖的特殊消息结构。
| 设置值 | 含义 | 工作方式 | 适用场景 |
|---|---|---|---|
ENABLE_TOOL_SEARCH=auto(默认) |
自动启用 Tool Search | 当工具描述占用上下文超过默认阈值(通常为约 10%)时自动开启 | 大多数用户,推荐使用 |
ENABLE_TOOL_SEARCH=auto:<N> |
自定义自动启用阈值 | 当达到指定阈值 N 时自动开启 Tool Search(具体含义取决于版本实现) |
需要精细控制工具检索行为 |
ENABLE_TOOL_SEARCH=true |
始终启用 Tool Search | 每次先检索相关工具,再将匹配工具发送给模型 | 工具数量很多(数十到数百个 MCP Tools) |
ENABLE_TOOL_SEARCH=false |
禁用 Tool Search | 每次都将所有工具定义完整发送给模型 | 工具数量较少,希望模型始终看到全部工具 |
从 Claude Code v2.1.121 开始,可以在某个 MCP Server 的配置中添加:
- 自动load开启
{
  "mcpServers": {
    "notion": {
      "command": "npx",
      "args": ["@notionhq/notion-mcp"],
      "alwaysLoad": true
    }
  }
}不进行Tool Search,而是加在所有的MCP Server工具,这个是针对某些工具几乎每轮都可以用到
这个 MCP Server 不参与 Tool Search,启动后其所有工具始终加载到 Claude 上下文中,每轮对话都可直接调用
- 动态工具更新
当同一个 MCP 服务器在多个作用域(本地、项目、用户)中定义时,本地配置优先。这样,您就可以使用本地自定义设置覆盖项目级或用户级的 MCP 设置,而不会发生冲突。
从 v2.1.184 版本开始,Claude Code 对每个 MCP 服务器的工具描述和指令强制执行 2 KB 的上限。这可以防止单个服务器因工具定义过于冗长而消耗过多上下文信息,从而减少上下文冗余并保持交互效率。
MCP 服务器可以公开提示符,这些提示符在 Claude 代码中显示为斜杠命令。提示符可通过以下命名约定访问:
/mcp__<server>__<prompt>
| 类型 | 作用 | Claude Code 中表现 |
|---|---|---|
| Tools | 执行动作 | AI 自动调用 |
| Resources | 提供数据 | AI 读取资源 |
| Prompts | 预定义提示模板 | Slash Command(斜杠命令) |
例如
GitHub MCP

Tools:
  create_pr
  list_issues

Resources:
  repository_info

Prompts:
  review
  explain_pr
MCP 服务器可以公开提示符,这些提示符在 Claude 代码中显示为斜杠命令。
- MCP 资源通过 @ 提及
以使用 @提及语法在提示中直接引用 MCP 资源。
@server-name:protocol://resource/pathClaude 就可以获取 MCP 资源内容并将其作为对话上下文的一部分内联包含
7.4 MCP Scopes和常规管理
- MCP层级
MCP 配置可以存储在不同的范围内,并具有不同的共享级别:
| Scope(范围) | 存储位置 | 含义 | 共享范围 | 是否需要审批 |
|---|---|---|---|---|
| Local(默认) | ~/.claude.json(在项目路径下) |
仅对当前用户 + 当前项目生效(旧版本叫 project scope) | 只有你自己 | ❌ 不需要 |
| Project | .mcp.json(项目仓库文件) |
写入 Git 仓库,团队共享配置 | 所有项目成员 | ✅ 需要(首次使用时) |
| User | ~/.claude.json |
全局用户级配置,所有项目都可用(旧版本叫 global scope) | 只有你自己 | ❌ 不需要 |
在.mcp.json中常见的配置项
{
  "mcpServers": {
    "github": {
      "type": "http",
      "url": "https://api.github.com/mcp"
    }
  }
}| 项目 | GitHub Remote MCP | GitHub Local MCP |
|---|---|---|
| 典型地址/方式 | https://api.githubcopilot.com/mcp/ |
github-mcp-server |
| MCP Server 在哪里运行 | GitHub 云端 | 你的 Mac / Linux / 容器 |
| Claude Code 连接方式 | HTTP / Remote MCP | stdio |
| 需要自己安装 MCP Server | ❌ 不需要 | ✅ 需要 |
| 是否需要 GitHub 网络访问 | ✅ | ✅ |
| 认证方式 | OAuth / Access Token | PAT 等 |
| Token 是否直接配置到本地 MCP | 通常不需要手动配置 | 通常需要 |
| 能否用 Podman 部署 | ❌ 没必要 | ✅ 可以 |
| 维护 MCP Server | GitHub 负责 | 你自己负责 |
| 版本更新 | GitHub 管理 | 自己更新 |
| 适合 | 快速使用、个人开发 | 内网、定制化、研究 MCP |
| Copilot 专属? | ❌ 不是 | ❌ 不是 |
| Copilot 特殊能力 | 部分 Remote-only 工具可能涉及 Copilot 权限 | 取决于本地 Server 版本和配置 |
- MCP设置管理
# 添加HTTP-base的server
claude mcp add --transport http github https://api.github.com/mcp

# 添加本地local stdio server
claude mcp add --transport stdio database -- npx @company/db-server

# 列出MCP 服务器列表
claude mcp list

# 查看mcp server的详细信息
claude mcp get github

# 移除mcp server
claude mcp remove github

# Authenticate an MCP server from the CLI (v2.1.186+)
claude mcp login github

# Sign out of an MCP server (v2.1.186+)
claude mcp logout github

# Import from Claude Desktop
claude mcp add-from-claude-desktop
claude mcp login 和claude mcp logout 是/mcp菜单中 OAuth 流程的非交互式版本——无需打开菜单即可进行身份验证或注销。在登录命令中添加–no-browser` 参数,即可通过 SSH 或在无头会话中完成 OAuth 认证(它会将流程重定向到标准输入)
- 常规的MCP
| MCP Server | 主要用途 | 常见工具(Tools) | 认证方式 | 是否支持实时操作 |
|---|---|---|---|---|
| Filesystem(文件系统) | 文件和目录操作 | read、write、delete |
操作系统文件权限 | ✅ 是 |
| GitHub | 仓库与代码管理 | list_prs、create_issue、push |
OAuth / Personal Access Token(PAT) | ✅ 是 |
| Slack | 团队沟通与消息管理 | send_message、list_channels |
Access Token | ✅ 是 |
| Database(数据库) | SQL 数据库操作 | query、insert、update |
数据库账号密码或凭据 | ✅ 是 |
| Google Docs | 文档读取与协作 | read、write、share |
OAuth | ✅ 是 |
| Asana | 项目与任务管理 | create_task、update_status |
API Key 或 OAuth | ✅ 是 |
| Stripe | 支付与账单管理 | list_charges、create_invoice |
API Key | ✅ 是 |
| Memory | 持久化记忆管理 | store、retrieve、delete |
本地存储 | ❌ 否(非实时外部服务) |
- 主要用途(Purpose):MCP Server 所连接的外部系统或服务
- 常见工具(Common Tools):该 MCP Server 通常暴露给 AI 调用的工具(Tool)示例
- 认证方式(Auth):连接对应服务时所采用的身份验证方式
- 是否支持实时操作(Real-time):
- ✅ 是:能够实时访问或修改外部服务的数据
- ❌ 否:主要操作本地数据或持久化存储,不直接与在线服务实时交互
7.5 练习例子
- GitHub MCP Configuratio项目本地配置
在本地启动一个 GitHub MCP Server,让 Claude Code 能通过 MCP 调用 GitHub 的 API
在project中创建.mcp.json,把下面内容写入
{
  "mcpServers": {
    "github": {
      "command": "npx",
      "args": ["@modelcontextprotocol/server-github"],
      "env": {
        "GITHUB_TOKEN": "${GITHUB_TOKEN}"
      }
    }
  }
}在之前~/.zshrc或!/.bashrc中加入export GITHUB_TOKEN="github_pat_xxxxx",这样就可以在项目本地使用github mcp
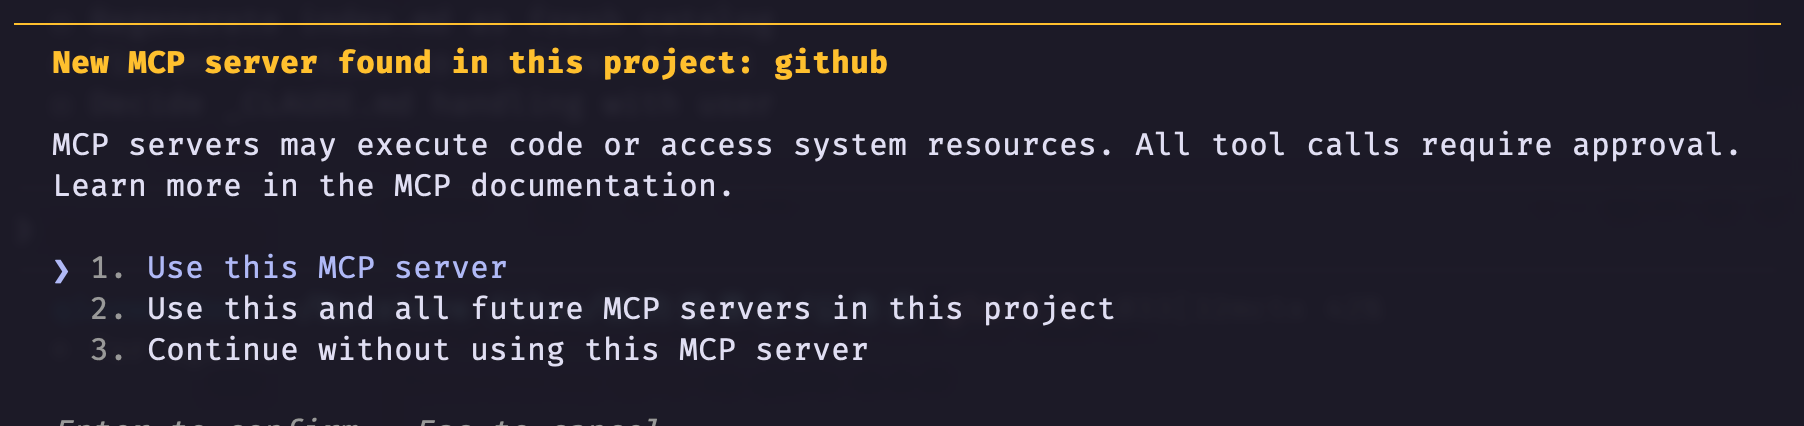
在claude code 输入/mcp,查看当前MCP Server,找到github mcp,就可以看到tools可食用的内容,在当前版本(v2.1.181)中,是在command中输入命令,例如create_pull_request相当于create_pr,在旧版本中是输入
/mcp__github__get_pr 456

# Returns:
Title: Add dark mode support
Author: @alice
Description: Implements dark theme using CSS variables
Status: OPEN
Reviewers: @bob, @charlie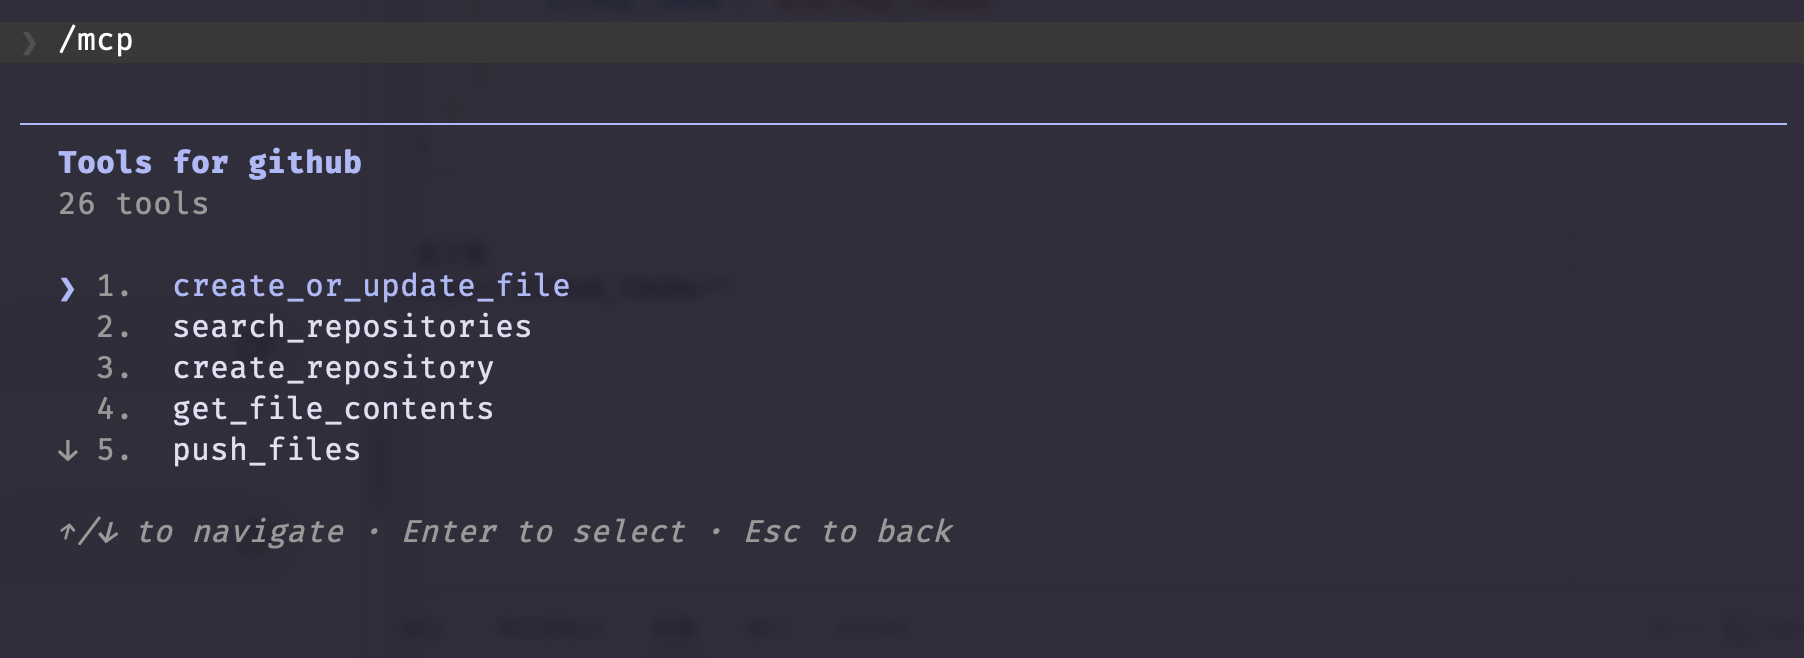
Claude Code(以及很多支持 MCP 配置的程序) 的一种环境变量展开(Environment Variable Expansion)功能
配置文件里不用写死内容,而是在程序启动时自动从操作系统的环境变量中读取,可以理解成一种变量替换
假设配置是
{
  "command": "${MCP_BIN_PATH}"
}程序启动时会去系统里面找MCP_BIN_PATH,如果环境变量是Linux/macOS中有export MCP_BIN_PATH=npx
- 第一种写法
${VAR}
${VAR}
Uses environment variable,
error if not set
就是系统中参数必须存在,如果不存在就会报错
- 第二种写法
${VAR:-default}
{
  "mcpServers": {
    "api-server": {
      "type": "http",
      "url": "${API_BASE_URL:-https://api.example.com}/mcp",
      "headers": {
        "Authorization": "Bearer ${API_KEY}",
        "X-Custom-Header": "${CUSTOM_HEADER:-default-value}"
      }
    },
    "local-server": {
      "command": "${MCP_BIN_PATH:-npx}",
      "args": ["${MCP_PACKAGE:-@company/mcp-server}"],
      "env": {
        "DB_URL": "${DATABASE_URL:-postgresql://localhost/dev}"
      }
    }
  }
}- 底层不同
MCP server 有三种能力,在 Claude Code 里的呈现方式不同:
MCP server ├── tools → 我(model)直接调用的工具,如 mcp__playwrightbrowser_click ├── prompts → 注册成你能输入的 slash command:/mcp
/mcp__github__review 存在的前提是:你连的 github server 定义了一个名叫 review 的 prompt。命令名不是你配置出来的,而是 server 端声明的 —— 你这边只负责把 server 加进来。
- 设置步骤
claude mcp add --scope user --transport http github https://api.githubcopilot.com/mcp/,然后参考前面的Token设置,选择最小的权限
┌───────────────┬─────────────────┬─────────────┐ │ Permission │ Access │ 用途 │ ├───────────────┼─────────────────┼─────────────┤ │ Metadata │ Read-only(强制) │ 基础 │ ├───────────────┼─────────────────┼─────────────┤ │ Contents │ Read-only │ 读代码/diff │ ├───────────────┼─────────────────┼─────────────┤ │ Pull requests │ Read-only │ PR review │ ├───────────────┼─────────────────┼─────────────┤ │ Issues │ Read-only │ issue 操作 │ └───────────────┴─────────────────┴─────────────┘
- 在
.zshrc中export GITHUB_MCP_PAT="github_pat_你的token" claude mcp add --scope user --transport http github https://api.githubcopilot.com/mcp/ --header 'Authorization: Bearer ${GITHUB_MCP_PAT}'
- Database MCP Setup
{
  "mcpServers": {
    "database": {
      "command": "npx",
      "args": ["@modelcontextprotocol/server-database"],
      "env": {
        "DATABASE_URL": "postgresql://user:pass@localhost/mydb"
      }
    }
  }
}
数据库MCP的使用和连接
  你的 Claude Code
        |
        | npx 运行
        ▼
  server-postgres (桥接器)  ← 需要 Node.js
        |
        | 通过 DATABASE_URL 连接
        ▼
PostgreSQL 数据库 ← 远程就不用装,本地玩就得装- 多重MCP 工作流程
# Daily Report Workflow using Multiple MCPs

## Setup
1. GitHub MCP - fetch PR metrics
2. Database MCP - query sales data
3. Slack MCP - post report
4. Filesystem MCP - save report

## Workflow

### Step 1: Fetch GitHub Data
/mcp__github__list_prs completed:true last:7days

Output:
- Total PRs: 42
- Average merge time: 2.3 hours
- Review turnaround: 1.1 hours

### Step 2: Query Database
SELECT COUNT(*) as sales, SUM(amount) as revenue
FROM orders
WHERE created_at > NOW() - INTERVAL '1 day'

Output:
- Sales: 247
- Revenue: $12,450

### Step 3: Generate Report
Combine data into HTML report

### Step 4: Save to Filesystem
Write report.html to /reports/

### Step 5: Post to Slack
Send summary to #daily-reports channel

Final Output:
✅ Report generated and posted
📊 47 PRs merged this week
💰 $12,450 in daily sales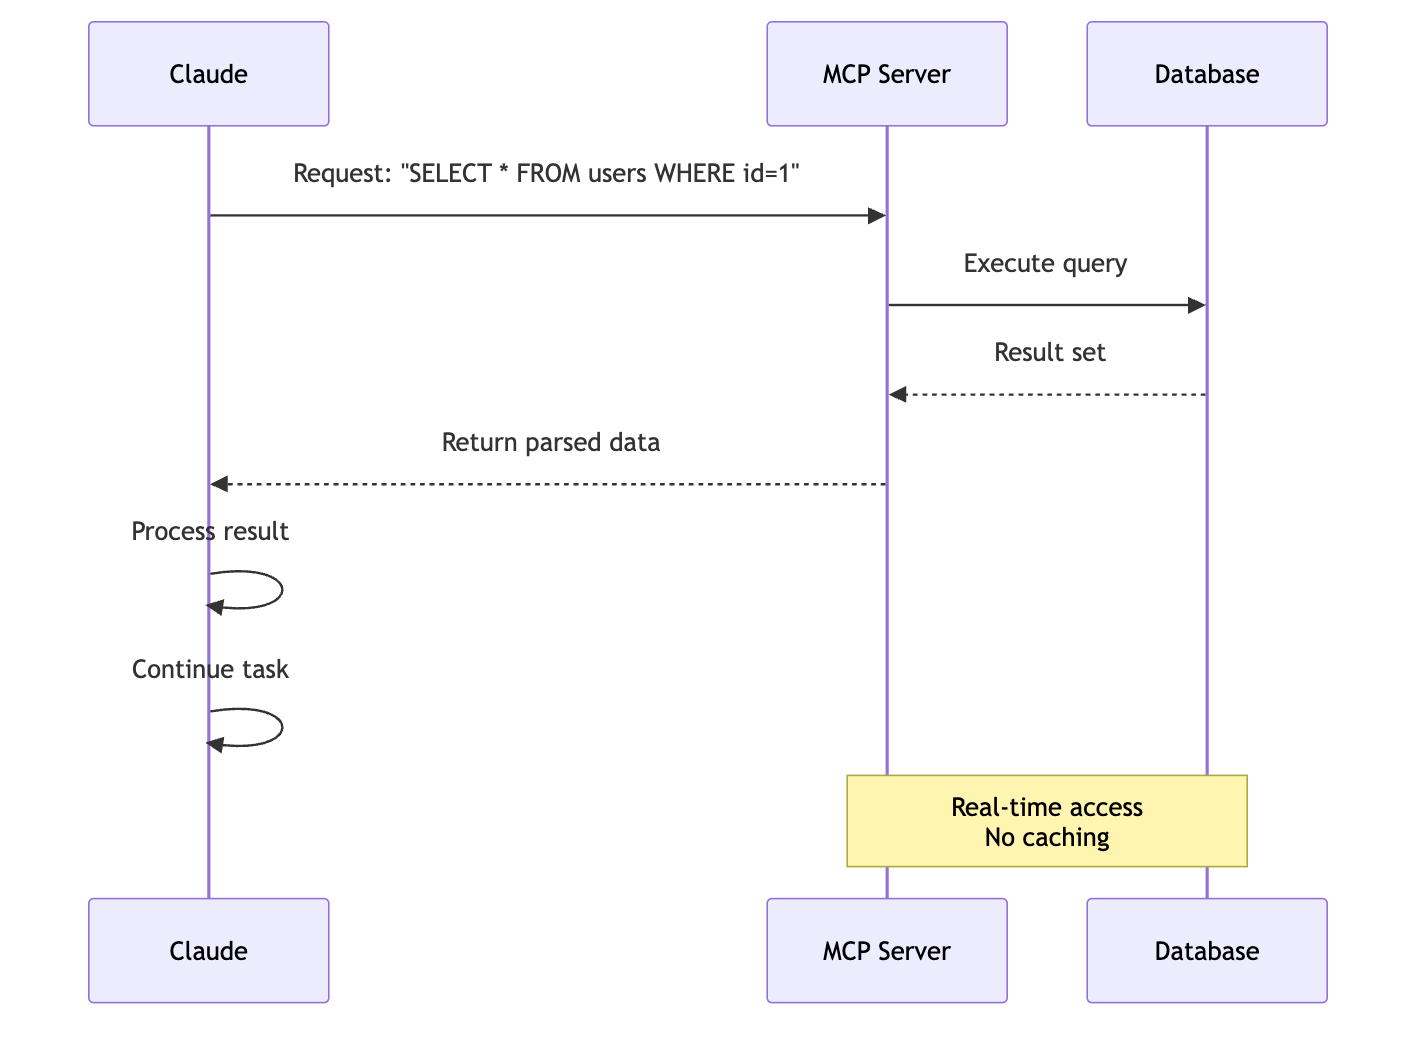
7.6 MCP 高级应用
- Claude Code作为MCP Server
Claude Code 本身可以作为其他应用程序的 MCP 服务器。这使得外部工具、编辑器和自动化系统能够通过标准的 MCP 协议利用 Claude 的功能。
# Start Claude Code as an MCP server on stdio
claude mcp serve
其他应用程序可以像连接任何基于标准 I/O 的 MCP 服务器一样连接到此服务器。例如,要将 Claude Code 添加为另一个 Claude Code 实例中的 MCP 服务器
claude mcp add --transport stdio claude-agent -- claude mcp serve- 托管 MCP 配置(企业版)
对于企业部署,IT 管理员可以通过 managed-mcp.json 配置文件强制执行 MCP 服务器策略。该文件提供对组织范围内允许或阻止哪些 MCP 服务器的完全控制
位置:
- macOS:
/Library/Application Support/ClaudeCode/managed-mcp.json - Linux:
~/.config/ClaudeCode/managed-mcp.json - Windows:
%APPDATA%\ClaudeCode\managed-mcp.json
在设置中,可以启用或禁用 MCP 服务器,并指定哪些用户或组可以访问它们。
{
  "allowedMcpServers": [
    {
      "serverName": "github",
      "serverUrl": "https://api.github.com/mcp"
    },
    {
      "serverName": "company-internal",
      "serverCommand": "company-mcp-server"
    }
  ],
  "deniedMcpServers": [
    {
      "serverName": "untrusted-*"
    },
    {
      "serverUrl": "http://*"
    }
  ]
}- Plugin-Provided MCP Servers
插件可以捆绑自己的 MCP 服务器,使其在插件安装时自动可用。插件提供的 MCP 服务器可以通过两种方式定义。
- Standalone
.mcp.json– Place a.mcp.jsonfile in the plugin root directory - Inline in
plugin.json– Define MCP servers directly within the plugin manifest
使用 ${CLAUDE_PLUGIN_ROOT} 变量来引用相对于插件安装目录的路径
{
  "mcpServers": {
    "plugin-tools": {
      "command": "node",
      "args": ["${CLAUDE_PLUGIN_ROOT}/dist/mcp-server.js"],
      "env": {
        "CONFIG_PATH": "${CLAUDE_PLUGIN_ROOT}/config.json"
      }
    }
  }
}- Subagent-Scoped MCP
MCP 服务器可以通过 mcpServers: 键在代理的 frontmatter 中直接定义,从而将其作用域限定于特定的子代理,而不是整个项目。当某个代理需要访问工作流中其他代理不需要的特定 MCP 服务器时,此功能非常有用。
---
mcpServers:
  my-tool:
    type: http
    url: https://my-tool.example.com/mcp
---

You are an agent with access to my-tool for specialized operations.- MCP输出限制
Claude Code 对 MCP 工具返回的数据(tool output)做了“长度限制 + 防爆内存机制”。
| 阈值类型 | 数值 | 行为说明 |
|---|---|---|
| 警告阈值 | 10,000 tokens | 当输出超过 10,000 tokens 时,会提示结果过大(仅警告,不截断) |
| 默认最大限制 | 25,000 tokens | 超过此限制后,输出内容会被截断,超出部分不会进入上下文 |
| 磁盘持久化阈值 | 50,000 characters | 当工具结果超过 50,000 字符时,会被持久化到磁盘(而非直接进入内存/上下文) |
# Increase the max output to 50,000 tokens
export MAX_MCP_OUTPUT_TOKENS=50000
7.7 利用代码执行解决MCP上下文臃肿问题
随着 MCP 应用规模的扩大,连接到数十台服务器以及数百甚至数千个工具带来了一个重大挑战:上下文膨胀。这可以说是 MCP 大规模应用面临的最大问题,而 Anthropic 的工程团队提出了一种巧妙的解决方案——使用代码执行而非直接调用工具
Anthropic 提出的方案是:
- 不要让模型直接处理数据
- 让模型写代码,让代码去调用 MCP
传统方式
Model → MCP tool → 返回大数据 → 再进 context → 再调用另一个 tool新方式(Code Execution)

| 组件 | 类比 |
|---|---|
| Claude model | 项目经理 |
| Sandbox | 实验室 |
| MCP tools | 外部供应商 |
| Code execution | 实验室里的操作员 |
| Context window | 会议记录 |
MCP sandbox 本质是一个“受控执行环境(container/VM/WASM)”,让模型只负责写代码和决策,所有工具调用与数据处理都在隔离环境中执行,从而避免 context overflow 并提升安全性与效率。
8. Hooks
Hooks是自动脚本,会在 Claude Code 会话期间响应特定事件而执行。它们支持自动化、验证、权限管理和自定义工作流程。
Hooks是当 Claude Code 中发生特定事件时自动执行的自动化操作(shell 命令、HTTP webhook、LLM 提示、MCP工具调用或子代理评估),它们接收 JSON 输入,并通过退出代码和 JSON 输出传递结果。
- 事件驱动自动化
- JSON-based 输入/输出
- 支持
command、http、mcp_tool、prompt和agent钩子类型 - 针对特定工具的钩子进行模式匹配
设置内容文件
~/.claude/settings.json- 用户设置 (all projects).claude/settings.json- 项目设置 (可分享,可提交).claude/settings.local.json- 本地设置 (仅当前项目)- 管理策略 - 组织范围设置
- 插件钩子
hook/hooks.json- 插件作用域的钩子 - 技能/代理前端 - 组件生命周期Hook
8.1 基础设置结构
{
  "hooks": {
    "EventName": [ // 触发事件名称,例如 PreToolUse、PostToolUse、SessionStart 等
      {
        "matcher": "ToolPattern",
                // 匹配哪些工具会触发 Hook
        // 支持:
        // "Write"             → 精确匹配
        // "Edit|Write"        → 正则匹配
        // "Write,Edit"        → 多工具匹配(v2.1.191+)
        // "*"                 → 所有工具
        // "mcp__memory__.*"   → 所有 memory MCP 工具

        // 当前 matcher 对应要执行的 Hook 列表
        "hooks": [
          {
            // Hook 类型
            // command  → 执行 Shell/Bash 命令
            // prompt   → 调用 LLM Prompt
            // http     → 发送 HTTP/Webhook 请求
            // mcp_tool → 调用 MCP 工具
            // agent    → 调用子 Agent
            "type": "command",

            // 当 Hook 被触发时执行的命令
            "command": "your-command-here",

            // 超时时间(秒)
            // 默认 60 秒,可省略
            "timeout": 60,

            // (可选)仅在当前 Claude Code 会话中执行一次
            "once": false,
            "async": true,
            "statusMessage": "Formatting…",
            "shell": "bash"
          }
        ]
      }
    ]
  }
}
hooks
|
|-- EventName
|
|-- matcher 匹配哪些工具触发这个hook(bash,writer,等)
|
|-- hooks 相当于hook数组,表示触发后执行的动作
|
|-- command
|-- timeoutEventName表示什么事件发生时出发
| 事件 | 什么时候触发 |
|---|---|
| PreToolUse | 调用工具之前 |
| PostToolUse | 工具执行之后 |
| UserPromptSubmit | 用户输入之后 |
| Stop | Claude停止回答时 |
| SessionStart | 会话开始 |
| SessionEnd | 会话结束 |
具体的hook解释:
| 字段 | 描述 | 示例 |
|---|---|---|
matcher |
用于匹配工具名称的模式(区分大小写)。支持精确匹配、正则表达式以及通配符 *。 |
"Write"、"Edit\|Write"、"*" |
hooks |
Hook 定义数组,可配置一个或多个 Hook。 | [{ "type": "command", ... }] |
type |
Hook 类型。支持:command(执行 Bash 命令)、prompt(调用 LLM 提示)、http(发送 Webhook 请求)、mcp_tool(调用 MCP 工具,v2.1.118+)、agent(调用子代理)。 |
"command" |
command |
要执行的 Shell(Bash)命令,仅适用于 command 类型。 |
"$CLAUDE_PROJECT_DIR/.claude/hooks/format.sh" |
timeout |
可选,Hook 的超时时间(单位:秒),默认值为 60 秒。 | 30 |
once |
可选。如果设置为 true,则该 Hook 在当前 Claude Code 会话中仅执行一次。 |
true |
async |
是否在后台异步运行 | |
asyncRewake |
后台运行结束后,是否在退出码为 2 时唤醒 Claude |
|
shell |
使用 Bash 还是 PowerShell 执行命令 | |
statusMessage |
Hook 运行期间显示的提示文字 |
matcher决定哪些工具(或者理解为是哪些动作)会触发该Hookhooks:一个数组,可以为同一个matcher配置多个hook, 它们会按顺序执行type:指定 Hook 的执行方式:- command:执行本地 Shell/Bash 命令
- prompt:向 Claude 发送预定义 Prompt
- http:向指定 URL 发送 HTTP/Webhook 请求
- mcp_tool:调用 MCP Server 提供的工具(Claude Code v2.1.118+)
- agent:调用 Claude Code 的子 Agent(Subagent)
timeout:Hook 最长允许运行的时间,超过后 Claude Code 会终止该 Hook
ToolPattern 模型的写法
| 模式 | 描述 | 示例 |
|---|---|---|
| 精确字符串(Exact string) | 完全匹配某个工具名称 | "Write" |
| 正则表达式(Regex pattern) | 使用正则匹配多个工具 | "Edit|Write" |
| 逗号分隔(Comma-separated,v2.1.191+) | 匹配列表中的任意工具 | "Write,Edit" |
| 通配符(Wildcard) | 匹配所有工具 | "*" 或 "" |
| MCP 工具匹配(MCP tools) | 按 MCP Server + 工具名匹配 | "mcp__memory__.*" |
类似系统中指令触发加载的时机类型,也就是:什么时候把某些规则或配置加载进当前会话:
Claude Code 的 Instruction(指令)是怎么被加载进来的,即这些指令的来源(Source)
| 功能 | Hook | Instruction Matcher Value |
|---|---|---|
| 用途 | 自动执行命令、MCP、HTTP 等 | 标识一条指令是如何被加载的 |
| 什么时候用 | 配置 hooks |
查看或调试 Instructions |
| 作用 | 执行动作 | 告诉你指令来自哪里 |
表示的是文件的加载顺序,即指令的来源(Source)
Claude Code 的 InstructionsLoaded Hook 事件里的 matcher(匹配条件):
InstructionsLoaded 的意思: Claude Code 加载指令文件(Instructions)时触发
matcher 不是匹配某个工具,而是匹配“指令是通过什么方式被加载的”
Claude Code 在运行过程中加载 instruction 文件时,是什么原因导致这次 instruction 被加载。
这里的 instruction 可以理解为 Claude Code 读取的规则/指令文件,例如 CLAUDE.md、AGENTS.md 等。
| Matcher Value | 描述 | 含义解释 |
|---|---|---|
| session_start | 会话启动时加载指令 | 当你打开一次新的会话(session)时,这些指令会立即加载,无需等待任何操作 |
| nested_traversal | 嵌套目录遍历时加载指令 | 当系统进入某个目录结构(比如递归扫描子目录)时,会在“进入更深层路径”时加载对应指令 |
| path_glob_match | 通过路径通配符匹配加载指令 | 当文件路径符合 glob 模式(如 *.md、src/**)时,自动加载对应指令 |
匹配器字段根据工具名称(“Write”, “Edit|Write”, “*“)选择钩子。要根据工具参数进行更精确的筛选——例如,仅当编辑操作涉及 src/ 目录时才运行钩子,或保护对敏感文件的读取——请在单个钩子处理程序中添加 if 条件。这与工具名称匹配器不同:匹配器决定使用哪个工具,而 if 条件决定调用哪个钩子
if写法的例子
匹配器字段根据工具名称(“写入”、“编辑|写入”、“*”)选择钩子。要根据工具参数进行更精确的筛选——例如,仅当编辑操作涉及 src/ 目录时才运行钩子,或保护对敏感文件的读取——请在单个钩子处理程序中添加 if 条件。这与工具名称匹配器不同:匹配器决定使用哪个工具,而 if 条件决定调用哪个钩子。
{
  "hooks": {
    "PreToolUse": [
      {
        "matcher": "Edit|Write",
        "hooks": [
          {
            "type": "command",
            "if": "Edit(src/**)",
            "command": "./hooks/lint-src.sh"
          }
        ]
      },
      {
        "matcher": "Read",
        "hooks": [
          {
            "type": "command",
            "if": "Read(.env)",
            "command": "./hooks/block-secret-read.sh"
          }
        ]
      }
    ]
  }
}
有效的 if 模式示例:Edit
(src/**)(编辑 src/ 下的文件),Read(~/.ssh/**)(读取任何 SSH 密钥),Read(.env)(当前目录或以下目录下的任何 .env 文件),Bash(git push *)(仅限 git push 子命令)。
8.2 Hook 类型
Claude Code 支持五种钩子类型:
- Command Hooks
默认的Hook类型。执行 shell 命令,并通过 JSON 标准输入/输出和退出代码进行通信
{
  "type": "command",
  "command": "python3 \"$CLAUDE_PROJECT_DIR/.claude/hooks/validate.py\"",
  "timeout": 60
}Execve的形式(直接执行): 绕过 Shell,直接在系统底层调用 execve() 函数来启动程序,并且通过一个数组(args array)来传递参数. 在 execve 模式下,每个参数都是数组里独立的一个元素,系统天然就能分清边界,所以路径里的占位符永远不需要加引号
{
  "type": "command",
  "args": ["python3", "$CLAUDE_PROJECT_DIR/.claude/hooks/validate.py", "--strict"],
  "timeout": 60
}
这两种形式互斥——同时设置了 command 和 args 的 hook 会在配置加载时被拒绝。当需要管道、重定向、&& 链式调用或 shell 扩展时,请使用 command;当需要使用参数调用单个二进制文件时,请使用 args。
- HTTP Hooks
HTTP 钩子会将接收到的 JSON 数据通过 POST 请求发送到指定的 URL,并且期望从远程服务端接收一个 JSON 格式的响应。这种设计非常适合对接外部服务,由远程服务处理数据后返回决策结果。
当系统启用了沙盒(sandboxing)机制时,HTTP 钩子的网络请求会被强制路由经过沙盒。这通常是为了安全隔离,确保钩子发出的出站网络请求受到沙盒防火墙的严格限制
出于安全考虑,如果你需要在 URL 中使用环境变量插值(例如 ${WEBHOOK_URL}),不能随意引用,而是必须在配置中显式声明一个 allowedEnvVars(允许的环境变量)列表。只有在这个白名单列表中的环境变量才会被允许注入到 URL 中,这能有效防止敏感信息泄露或恶意变量注入
{
  "hooks": {
    "PostToolUse": [{
      "type": "http",
      "url": "https://my-webhook.example.com/hook",
      "matcher": "Write"
    }]
  }
}
"type": "http"–确定是一个http 钩子- “url” – the webhook endpoint URL
- 启用沙盒后,路由将通过沙盒进行
- URL 中任何环境变量插值都需要显式指定 allowedEnvVars 列表
这里的 matcher 不是在 type 下面, 它们是同一级别(siblings,兄弟字段)
hooks
└── PostToolUse
    └── Hook对象
        ├── type
        ├── url
└── matcher- 触发以后,用什么方式执行? “type”: “http”表示发送 HTTP 请求
- matcher, 什么时候触发?匹配什么工具?
简化示例或者旧版本/不同配置格式里的写法,Claude Code Hooks 的标准结构里,matcher 通常属于 hook group(匹配器层),而不是具体执行 hook action 的层,所以matcher在hook里面还是在hook外面都是一样的
Claude Code
    │
    │ Claude执行 Write 工具
    ▼
PostToolUse 事件触发
    │
    │ POST JSON
    ▼
https://my-webhook.example.com/hook
    │
    │ 返回 JSON
    ▼
Claude Code- 调用公司内部 API
- 调用 Web 服务
- 发送通知
- 触发自动化平台
- 记录审计日志
- 把 Claude Code 事件发送到自己的 AI Agent 后端
- Prompt Hooks
LLM 评估提示,其中钩子内容是 Claude 评估的提示。主要用于 Stop 和 SubagentStop 事件,以实现智能任务完成检查
Hook 本身不是执行 shell 命令,而是给 Claude 一个评估提示词(prompt)
{
  "type": "prompt",
  "prompt": "Evaluate if Claude completed all requested tasks.",
  "timeout": 30
}- MCP Tool Hooks
mcp_tool 类型直接调用已配置的 MCP 工具;配置引用的是 MCP 服务器和工具名称,而不是 shell 命令或 URL。当验证或响应逻辑已存在于您配置的 MCP 服务器中时,此功能非常有用。
{
  "matcher": "Edit",
  "hooks": [{
    "type": "mcp_tool",
    "server": "my-mcp-server",
    "tool": "validate_edit"
  }]
}- “type”: “mcp_tool” – 将其标识为 MCP 工具钩子
- server MCP 务器的名称
- “tool”——该服务器上要调用的工具名称
- Agent Hook
基于子代理的验证钩子会生成一个专用代理来评估条件或执行复杂的检查。与提示钩子(单轮 LLM 评估)不同,代理钩子可以使用工具并执行多步骤推理
{
  "type": "agent",
  "prompt": "Verify the code changes follow our architecture guidelines. Check the relevant design docs and compare.",
  "timeout": 120
}- “type”: “agent” – identifies this as an agent hook
- “prompt” – the task description for the subagent
- 代理可以使用工具(例如 Read、Grep、Bash 等)来执行评估
- 返回类似于提示钩子的结构化决策
8.3 Hook 事件
Claude Code 提供了 31 种可以被 Hook 监听的事件
| 事件(Event) | 触发时机(When Triggered) | Matcher 输入 | 是否可阻断(Can Block) | 常见用途(Common Use) |
|---|---|---|---|---|
| SessionStart(会话开始) | 会话开始、恢复、清空上下文、压缩上下文、fork 会话时 | startup / resume / clear / compact / fork |
否 | 环境初始化、加载上下文、准备工作环境 |
| Setup(初始化设置) | 每个会话首次环境初始化时(一次性) | 无 | 否 | 安装依赖、配置工具、准备运行环境 |
| InstructionsLoaded(指令加载) | CLAUDE.md 或规则文件加载后 |
无 | 否 | 修改、过滤、扩展 AI 指令 |
| UserPromptSubmit(用户提交提示) | 用户输入 Prompt 后 | 无 | 是 | Prompt 校验、修改用户请求 |
| UserPromptExpansion(用户提示展开) | 用户 Prompt 展开后(如 @ 引用、Slash Command 解析完成) |
无 | 是 | 检查或转换展开后的 Prompt |
| PreToolUse(工具调用前) | Claude 执行工具之前 | 工具名称 | 是(允许/拒绝/询问) | 工具调用安全检查、修改参数 |
| PermissionRequest(权限请求) | 出现权限确认窗口时 | 工具名称 | 是 | 自动批准或拒绝权限 |
| PermissionDenied(权限拒绝) | 用户拒绝权限请求后 | 工具名称 | 否 | 日志记录、策略分析、权限管理 |
| PostToolUse(工具调用后) | 工具成功执行完成后 | 工具名称 | 否 | 添加上下文、反馈、记录结果 |
| PostToolUseFailure(工具失败后) | 工具执行失败后 | 工具名称 | 否 | 错误处理、失败日志记录 |
| PostToolBatch(批量工具完成后) | 一批工具调用全部完成后 | 无 | 否 | 汇总报告、批量检查 |
| Notification(通知事件) | Claude 发送通知时 | 通知类型 | 否 | 自定义提醒、消息推送 |
| MessageDisplay(消息显示) | Claude 输出消息展示过程中 | 无 | 否 | 修改或隐藏展示内容 |
| SubagentStart(子 Agent 启动) | 子 Agent 创建时 | Agent 类型名称 | 否 | 子 Agent 初始化 |
| SubagentStop(子 Agent 停止) | 子 Agent 完成任务时 | Agent 类型名称 | 是 | 子 Agent 结果验证 |
| Stop(停止响应) | Claude 完成回答准备停止时 | 无 | 是 | 检查任务是否真正完成 |
| StopFailure(停止失败) | API 错误导致回合结束时 | 无 | 否 | 错误恢复、错误记录 |
| TeammateIdle(团队成员空闲) | Agent Team 中成员进入空闲状态 | 无 | 是 | 多 Agent 协调 |
| TaskCompleted(任务完成) | Task 被标记完成时 | 无 | 是 | 完成后的自动操作 |
| TaskCreated(任务创建) | 通过 TaskCreate 创建任务时 |
无 | 否 | 任务跟踪、日志记录 |
| ConfigChange(配置变化) | 配置文件发生变化时 | 无 | 是(策略配置除外) | 响应配置更新 |
| CwdChanged(工作目录变化) | 当前工作目录改变时 | 无 | 否 | 根据目录切换环境配置 |
| DirectoryAdded(目录添加) | 通过 /add-dir 或 SDK 添加新工作目录时 |
无 | 否 | 为新目录初始化工具 |
| FileChanged(文件变化) | 被监控文件发生变化时 | 无 | 否 | 文件监控、自动构建 |
| PreCompact(上下文压缩前) | 上下文压缩开始前 | manual / auto |
否 | 压缩前保存状态、整理信息 |
| PostCompact(上下文压缩后) | 上下文压缩完成后 | 无 | 否 | 压缩后恢复状态 |
| WorktreeCreate(创建工作树) | Git worktree 创建时 | 无 | 是(可返回路径) | 初始化工作树环境 |
| WorktreeRemove(删除工作树) | Git worktree 删除时 | 无 | 否 | 清理工作环境 |
| Elicitation(MCP 请求输入) | MCP Server 请求用户输入时 | 无 | 是 | 输入校验、控制用户交互 |
| ElicitationResult(MCP 输入结果) | 用户完成 MCP 输入后 | 无 | 是 | 处理用户反馈结果 |
| SessionEnd(会话结束) | Claude 会话终止时 | 无 | 否 | 保存状态、清理资源、生成总结 |
新增事件
| 事件 | 触发时机 | matcher 值 |
主要用途 |
|---|---|---|---|
PreModelSwitch |
Claude Code 准备切换模型、但还没有真正切换之前 | 目标模型的规范名称,即 to_model |
检查、允许或阻止模型切换 |
PostModelSwitch |
模型已经切换完成之后 | 已切换到的模型名称,即 to_model |
记录、通知或执行切换后的操作 |
Claude Code 不同类型的 Hook,返回结果的 JSON 字段确实可能不一样
决策字段(decision):这些字段具体控制什么行为,例如允许操作、阻止操作,或者要求 Claude 继续处理
| Hook 类型 / 事件 | 关键返回字段 | 核心作用 |
|---|---|---|
PreToolUse |
permissionDecision |
允许、拒绝或要求确认工具调用 |
PermissionRequest |
decision.behavior |
响应权限申请,允许或拒绝操作 |
PostToolUse |
decision |
阻止后续处理,并向 Claude 提供反馈 |
Stop |
decision |
控制 Claude 是否可以结束当前轮次 |
prompt Hook |
ok |
根据模型评估结果判断是否通过 |
agent Hook |
ok |
根据子 Agent 的检查结果判断是否通过 |
- PreToolUse
在 Claude 生成工具参数之后、工具真正执行之前运行。可以用它来验证或修改工具输入参数。
{
  "hooks": {
    "PreToolUse": [
      {
        "matcher": "Bash",
        "hooks": [
          {
            "type": "command",
            "command": "$CLAUDE_PROJECT_DIR/.claude/hooks/validate-bash.py"
          }
        ]
      }
    ]
  }
}
例如:在 Claude 即将执行 Bash 命令之前,先运行一个自定义 Python 检查脚本,决定这个 Bash 命令是否安全
常见的匹配matcher工具:
| Matcher | 对应工具 | 作用 |
|---|---|---|
Task |
Task 工具 | 创建/管理任务 |
Bash |
Bash 工具 | 执行命令行 |
Glob |
Glob 工具 | 文件路径匹配 |
Grep |
Grep 工具 | 搜索文件内容 |
Read |
Read 工具 | 读取文件 |
Edit |
Edit 工具 | 修改文件 |
Write |
Write 工具 | 创建文件 |
WebFetch |
WebFetch 工具 | 获取网页 |
WebSearch |
WebSearch 工具 | 搜索网络 |
permissionDecision 是 Claude Code Hook 返回给系统的“权限决策指令”.它告诉 Claude Code:这个工具调用应该直接执行、阻止、询问用户,还是暂时挂起。
Claude 想调用工具
        |
        ↓
生成工具参数
        |
        ↓
PreToolUse Hook
        |
        ↓
你的脚本返回 permissionDecision
        |
        ↓
Claude Code 根据结果决定
        |
        ↓
执行 / 拒绝 / 询问
permissionDecision 值 |
中文含义 | Claude Code 行为 | 使用场景 | 示例 |
|---|---|---|---|---|
"allow" |
允许 | 跳过权限确认,直接执行工具调用(部分必须用户交互的工具除外) | 自动化执行可信操作 | 允许运行 python analysis.py、读取文件、执行测试 |
"deny" |
拒绝 | 阻止工具调用,不执行 | 禁止危险操作、保护资源 | 阻止 rm -rf data/、禁止修改原始数据 |
"ask" |
询问 | 弹出确认窗口,让用户决定是否执行 | 中等风险操作,需要人工确认 | 执行 git push、删除文件、修改重要配置前询问 |
"defer" |
延迟 | 当前工具调用暂时退出,之后可以恢复处理 | 等待外部条件、暂缓执行 | 等待审批、等待资源、等待用户输入 |
- permissionDecisionReason:决策解释。对于“允许”和“询问”操作,此解释会显示给用户(而非 Claude);对于“拒绝”操作,此解释会显示给 Claude;对于“延迟”操作,此解释会被忽略
- 已更新的输入:修改了工具输入参数
{
  "hookSpecificOutput": {
    "hookEventName": "PreToolUse",
    "permissionDecision": "deny",
    "permissionDecisionReason": "禁止执行此命令"
  }
}- PostToolUse
工具运行完毕后立即运行。用于验证、记录日志或向 Claude 提供上下文信息,工具执行后,反馈检查结果
{
  "hooks": {
    "PostToolUse": [
      {
        "matcher": "Write|Edit",
        "hooks": [
          {
            "type": "command",
            "command": "$CLAUDE_PROJECT_DIR/.claude/hooks/security-scan.py",
            "continueOnBlock": true
          }
        ]
      }
    ]
  }
}| 字段 | 含义 | 作用 |
|---|---|---|
"decision": "block" |
阻止当前结果继续 | 告诉 Claude:刚才工具执行结果有问题,需要处理 |
additionalContext |
附加上下文 | 给 Claude 添加额外信息,帮助它下一步行动 |
在钩子上设置“continueOnBlock”: true,以便将拒绝结果作为 tool_result 呈现给 Claude,这样模型就可以读取反馈并重试或调整。
新增continueOnBlock:被阻止后,是否让 Claude 继续尝试
- UserPromptSubmit
在用户提交提示时运行,在 Claude 处理提示之前运行
它发生在用户输入 Prompt 后、Claude 开始思考之前, 用户给 Claude 的请求是否需要检查、修改、补充
{
  "hooks": {
    "UserPromptSubmit": [
      {
        "hooks": [
          {
            "type": "command",
            "command": "$CLAUDE_PROJECT_DIR/.claude/hooks/validate-prompt.py"
          }
        ]
      }
    ]
  }
}
常规的流程就变成了
- decision: “block” to prevent processing
- reason: Explanation if blocked
- additionalContext: Context added to prompt
- Stop and SubagentStop
当 Claude 完成响应(Stop)或子代理完成任务(SubagentStop)时运行。支持基于提示的评估,以实现智能任务完成检查。
附加输入字段:Stop 和 SubagentStop 钩子函数的 JSON 输入中都会包含一个 last_assistant_message 字段,其中包含 Claude 或子代理在停止前发送的最后一条消息。这有助于评估任务完成情况
当Claude准备结束时,就会触发Stop Hook, 此时hook可以检查
- 是否真的完成了用户要求
- 是否运行过测试
- 是否还有未解决的错误
- 是否修改了预期文件
{
  "hooks": {
    "Stop": [
      {
        "hooks": [
          {
            "type": "prompt",
            "prompt": "Evaluate if Claude completed all requested tasks.",
            "timeout": 30
          }
        ]
      }
    ]
  }
}
完成之后,这两个Hook都会受到
Claude Code 为 Stop Hook 增加了连续阻止次数上限,防止 Hook 出现死循环,让会话永远无法结束。
{
  "last_assistant_message": "我已经完成代码修改,所有测试通过。"
}
Claude 或子代理在停止之前,最后输出给用户或主代理的那段文字.Stop 和 SubagentStop Hook 现在可以通过 hookSpecificOutput.additionalContext 给 Claude 补充反馈,让 Claude 继续当前任务,而且不会显示类似错误的阻止提示。
如果Stop Hook判断任务没有完成,可以返回类似:
{
  "hookSpecificOutput": {
    "hookEventName": "Stop",
    "additionalContext": "Reminder: run the test suite before declaring done."
  }
}- SubagentStart
当子代理开始执行时运行。匹配器输入是代理类型名称,允许钩子函数针对特定的子代理类型。
当一个 Subagent 开始执行时触发。matcher 匹配的是 Agent 类型名称,因此可以让 Hook 只针对特定类型的 Subagent 生效。
{
  "hooks": {
    "SubagentStart": [
      {
        "matcher": "code-review",
        "hooks": [
          {
            "type": "command",
            "command": "$CLAUDE_PROJECT_DIR/.claude/hooks/subagent-init.sh"
          }
        ]
      }
    ]
  }
}- SessionStart
会话启动或恢复时运行。可以保存环境变量。
Matchers: startup, resume, clear, compact, fork
CLAUDE_ENV_FILE:让 Hook 设置的环境变量持续存在
SessionStart Hook
       │
       │
       ▼
CLAUDE_ENV_FILE
       │
       ├── export NODE_ENV=development
       ├── export PROJECT_ENV=test
       └── ...
       │
       ▼
后续 Claude Code 环境
       │
       ├── Bash
       ├── 后续 Hook
       └── 其他相关进程
Claude Code 提供给 Hook 的一个“环境变量持久化文件”,这样 Claude Code 后续执行相关命令时,就可以继续使用这个环境变量
- reloadSkills: true:Hook 安装 Skill 后立即让 Claude 重新扫描
- SessionEnd
会话结束时运行,用于执行清理或最终日志记录。无法阻止会话终止。
- clear - User cleared the session
- logout - User logged out
- prompt_input_exit - User exited via prompt input
- other - Other reason
- Notification Event
Claude Code 产生不同类型的“通知事件”时,Notification Hook 可以通过 matcher 判断是哪一种通知,然后只对特定通知执行 Hook。
- permission_prompt - Permission request notification
- idle_prompt - Idle state notification
- auth_success - Authentication success
- elicitation_dialog - Dialog shown to user
- agent_needs_input - Background agent needs input (v2.1.198)
- agent_completed - Background agent finished (v2.1.198)
| Matcher | 含义 | 典型场景 |
|---|---|---|
permission_prompt |
权限请求通知 | Claude 要求你批准某个操作 |
idle_prompt |
空闲状态通知 | Claude 暂时没有继续执行 |
auth_success |
认证成功通知 | 登录 / 身份认证成功 |
elicitation_dialog |
用户交互对话框出现 | Claude Code 弹出需要用户输入的对话框 |
agent_needs_input |
后台 Agent 需要用户输入 | 后台 Agent 卡住,需要你回答问题 |
agent_completed |
后台 Agent 完成 | 后台 Agent 已经执行结束 |
{
  "hooks": {
    "Notification": [
      {
        "matcher": "agent_completed",
        "hooks": [
          {
            "type": "command",
            "command": "./notify.sh"
          }
        ]
      }
    ]
  }
}
8.4 Component-Scoped Hooks
Hook 可以附加到特定组件(技能、代理、命令)的 frontmatter 中
- In SKILL.md, agent.md, or command.md:
---
name: secure-operations
description: Perform operations with security checks
hooks:
  PreToolUse:
    - matcher: "Bash"
      hooks:
        - type: command
          command: "./scripts/check.sh"
          once: true  # Only run once per session
---
支持的hooks类型:Supported events for component hooks: PreToolUse, PostToolUse, Stop
- Hooks in Subagent Frontmatter
当在子代理的 frontmatter 中定义停止钩子时,它会自动转换为作用域限定于该子代理的 SubagentStop 钩子。这确保停止钩子仅在特定子代理完成时触发,而不是在主会话停止时触发。
---
name: code-review-agent
description: Automated code review subagent
hooks:
  Stop:
    - hooks:
        - type: prompt
          prompt: "Verify the code review is thorough and complete."
  # The above Stop hook auto-converts to SubagentStop for this subagent
---
PermissionRequest = Claude 想执行一个需要权限的操作时,Hook 可以替你决定“允许还是拒绝”。可以把它理解成一个自动权限审批器
8.4 Hook输入和输出
可以把 Hook 想成一个被 Claude Code 临时启动的小程序
                  Claude Code
                      │
                      │ JSON Input
                      │ stdin
                      ▼
                ┌─────────────┐
                │    Hook     │
                │             │
                │ 读取事件    │
                │ 检查条件    │
                │ 执行逻辑    │
                └─────────────┘
                   │    │    │
          ┌────────┘    │    └─────────┐
          ▼             ▼              ▼
       stdout        exit code    terminalSequence
          │             │              │
          ▼             ▼              ▼
      JSON结果       成功/错误       终端控制
          │
          ▼
     Claude Code
          │
    ┌─────┴──────────┐
    ▼                ▼
允许/拒绝         修改上下文/
工具调用          Tool Output
所有的hook搜到的input JSON都是标准的输入
Claude Code
    │
    │ ① 把事件信息通过 stdin 交给 Hook
    ▼
┌──────────────┐
│     Hook     │
│ shell/python │
└──────────────┘
    │
    │ ② Hook 处理
    │
    │ ③ 通过 stdout 返回 JSON
    ▼
Claude Code- Input
{
  "session_id": "abc123",
  "transcript_path": "/path/to/transcript.jsonl",
  "cwd": "/current/working/directory",
  "permission_mode": "default",
  "hook_event_name": "PreToolUse",
  "tool_name": "Write",
  "tool_input": {
    "file_path": "/path/to/file.js",
    "content": "..."
  },
  "tool_use_id": "toolu_01ABC123...",
  "agent_id": "agent-abc123",
  "agent_type": "main",
  "worktree": "/path/to/worktree",
  "effort": { "level": "medium" }
}| 字段 | 描述 |
|---|---|
session_id |
唯一的会话标识符 |
transcript_path |
当前会话对话记录(transcript)文件的路径 |
cwd |
当前工作目录(Current Working Directory) |
prompt_id |
当前正在处理的 Prompt 的 UUID,可与 OpenTelemetry 中的 prompt.id 属性对应(v2.1.196+) |
hook_event_name |
触发当前 Hook 的事件名称 |
agent_id |
执行当前 Hook 的 Agent 标识符 |
agent_type |
Agent 类型,例如 "main" 表示主 Agent,也可以是具体的子 Agent 类型名称 |
worktree |
Git Worktree 的路径;如果 Agent 运行在 Worktree 中,则提供该路径 |
effort.level |
当前 Agent 的工作强度级别(v2.1.133+),可选值:low、medium、high、xhigh、max |
- Output
Claude 准备用某个工具之前,Hook 最后有机会检查、批准、拒绝,甚至修改这次工具调用。
{
  "continue": true,
  "stopReason": "Optional message if stopping",
  "suppressOutput": false,
  "systemMessage": "Optional warning message",
  "hookSpecificOutput": {
    "hookEventName": "PreToolUse",
    "permissionDecision": "allow",
    "permissionDecisionReason": "File is in allowed directory",
    "updatedInput": {
      "file_path": "/modified/path.js"
    }
  }
}| 字段 | 作用 |
|---|---|
continue |
Hook 执行后是否继续当前流程 |
stopReason |
如果停止流程,用于说明停止原因 |
suppressOutput |
是否隐藏 Hook 输出 |
systemMessage |
给 Claude 的额外系统级提醒或警告 |
hookSpecificOutput |
PreToolUse 专用返回内容 |
hookEventName |
当前 Hook 事件名称,这里为 PreToolUse |
permissionDecision |
对 Tool 调用进行权限决策 |
permissionDecisionReason |
说明为什么允许或拒绝 |
updatedInput |
修改 Claude 原本准备传给 Tool 的参数 |
Claude Code Hook是新增或者调整了几个能力
| 功能 | Hook | 作用 | 最直观的理解 |
|---|---|---|---|
updatedToolOutput |
PostToolUse |
修改 Tool 执行结果后再交给 Claude | “Tool 做完了,但我先改一下返回结果。” |
retry |
PermissionDenied |
告诉模型被拒绝后可以重新尝试 | “这次没成功,你可以再试。” |
permissionDecision |
PreToolUse |
新版权限控制方式 | “这个 Tool 到底允不允许执行?” |
terminalSequence |
所有支持 Hook | 向终端发送原始控制序列 | “Hook 可以直接让终端响铃/通知。” |
Hook
 │
 ├── stdout → “我要告诉 Claude Code 什么”
 │
└── exit code → “Hook 自己执行是否正常”- Exit Code
和JSON output是两套不同的信号
Hook 执行结束时,不仅有 stdout,还会有一个 exit code
| 退出码 | 含义 | 行为 |
|---|---|---|
| 0 | 执行成功 | 继续执行,并解析 stdout 中的 JSON |
| 2 | 阻塞错误 | 阻止操作,并将 stderr 显示为错误 |
| 其他 | 非阻塞错误 | 继续执行,stderr 仅在详细模式下显示 |
- terminalSequence
通过在 JSON 输出中设置 terminalSequence,钩子程序可以发出原始的 OSC(操作系统命令)转义序列。当钩子程序返回时,主机会将该序列写入其控制终端——这对于桌面通知、窗口标题更新和终端提示音非常有用,而无需您自己的 TTY。
让 Claude Code 的宿主终端直接收到终端控制序列。
Hook
 ↓
terminalSequence
 ↓
Terminal
 ├── 桌面通知
 ├── 修改窗口标题
 └── terminal bell
8.5 环境变量
| Variable | Availability | Description |
|---|---|---|
CLAUDE_PROJECT_DIR |
All hooks | 项目根目录的绝对路径 |
CLAUDE_ENV_FILE |
SessionStart、CwdChanged、FileChanged |
用于持久化环境变量的文件路径 |
CLAUDE_CODE_REMOTE |
All hooks | 如果运行在远程环境中,则为 "true" |
${CLAUDE_PLUGIN_ROOT} |
Plugin hooks | Plugin 目录的路径 |
${CLAUDE_PLUGIN_DATA} |
Plugin hooks | Plugin 数据目录的路径 |
CLAUDE_CODE_SESSIONEND_HOOKS_TIMEOUT_MS |
SessionEnd hooks |
SessionEnd Hook 的可配置超时时间,单位为毫秒;可覆盖默认超时时间 |
CLAUDE_CODE_SESSION_ID |
Bash tool subprocesses(v2.1.132+) | 当前 Session 的 UUID,与 Hook 输入 JSON 中的 session_id 字段一致,可用于关联 Bash 日志和 Hook telemetry |
CLAUDE_EFFORT |
Bash tool subprocesses(v2.1.133+) | 当前 Agent 的工作强度级别:low / medium / high / xhigh / max;与 Hook 输入 JSON 中的 effort.level 对应 |
CLAUDE_CODE_STOP_HOOK_BLOCK_CAP |
Process-wide(v2.1.143+) | Stop Hook 连续阻止任务结束的最大次数,默认 8;设置为 0 可关闭该限制 |
8.6 例子
- Bash Command Validator (PreToolUse)
文件放在 .claude/hooks/validate-bash.py
文件代码
#!/usr/bin/env python3
import json
import sys
import re

BLOCKED_PATTERNS = [
    (r"\brm\s+-rf\s+/", "Blocking dangerous rm -rf / command"),
    (r"\bsudo\s+rm", "Blocking sudo rm command"),
]

def main():
    input_data = json.load(sys.stdin)

    tool_name = input_data.get("tool_name", "")
    if tool_name != "Bash":
        sys.exit(0)

    command = input_data.get("tool_input", {}).get("command", "")

    for pattern, message in BLOCKED_PATTERNS:
        if re.search(pattern, command):
            print(message, file=sys.stderr)
            sys.exit(2)  # Exit 2 = blocking error

    sys.exit(0)

if __name__ == "__main__":
main()- Security Scanner (PostToolUse)
文件位置.claude/hooks/security-scan.py 用于tool使用后的扫描是否安全
- Auto-Format Code (PostToolUse)
用于tool使用之后自动格式化code
- Prompt Validator (UserPromptSubmit)
用于prompt输入的验证
- Intelligent Stop Hook (Prompt-Based)
Claude 准备结束任务时,再让一个 Prompt Hook 自动检查一遍:到底是不是真的完成了
{
  "hooks": {
    "Stop": [
      {
        "hooks": [
          {
            "type": "prompt",
            "prompt": "Review if Claude completed all requested tasks. Check: 1) Were all files created/modified? 2) Were there unresolved errors? If incomplete, explain what's missing.",
            "timeout": 30
          }
        ]
      }
    ]
  }
}- 种子自动模式权限(一次性设置脚本)
8.7 Plugin Hooks
插件可以在其 hooks/hooks.json 文件中包含钩子:
文件位于plugins/hooks/hooks.json中
{
  "hooks": {
    "PreToolUse": [
      {
        "matcher": "Bash",
        "hooks": [
          {
            "type": "command",
            "command": "${CLAUDE_PLUGIN_ROOT}/scripts/validate.sh"
          }
        ]
      }
    ]
  }
}${CLAUDE_PLUGIN_ROOT}: 插件目录路径${CLAUDE_PLUGIN_DATA}: 插件数据目录的路径
9. Plugins
Claude Code 插件是将自定义功能(斜杠命令、子代理、MCP 服务器和钩子)打包在一起的集合,只需一条命令即可安装。它们代表了最高级别的扩展机制——将多个功能组合成一个统一且可共享的软件包.
上文学的Skills, MCP, Hooks, Agents, Command其实 Plugin 正好是把这些东西打包成一个产品的那一层
| 类型(Type) | 作用范围(Scope) | 共享对象(Shared) | 权威来源(Authority) | 示例(Examples) |
|---|---|---|---|---|
| 官方(Official) | 全局(Global) | 所有用户 | Anthropic | PR Review、安全指导 |
| 社区(Community) | 公开(Public) | 所有用户 | 社区 | DevOps、数据科学 |
| 组织(Organization) | 内部(Internal) | 团队成员 | 公司 | 内部规范、内部工具 |
| 个人(Personal) | 个人(Individual) | 单个用户 | 开发者本人 | 自定义工作流 |
9.1 Plugin定义结构
Plugin最核心的东西只有一个,就是.claude-plugin/plugin.json
Plugin 的身份证 + 配置文件
下面是最小的Plugin,虽然没有意义
my-plugin/
│
└── .claude-plugin/
    └── plugin.json
plugin.json是用来告诉claude code这个plugin是什么?名字是什么?版本是什么等等信息
{
  "name": "my-first-plugin",
  "description": "A greeting plugin",
  "version": "1.0.0",
  "author": {
    "name": "Your Name"
  },
  "homepage": "https://example.com",
  "repository": "https://github.com/user/repo",
  "license": "MIT"
}| 字段 | 类型 | 作用 | 简单理解 | 当前是否需要重点学习 |
|---|---|---|---|---|
name |
string | Plugin 的名称 | Plugin 叫什么 | ⭐⭐⭐⭐⭐ |
description |
string | Plugin 的功能描述 | 这个 Plugin 是干什么的 | ⭐⭐⭐⭐⭐ |
version |
string | Plugin 的版本号 | 当前是哪个版本 | ⭐⭐⭐⭐⭐ |
author |
object | 作者信息 | 谁开发的 | ⭐⭐⭐⭐ |
homepage |
string | Plugin 项目主页 | 去哪里看项目介绍/文档 | ⭐⭐⭐ |
repository |
string | 源代码仓库地址 | 去哪里看源码/提交 Issue | ⭐⭐⭐ |
license |
string | 开源许可证 | 允许别人怎么使用代码 | ⭐⭐⭐ |
workflows |
string / array | 指定 Workflow 文件或目录 | 定义完整的多步骤任务流程 | ⭐⭐⭐⭐ |
outputStyles |
string / array | 指定输出样式文件或目录 | 控制 Claude 最终如何组织输出 | ⭐⭐ |
lspServers |
string / array / object | 配置 LSP Server | 增强代码理解、跳转、诊断等能力 | ⭐⭐ |
channels |
array | 定义消息 Channel | 让 Telegram、Slack、Discord 等消息进入 Claude | ⭐ |
dependencies |
array | 声明其他 Plugin 依赖 | 我的 Plugin 还需要哪些 Plugin | ⭐⭐⭐ |
keywords |
array | Plugin 搜索关键词 | 方便 Marketplace 搜索和发现 | ⭐⭐⭐ |
metadata |
object | 自定义元数据 | 存放自己定义的额外信息 | ⭐⭐ |
experimental.themes |
string / array | 指定主题文件或目录 | 控制 Claude Code 的界面主题 | ⭐ |
experimental.monitors |
string / array | 配置后台 Monitor | Plugin 激活后自动运行后台监控任务 | ⭐⭐ |
9.2 Plugin的示例结构
my-plugin/
├── .claude-plugin/
│   └── plugin.json       # Manifest (name, description, version, author)
├── commands/             # Skills as Markdown files
│   ├── task-1.md
│   ├── task-2.md
│   └── workflows/
├── agents/               # Custom agent definitions
│   ├── specialist-1.md
│   ├── specialist-2.md
│   └── configs/
├── skills/               # Agent Skills with SKILL.md files
│   ├── skill-1.md
│   └── skill-2.md
├── hooks/                # Event handlers in hooks.json
│   └── hooks.json
├── .mcp.json             # MCP server configurations
├── .lsp.json             # LSP server configurations for code intelligence
├── bin/                  # Executables added to Bash tool's PATH while plugin is enabled
├── settings.json         # Default settings applied when plugin is enabled (currently only `agent` key supported)
├── themes/               # Optional: ship custom Claude Code themes (v2.1.118+)
├── templates/
│   └── issue-template.md
├── scripts/
│   ├── helper-1.sh
│   └── helper-2.py
├── docs/
│   ├── README.md
│   └── USAGE.md
└── tests/
└── plugin.test.js- LSP Server configuration
插件可以包含语言服务器协议 (LSP) 支持,以实现实时代码智能。LSP 服务器会在您工作时提供诊断信息、代码导航和符号信息。
.lsp.json位于插件根目录中的文件lspServers可以是一个字符串、数组或对象,用于指定要启用的 LSP 服务器。
lspServers= 告诉 Claude Code:这个 Plugin 要启用哪些 LSP(Language Server)。
String
下面这个是在plugin.json中的写法
{
  "name": "my-plugin",
  "lspServers": "./.lsp.json"
}
常见数组形式
Array
{
  "lspServers": [
    "./python.lsp.json",
    "./r.lsp.json"
  ]
}.lsp.json中该怎么写呢?其实本质上也是json输入性问津
{
  "python": {
    "command": "pyright-langserver",
    "args": ["--stdio"],
    "extensionToLanguage": {
      ".py": "python"
    }
  }
}command是启动哪个LSP,意思是LSP Server 的可执行程序叫什么?能够在extensionToLanguage—— 哪些文件交给它
| 字段 | 必填 | 说明 |
|---|---|---|
command |
是 | LSP Server 的可执行程序,必须能够在系统 PATH 中找到 |
extensionToLanguage |
是 | 将文件扩展名映射到对应的语言 ID,例如 .py → python |
args |
否 | 启动 LSP Server 时传入的命令行参数 |
transport |
否 | Claude Code 与 LSP Server 的通信方式,可选 stdio(默认)或 socket |
env |
否 | LSP Server 进程运行时使用的环境变量 |
initializationOptions |
否 | LSP 初始化时发送给 Server 的配置选项 |
settings |
否 | 传递给 LSP Server 的工作区(Workspace)配置 |
workspaceFolder |
否 | 覆盖默认的工作区目录路径 |
startupTimeout |
否 | 等待 LSP Server 启动的最长时间,单位为毫秒(ms) |
shutdownTimeout |
否 | 等待 LSP Server 正常关闭的最长时间,单位为毫秒(ms) |
restartOnCrash |
否 | LSP Server 崩溃后是否自动重新启动 |
maxRestarts |
否 | LSP Server 崩溃后允许的最大重启次数,超过后停止尝试 |
- bin/ 目录on PATH
启用插件后,其 bin/ 目录会被添加到会话的 PATH 环境变量中。该目录下的任何可执行文件都可以直接通过 Bash 工具按名称调用,无需提供完整路径。
# In a plugin layout:
my-plugin/
├── plugin.json
└── bin/
    └── my-tool          # executable file (chmod +x)

# Inside a Claude Code session with the plugin enabled:
$ my-tool --help
Plugin 自带一组“小型命令行工具”,插件启用后,这些工具自动进入 Claude Code 的 PATH,所以 Hook / Skill / Command 可以直接调用。
- 用户可配置参数
userConfig = Plugin 作者告诉 Claude Code:“我的这个 Plugin 有一些参数,需要让使用者自己填写或选择。”
{
  "name": "my-plugin",
  "version": "1.0.0",
  "userConfig": {
    "apiKey": {
      "description": "API key for the service",
      "sensitive": true
    },
    "region": {
      "description": "Deployment region",
      "default": "us-east-1"
    }
  }
}
插件可以通过 userConfig 在清单文件中声明用户可配置选项。标记为 sensitive: true 的值将存储在系统钥匙串中,而不是纯文本设置文件中
- Persistent Plugin Data (${CLAUDE_PLUGIN_DATA})
${CLAUDE_PLUGIN_DATA} = Plugin自己的“持久化数据目录”。也就是:Plugin 运行过程中产生的数据,可以放在这里,而且卸载 Plugin 之前一直保留。
{
  "hooks": {
    "PostToolUse": [
      {
        "command": "node ${CLAUDE_PLUGIN_DATA}/track-usage.js"
      }
    ]
  }
}
Claude Code 使用工具之后触发, 每次 Claude Code 执行某个工具之后,就运行 Plugin 数据目录里的 track-usage.js。
- Background Monitors
Plugins中的“后台监视器”
插件可以注册后台监控器,以便在会话开始或插件技能被调用时自动启用。在插件清单中添加一个顶级 monitors 键:
{
  "name": "my-plugin",
  "version": "1.0.0",
  "monitors": [
    {
      "command": "tail -f /var/log/app.log",
      "trigger": "session_start"
    }
  ]
}
当 Claude Code Session 开始时,自动启动
tail -f /var/log/app.log,持续监控这个日志文件;日志不断产生的新内容会作为事件提供给 Claude
- Inline Plugin via Settings (source: ‘settings’) (v2.1.80+)
这个 Marketplace 的定义来自当前 settings,而不是来自 GitHub、Git URL 或其他 Marketplace 来源。
source: "settings"= 不建立一个真正的 Marketplace 仓库,而是直接在 Claude Code 的 settings 配置里“声明一个 Marketplace”
{
  "pluginMarketplaces": [
    {
      "name": "inline-tools",
      "source": "settings",
      "plugins": [
        {
          "name": "quick-lint",
          "source": "./local-plugins/quick-lint"
        }
      ]
    }
  ]
}
然后在plugin.json中进行设定本地插件
Marketplace
└── source = settings
        ↓
    settings.json 里面定义
        ↓
Plugin
└── source = ./local-plugins/quick-lint
        ↓
本地插件目录| 概念 | 含义 |
|---|---|
source: "settings" |
Marketplace 定义直接来自 Settings |
source: "./local-plugins/xxx" |
Plugin 位于本地目录 |
source: "github" |
Plugin/Marketplace 从 GitHub 获取 |
source: ... |
本质都是在告诉 Claude Code:“东西在哪里?” |
大的价值其实是“开发插件”,修改代码之后继续测试
                    Claude Code
                         │
                 Plugin Marketplace
                         │
              ┌──────────┴──────────┐
              │                     │
        正式 Marketplace        settings 内联
              │                     │
       GitHub / Git URL             │
              │                     │
              └──────────┬──────────┘
                         ↓
                      Plugin
                         │
        ┌────────────────┼────────────────┐
        ↓                ↓                ↓
     skills           agents           commands
        │
        ↓
      bin/
        │
        ↓
   CLI helper
9.3 例子
- devops-automation
仓库地址[https://github.com/luongnv89/claude-howto/tree/main/07-plugins/devops-automation], 文件夹结构如下
devops-automation/
├── commands/
│   ├── deploy.md
│   ├── rollback.md
│   ├── status.md
│   └── incident.md
├── agents/
│   ├── deployment-specialist.md
│   ├── incident-commander.md
│   └── alert-analyzer.md
├── mcp/
│   ├── github-config.json
│   ├── kubernetes-config.json
│   └── prometheus-config.json
├── hooks/
│   ├── pre-deploy.js
│   ├── post-deploy.js
│   └── on-error.js
└── scripts/
    ├── deploy.sh
    ├── rollback.sh
└── health-check.sh.claude-plugin配置内容如下plugin.json
{
  "name": "devops-automation",
  "version": "1.0.0",
  "description": "Complete DevOps automation for deployment, monitoring, and incident response",
  "author": {
    "name": "Community"
  },
  "license": "MIT"
}
9.4 Plugin Marketplace
- 基础设置
官方由 Anthropic 管理的插件目录为 anthropics/claude-plugins-official,会在首次交互式启动时自动注册。企业管理员还可以创建私有插件市场,用于内部分发。
你第一次以交互方式启动 Claude Code 时,这个官方插件市场会自动注册到你的 Claude Code 中,不需要你手动添加
此外,还有一个名为 anthropics/claude-plugins-community 的社区市场,其中托管着通过 Anthropic 自动验证和安全筛选的第三方插件——每个插件都与目录中的特定提交 SHA 相关联。与官方市场不同的是,您需要手动添加插件:
/plugin marketplace add anthropics/claude-plugins-community

# Then install from it using the claude-community marketplace name
/plugin install <plugin-name>@claude-community- 权限限制
Marketplace Configuration 是给企业管理员控制“Claude Code 可以从哪些插件市场安装插件,以及哪些市场/插件被禁止”的
| 配置 | 作用 | 可以理解成 |
|---|---|---|
extraKnownMarketplaces |
额外添加 Marketplace | 允许/预置的市场 |
strictKnownMarketplaces |
限制用户可以添加哪些 Marketplace | Marketplace 白名单 |
blockedMarketplaces |
禁止某些 Marketplace | Marketplace 黑名单 |
deniedPlugins |
禁止安装特定 Plugin | Plugin 黑名单 |
在json中进行设置
{
  "extraKnownMarketplaces": [
    {
      "source": {
        "source": "github",
        "repo": "my-company/internal-plugins"
      }
    }
  ]
}
除了默认 Marketplace 之外,公司再告诉 Claude Code:“这个 Marketplace 也是我们认可/知道的。”
{
  "blockedMarketplaces": [
    {
      "hostPattern": "^evil\\.example\\.com$",
      "pathPattern": "^/marketplaces/.*"
    }
  ]
}- 匹配域名
- 匹配 URL 路径, 实现比较精细的 Marketplace 禁止规则
(2). 安全认证
私有 Marketplace 怎么安全认证?用一个命令动态生成 HTTP headers
(3). 实用功能
| 功能 | 意思 | 解决什么问题 |
|---|---|---|
| Marketplace search bar | /plugin 中可以搜索插件 |
插件太多时不用一个个翻 |
| Default git timeout | Git 下载超时从 30 秒提高到 120 秒 | 大型插件仓库下载更稳定 |
| Custom npm registries | 插件可以指定自己的 npm 镜像/仓库 | 解决依赖下载来源问题 |
| Version pinning | 锁定插件版本 | 保证环境可重复 |
| Projected context cost | 安装前显示插件预计占用多少上下文 Token | 提前判断插件是否“太重” |
- Marketplace definition schema
插件市场的定义如下:.claude-plugin/marketplace.json:
{
  "name": "my-team-plugins",
  "owner": "my-org",
  "plugins": [
    {
      "name": "code-standards",
      "source": "./plugins/code-standards",
      "description": "Enforce team coding standards",
      "version": "1.2.0",
      "author": "platform-team"
    },
    {
      "name": "deploy-helper",
      "source": {
        "source": "github",
        "repo": "my-org/deploy-helper",
        "ref": "v2.0.0"
      },
      "description": "Deployment automation workflows"
    }
  ]
}
Marketplace = 一个“插件商店目录”,这个文件就是在告诉 Claude Code:这个市场叫什么、谁维护、里面有哪些 Plugin,以及每个 Plugin 从哪里下载。
| 字段 | 必填? | 简单理解 |
|---|---|---|
name |
✅ | Marketplace 的名字 |
owner |
✅ | 谁维护这个 Marketplace |
plugins |
✅ | 这个市场里面有哪些 Plugin |
plugins[].name |
✅ | Plugin 的名字 |
plugins[].source |
✅ | Plugin 到哪里去找/下载 |
plugins[].description |
❌ | Plugin 简介 |
plugins[].version |
❌ | Plugin 版本 |
plugins[].author |
❌ | Plugin 作者 |
plugins[].renames |
❌ | Plugin 改名/删除后的迁移规则 |
plugins[].displayName |
❌ | UI 中显示的友好名称 |
plugins[].defaultEnabled |
❌ | 安装后默认是否启用 |
插件可以从多个位置获取:
| Source 类型 | 写法 | 作用 | 示例 |
|---|---|---|---|
| Relative path 相对路径 | "./plugins/my-plugin" |
从 Marketplace 仓库内部的相对路径加载 Plugin,适合多个 Plugin 放在同一个仓库中 | "./plugins/my-plugin" |
| GitHub | { "source": "github", "repo": "owner/repo" } |
从 GitHub 仓库获取 Plugin,可通过 ref 指定版本、分支或 Tag |
{ "source": "github", "repo": "acme/lint-plugin", "ref": "v1.0" } |
| Git URL | { "source": "url", "url": "..." } |
从任意 Git URL 获取 Plugin,适合 GitHub 以外的 Git 服务或公司内部 Git 仓库 | { "source": "url", "url": "https://git.internal/plugin.git" } |
| Git subdirectory | { "source": "git-subdir", "url": "...", "path": "..." } |
Plugin 位于一个 Git 仓库的子目录中,适合 Monorepo | { "source": "git-subdir", "url": "https://github.com/org/monorepo.git", "path": "packages/plugin" } |
| npm | { "source": "npm", "package": "..." } |
从 npm Registry 获取 Plugin,可以指定版本范围 | { "source": "npm", "package": "@acme/claude-plugin", "version": "^2.0" } |
| pip | { "source": "pip", "package": "..." } |
从 Python Package Index / Python 包源获取 Plugin,可以指定版本范围 | { "source": "pip", "package": "claude-data-plugin", "version": ">=1.0" } |
| Archive | { "source": "archive", "url": "..." } |
直接下载 ZIP 等归档文件作为 Plugin;v2.1.224+ 支持,可通过 sha256 校验完整性 |
{ "source": "archive", "url": "https://cdn.example.com/lint-plugin-1.2.0.zip", "sha256": "…" } |
| Command | { "source": "command", "command": "..." } |
执行一个命令,由命令动态解析/返回 Plugin 所在位置;v2.1.229+ 支持 | { "source": "command", "command": "acme-plugin-resolver --print-dir" } |
- Managing Marketplaces
# Marketplace CLI commands
claude plugin marketplace add <source>       # Add marketplace (GitHub, URL, local)
claude plugin marketplace update [name]      # Refresh catalog index
claude plugin marketplace remove <name>      # Remove marketplace
claude plugin marketplace list # List configured marketplaces- Plugin CLI Commands
claude plugin install <name>@<marketplace>   # Install from a marketplace
claude plugin uninstall <name>               # Remove a plugin
claude plugin update <name>                  # Update installed plugin to latest version
claude plugin list                           # List installed plugins
claude plugin enable <name>                  # Enable a disabled plugin
claude plugin disable <name>                 # Disable a plugin
claude plugin validate <path>                # Validate the plugin structure at <path>
claude plugin tag [path]                     # Create a {name}--v{version} release git tag (v2.1.118+)
claude plugin prune                          # Remove orphaned auto-installed plugin dependencies (v2.1.121+)
claude plugin uninstall <name> --prune       # Uninstall and cascade-clean orphaned dependencies (v2.1.121+)
claude plugin details <name>                 # Show inventory + projected per-turn token cost (v2.1.139+)
claude plugin init <name>                    # Scaffold a new plugin (alias: claude plugin new)
9.5 安装方法
- From Marketplace
/plugin install plugin-name
# or from CLI:
claude plugin install plugin-name@marketplace-name
在 v2.1.221 之前,在当前会话中,除非运行
/reload-plugins或重新启动,否则任何安装都不会生效,因此较早的指南将该步骤描述为无条件的
/plugin list             # all installed plugins
/plugin list --enabled   # only enabled plugins
/plugin list --disabled # only disabled plugins- 查看plugin details
claude plugin details plugin-name- 本地或者github安装
# CLI flag for local testing (repeatable for multiple plugins)
claude --plugin-dir ./path/to/plugin
claude --plugin-dir ./plugin-a --plugin-dir ./plugin-b

# --plugin-dir also accepts a .zip archive path (v2.1.128+)
claude --plugin-dir ./my-plugin.zip

# Fetch a plugin .zip archive from a URL for the current session (v2.1.129+, repeatable)
claude --plugin-url https://example.com/releases/my-plugin-0.3.0.zip- 查看能/不能使用的plugin
# Temporarily disable
/plugin disable plugin-name

# Re-enable
/plugin enable plugin-name
9.6 如何publishig a plugin
- 创建包含所有组件的 Plugin 结构
- 编写
.claude-plugin/plugin.json清单文件(manifest) - 创建
README.md文档,说明 Plugin 的使用方法 - 使用
claude --plugin-dir ./my-plugin在本地测试 - 使用
claude plugin tag ./my-plugin创建 Release 标签(v2.1.118+)——该命令接收 Plugin 的路径,并根据plugin.json中的信息创建{name}--v{version}格式的 Git tag - 提交到 Plugin Marketplace
- 接受审核并获得批准
- 发布到 Marketplace
- 用户即可通过一条命令安装
开发 Plugin → 本地测试 → 打版本 Tag → 提交 Marketplace → 审核 → 发布 → 用户安装
- 创建 Plugin 结构和所有组件
首先创建 Plugin 的目录结构,把需要的 Skills、Agents、Commands、Hooks、Scripts 等组件放进去
oecd497-agent/
├── .claude-plugin/
│   └── plugin.json
│
├── agents/
│   └── oecd497-assessor.md
│
├── skills/
│   ├── oecd497-assessment/
│   │   └── SKILL.md
│   ├── dpra/
│   │   └── SKILL.md
│   └── h-clat/
│       └── SKILL.md
│
├── commands/
│   └── assess.md
│
├── references/
│   ├── oecd497.md
│   └── ilc.md
│
├── bin/
│   └── calculate-pod
│
└── README.md
这个plugin到底由哪些能力组成
- 编写.claude-plugin/plugin.json
{
  "name": "oecd497-agent",
  "version": "1.0.0",
  "description": "An agent for OECD 497 skin sensitisation assessment",
  "author": {
    "name": "Your Name"
  },
  "license": "MIT"
}
创建README.md
本地测试
claude --plugin-dir ./oecd497-agent 启动Claude Code并临时加载当前这个plugin
- Agent 能不能正常调用
- Skill 有没有被发现
- bin/ 中的脚本能不能执行
- Plugin 是否存在路径/配置错误
用于本地开发测试,local development
- 创建Release Tag
claude plugin tag ./oecd497-agent Claude Code会根据name+version创建一个git tag
plugin.json

name = oecd497-agent
version = 1.0.0
          │
          ▼
claude plugin tag
          │
          ▼
Git tag
oecd497-agent--v1.0.0- 提交到Plugin Marketplace
把 Plugin 提交给 Marketplace.
其实本质就是写一个marketplace.json文件
{
  "name": "bio-ai-marketplace",
  "owner": {
    "name": "Your Name"
  },
  "plugins": [
    {
      "name": "oecd497-agent",
      "source": "./plugins/oecd497-agent",
      "description": "OECD 497 skin sensitisation assessment agent",
      "version": "1.0.0"
    }
  ]
}- 用户安装
# 添加marketplace
claude plugin marketplace add yourname/bio-ai-marketplace

# 2. 安装 Plugin
claude plugin install oecd497-agent@bio-ai-marketplace
或者在claude code中进行添加
# add
/plugin marketplace add yourname/bio-ai-marketplace

# install
/plugin install oecd497-agent@bio-ai-marketplace
10. Checkpoints
检查点功能允许您保存对话状态,并回溯到 Claude Code 会话中的先前节点。这对于探索不同的方法、从错误中恢复或比较替代解决方案都非常宝贵。
检查点功能允许您保存对话状态并回溯到之前的步骤,从而实现安全地试验和探索多种方法。它们是您对话状态的快照,包括
- 所有交流信息
- 文件修改
- 工具使用历史
- 会话上下文
在探索不同方法、从错误中恢复或比较替代解决方案时,检查点是非常宝贵的。
10.1 Accessing Checkpoints
你可以通过以下命令访问检查点:
- 使用键盘快捷键
按两次 Esc 键(Esc + Esc)打开检查点界面并浏览已保存的检查点。
- 使用/slash 命令
Use the /rewind command (alias: /checkpoint) for quick access:
# Open rewind interface
/rewind

# Or use the alias
/checkpoint- Rewind选项
再调用/rewind之后会出现多种选线
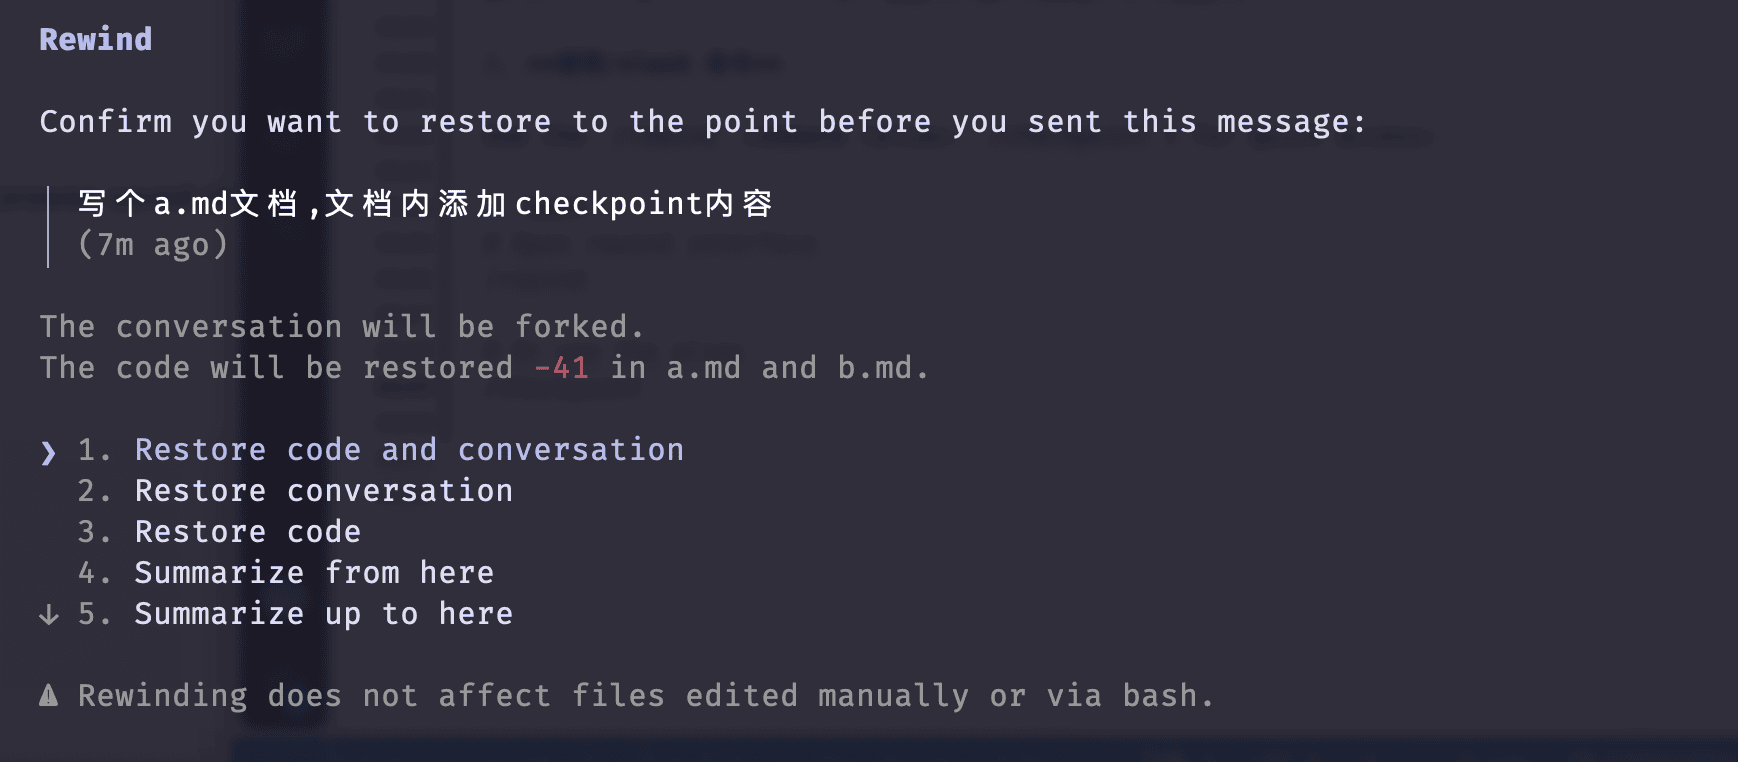
- 恢复代码和对话——将文件和消息都还原到该检查点。
- 恢复对话——仅回溯消息,保留您当前的代码
- 恢复代码——仅还原文件更改,保留完整的对话历史记录
- 从此处开始摘要——将对话从此处压缩成由 AI 生成的摘要,从而释放上下文窗口空间。所选点之前的消息将保持不变。磁盘上的文件不会被更改。原始消息将保留在会话记录中。您可以选择性地提供说明,以便摘要重点关注特定主题。
- 总结至此处——反向对应功能:将选定点之前的所有内容压缩成 AI 生成的摘要,同时保留从该点之后的消息。结合“从此处开始总结”功能,您可以对上下文窗口进行双向、定向的压缩。磁盘上的文件不会被更改,原始消息会保留在会话记录中。
- 算了——取消并返回当前状态
从 Claude Code v2.1.191 开始,
/clear不再是一个“不可回头”的边界。现在如果你在/clear之前已经产生了一个checkpoint,那么之后可以通过/rewind回到/clear之前的状态。
| 功能 | 作用 |
|---|---|
/clear |
清理当前对话上下文,开始一个更干净的对话 |
/rewind |
回到之前的 checkpoint,恢复之前的代码/状态 |
| Checkpoint | 为之后的 rewind 提供恢复节点 |
10.2 Automatic Checkpoints
Claude Code 会自动为您创建检查点:
- 每次用户输入——每次用户输入都会创建一个新的检查点
- 持久性 - 检查点在会话之间保持不变
- 自动清理 - 检查点会在 30 天后自动清理。
这意味着您可以随时回溯到对话中的任何先前时间点,从几分钟前到几天前。
| 场景 | 工作流程 | 中文说明 |
|---|---|---|
| 探索不同方案 | Save → Try A → Save → Rewind → Try B → Compare | 保存 → 尝试方案 A → 再保存 → 回退 → 尝试方案 B → 比较两种方案 |
| 安全重构 | Save → Refactor → Test → If fail: Rewind | 保存 → 执行代码重构 → 测试 → 如果失败则回退 |
| A/B 测试 | Save → Design A → Save → Rewind → Design B → Compare | 保存 → 设计方案 A → 再保存 → 回退 → 设计方案 B → 比较两种方案 |
| 错误恢复 | Notice issue → Rewind to last good state | 发现问题 → 回退到最近一次正常状态 |
10.3 设置
检查点是 Claude Code 的内置默认功能,无需任何配置即可启用。每次用户提示都会自动创建一个检查点。检查点行为由两个设置控制——是否拍摄快照以及快照的保存时间:
{
  "fileCheckpointingEnabled": true,
  "cleanupPeriodDays": 30
}- Bash 命令更改未被跟踪 - 文件系统上的 rm、mv、cp 等操作不会被记录到检查点中。
- 外部更改不会被追踪 - 在 Claude Code 之外(例如在您的编辑器、终端等处)所做的更改不会被记录。
- 它不能替代版本控制——使用 Git 来对代码库进行永久性、可审计的更改。
- 子代理编辑的内容不会被恢复 - 子代理编辑的文件不会被跟踪,因此 /rewind 命令会保留它们的原样;例外情况是前台上下文:fork 技能,其编辑内容会像主会话一样被恢复。
11. 高级功能
全面介绍 Claude Code 的高级功能,包括规划模式、扩展思考、自动模式、后台任务、权限模式、打印模式(非交互式)、会话管理、交互式功能、频道、语音听写、远程控制、Web 会话、桌面应用程序、任务列表、提示建议、git 工作树、沙盒、托管设置和配置。
- Planning Mode: 在编写代码之前,请先制定详细的实施计划。
- Extended Thinking: 对复杂问题进行深度推理
- Auto Mode: 背景安全分类器会在执行前审查每项操作。
- Permission Modes: 控制 Claude 可以执行的操作
- Print Mode: 以非交互方式运行 Claude 代码,用于自动化和 CI/CD(claude -p)
- Session Management:管理多个工作会话
- Interactive Features: 键盘快捷键、多行输入和命令历史记录
- Voice Dictation: 支持20种语言的对讲语音输入。
- Channels: MCP 服务器将消息推送至正在运行的会话(研究预览)
- Remote Control: 通过 Claude.ai 或 Claude 应用程序控制 Claude 代码
- Web Sessions: 在浏览器中运行 Claude Code,网址为 claude.ai/code
- Desktop App: 用于视觉差异分析和多会话的独立应用程序
- Task List: 跨上下文压缩的持续任务跟踪
- Prompt Suggestions: 基于上下文的智能命令建议
- Git Worktrees: 用于并行工作的隔离工作树分支
- Sandboxing: 操作系统级文件系统和网络隔离
- Managed Settings:通过 plist、注册表或托管文件进行企业部署
- Configuration: 使用 JSON 配置文件自定义行为
- Planing Mode
规划模式允许 Claude 在执行复杂任务之前仔细思考,从而创建一个详细的计划,供您审核和批准。
- 规划阶段:Claude分析任务并制定详细的实施计划
- 实施阶段:计划获批后,Claude开始执行该计划
plan模式主要用于
- 复杂的多文件重构
- 新功能实现
- 架构变更
- 数据库迁移
- 主要API重设计
有两种方式激活planning mode
# 在claude code中使用
/plan Implement user authentication system

# 在bash中使用,进入后直接plan模式
claude --permission-mode plan
在claude code中可以使用
Shift + Tab进行切换
- Extended Thinking
Extended Thinking中claude能够花更多时间思考复杂问题,然后再提出解决方案.
扩展性思维是一种深思熟虑、循序渐进的推理过程,claude
- 分解复杂问题
- 考虑多种方法
- 权衡利弊
- 通过极端情况来解释原因
Claude Code 的“Extended Thinking(扩展思考)”开关.macOS:
Option + T;Windows/Linux:Alt + T
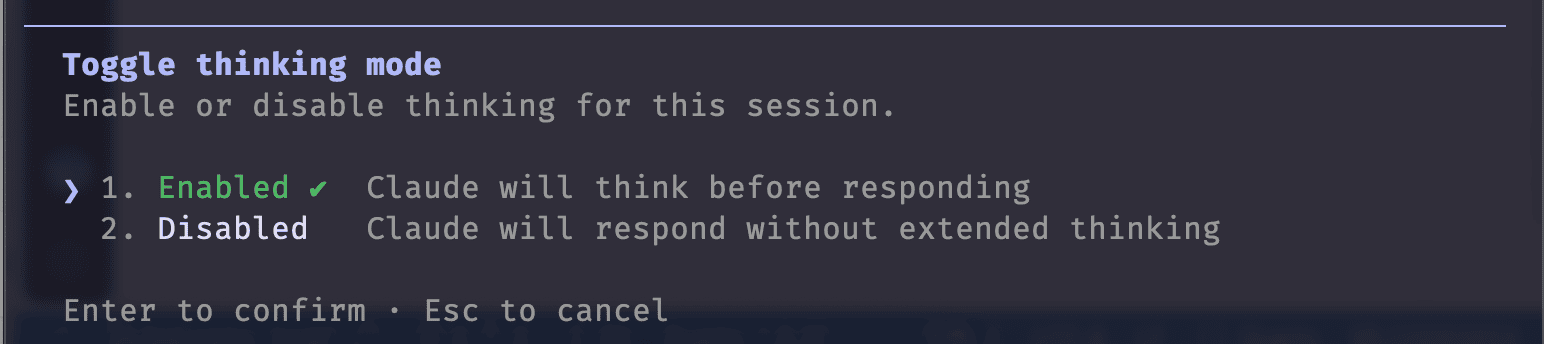
Claude Code在Extended Thinking/ Adaptive Reasoning 到底怎么分配“思考量”。可以把它理解成两个体系:
- 新模型:不是简单设置“多少 token”,而是设置 effort(思考力度)。
- 其他模型:直接给一个固定的 thinking token 上限。
low
 ↓
少思考一些,速度更快

medium
 ↓
中等思考

high
 ↓
更多思考

xhigh
 ↓
非常高的思考力度

max
 ↓
允许达到该模型支持的最高级别
每个模型都有自己的efort思考力度,不是简单的token数量
在claude code中使用/effort high 进行设定
Claude 在真正处理请求之前,可能有一个安全分类器先判断请求属于什么类别。
你的 Prompt
     ↓
Safety Classifier
     ↓
┌──────────────┐
│ 正常          │ → 正常使用当前模型
│ Cybersecurity │ → 可能触发模型切换
│ Biology       │ → 可能拒绝
└──────────────┘
安全分类器认为这个请求属于某个需要特殊处理的类别。
举个使用例子
User: ultrathink Should we use microservices or a monolith for our e-commerce platform?

Claude: Let me think through this architectural decision carefully...

<extended_thinking>
## Context Analysis
- Team size: 5 developers
- Expected traffic: 10k daily users initially
- Need to scale to 100k+ users
- Limited DevOps resources
- 6-month timeline to MVP- Auto Mode
自动模式是一种权限模式,它使用后台安全分类器在执行每个操作前进行审查。它允许 Claude 自主运行,同时阻止危险操作。所有套餐均提供此功能,但需要符合条件的型号.在团队版和企业版中,该功能默认开启——管理员可以在管理设置中为组织关闭该功能。
Auto Mode = “不用你逐条批,但有一个 AI 安全员在旁边逐条审”的权限模式
传统 Manual mode 里,每个危险操作(Bash 命令、网络请求)都要你手动点 Yes/No。Auto mode 把这个“审批人”换成了一个独立的 classifier model(后台安全分类器)——Claude 每次要执行动作前,先把这个动作发给它审一遍,判定安全才放行。
只有当您的帐户满足以下所有要求时,才能使用自动模式:
- Plan: all plans.
- 组织:在团队版和企业版中,自动模式默认启用。管理员可以通过在托管设置中将 permissions.disableAutoMode 设置为“disable”来关闭组织的自动模式。
- 分类器:会增加额外的令牌费用,但企业版套餐和 Claude API 账户除外,v2.1.278 及更高版本会在服务器端免费运行检查。
# Unlock auto mode with CLI flag (no longer required for Max subscribers on Opus 4.7 — access it directly)
claude --enable-auto-mode

# Then cycle to it with Shift+Tab in the REPL- 可以使用CLI命令直接启动,也可以在claude code中进行切换
用户/Agent 发起 Action
          │
          ▼
   1. Allow/Deny Rules
          │
          ▼
   2. Read-only / Edit 自动通过
          │
          ▼
   3. Background Classifier
          │
          ▼
   4. Fallback → 请求用户确认
Auto Mode 允许 Claude 自动执行很多任务,但对于可能造成不可逆损失、泄露信息、影响生产环境的操作,会默认阻止
不允许的操作
| Blocked Action | Example | 含义 | 风险 |
|---|---|---|---|
| Pipe-to-shell installs | curl \| bash |
从网络下载脚本并直接交给 Shell 执行 | 可能执行未知代码、安装恶意软件、修改系统 |
| Sending sensitive data externally | API keys, credentials over network | 将敏感信息发送到外部服务 | API Key、密码、Token、数据泄露 |
| Production deploys | Deploy commands targeting production | 执行面向生产环境的部署命令 | 可能影响真实用户和线上业务 |
| Mass deletion | rm -rf on large directories |
大规模递归强制删除文件或目录 | 数据不可恢复丢失、破坏系统 |
| IAM changes | Permission and role modifications | 修改身份、权限、角色配置 | 权限提升、访问控制失效、安全漏洞 |
| Force push to main | git push --force origin main |
强制覆盖远程 main 分支历史 | 覆盖团队代码、丢失提交记录 |
允许的操作
| Allowed Action | Example | 含义 | 为什么允许 |
|---|---|---|---|
| Local file operations | Read, write, edit project files | 本地文件读取、创建、修改 | 属于正常开发行为,可逆、风险较低 |
| Declared dependency installs | npm install, pip install from manifest |
安装项目声明的依赖 | 依赖来源明确,符合项目配置 |
| Read-only HTTP | curl for fetching documentation |
只读 HTTP 请求,例如下载文档 | 只获取信息,不修改外部系统 |
| Pushing to current branch | git push origin feature-branch |
推送当前开发分支 | 不影响主分支,风险较低 |
Extending defaults with “$defaults”
以前:你自定义规则会覆盖 Claude 内置规则。 现在:可以使用 “$defaults” 保留内置规则,再追加自己的规则。
{
  "autoMode": {
    "allow": ["$defaults", "Bash(gh pr list:*)"],
    "soft_deny": ["$defaults", "Bash(kubectl delete:*)"],
    "environment": ["$defaults", "trusted-ci.internal"]
  }
}hard_deny: 不管 Claude 推断用户目的是什么,都拒绝soft_deny: 需要进行判断的操作
{
  "autoMode": {
    "classifyAllShell": true
  }
}classifyAllShell: 把所有 Bash 命令都分类,不管用户是否明确声明
                 Shell Command
                       |
                       ▼
          ┌─────────────────────┐
          │ hard_deny           │
          │ 永久禁止             │
          └─────────────────────┘
                       |
                  通过
                       |
                       ▼
          ┌─────────────────────┐
          │ allow / soft_deny   │
          │ 权限规则             │
          └─────────────────────┘
                       |
                  通过
                       |
                       ▼
          ┌─────────────────────┐
          │ Classifier          │
          │ 风险判断             │
          └─────────────────────┘
                       |
             ┌─────────┴─────────┐
             │                   │
          Allow               Deny
             │                   │
             ▼                   ▼
          执行              记录原因 → 请求用户确认
如果 Auto Mode 的安全分类器(classifier)连续很多次无法判断某个操作是否安全,Claude Code 会停止自动决定,转而让用户人工确认。
- Background Tasks
后台任务允许长时间运行的操作执行,而不会阻塞您的对话。
- Long test suites
- 构建流程
- Database migrations
- Deployment scripts
- Analysis tools
User: Run tests in background

Claude: Started task bg-1234

/task list           # Show all tasks
/task status bg-1234 # Check progress
/task show bg-1234   # View output
/task cancel bg-1234 # Cancel task
“允不允许后台任务” ≠ “同时跑多少个 Agent” ≠ “一个后台命令最多跑多久”
后台运行的功能,可以在bash中进行设置 export CLAUDE_CODE_DISABLE_BACKGROUND_TASKS=true
- Monitor Tool (Event-Driven Streams)
Monitor 会附加到任何向标准输出 (stdout) 写入内容的 shell 命令。命令输出的每一行都会成为一条通知,用于唤醒会话。Claude 指定命令;该组件会流式传输输出,并在事件触发时将其传递给客户端。
让 Claude “睡着等事件”,而不是让 Claude 每隔几十秒起来问一次“有变化吗?”
| 你的需求 | 用什么 |
|---|---|
| 让一个命令在后台继续跑,Claude 不用等 | Background Task |
| 后台任务跑着,出现某个事件时让 Claude 处理 | Monitor |
| 把一个复杂任务拆成多个 Agent 并行 | Subagents |
| 限制同时运行多少 Agent | CLAUDE_CODE_MAX_CONCURRENT_SUBAGENTS |
| 防止后台程序无限运行 | timeout |
| 不想让 Claude 使用后台任务 | CLAUDE_CODE_DISABLE_BACKGROUND_TASKS=true |
轮询 polling: 一直隔一段时间就查看日志,不断检查 → 没变化 → 等待 → 检查 → 没变化 → 等待
启动监控
   ↓
Claude 不再反复询问
   ↓
        等待
         │
         │  什么都没发生
         │
         │  ← 不消耗 token
         │
         ↓
stdout 出现匹配事件
         ↓
Monitor 发通知
         ↓
唤醒 Claude
         ↓
Claude 立即处理| 方法 | 工作方式 |
|---|---|
| Polling | Claude 主动不断检查 |
| Monitor | 命令产生事件 → 主动通知 Claude |
Monitor 监控的是 shell command 的 stdout
两种模式
Stream filters:
tail -f /var/log/app.log | grep --line-buffered "ERROR"用于日志,写系统事件, 网络流,持续运行的程序Poll-and-Emit: 定期检查数据源,仅在内容发生变化时才发出数据。此方法适用于 API、数据库或任何没有原生流的场景
“启动我的开发服务器并监控错误。” Claude 会将服务器作为后台任务启动,并附加一个监控过滤器(
tail -F server.log | grep --line-buffered -E "ERROR|FATAL")),然后会话保持静默。一旦日志中出现错误行,Claude 就会立即唤醒,读取错误信息,并做出相应的反应——重启服务器、修复错误或将其反馈给您——而无需您手动检查。
- Dynamic Workflows
把一个复杂任务写成“流水线”,让 Claude 按照预先规定好的方式,批量启动几十甚至上百个 Subagent,而不是让一个 Claude 自己临时决定怎么拆任务。单个agent只负责一个上下文窗口,而工作流则将任务分解到多个agent,并重新组合它们的结果。
任务
 ↓
Workflow
 ↓
按照规定好的流程
 ↓
启动大量 Subagent
 ↓
收集结果
 ↓
进入下一阶段
workflowSizeGuideline建议限制在少于10个Agent左右
- Scheduled Tasks
计划任务允许您按周期性计划自动运行提示,或设置一次性提醒。任务的作用域为会话级——它们在 Claude Code 处于活动状态时运行,并在会话结束时清除。
到了某个时间 → 自动启动一个任务。
- /loop command
# Explicit interval
/loop 5m check if the deployment finished

# Natural language
/loop check build status every 30 minutes
还支持5字段Cron表达式,可以精确指定执行时间
*/5 ****
- 一次性提醒: 只执行一次
remind me at 3pm to push the release branch
in 45 minutes, run the integration tests
它们是 Claude Code 用于管理定时任务的工具,不是需要你在终端中直接输入的命令。
这三个工具的作用是:让 Claude Code 在后台管理你创建的定时任务。你可以通过它们创建任务、查看任务、删除任务。
| 工具 | 作用 | 可以理解为 |
|---|---|---|
CronCreate |
创建定时任务 | 新建任务 |
CronList |
查看当前所有活动任务 | 查看任务清单 |
CronDelete |
删除某个定时任务 | 取消任务 |
通常不需要自己调用这些工具, 你直接用自然语言告诉 Claude Code 想做什么即可,由 Claude 决定是否调用相应工具。
/loop是你可以直接输入的命令。它们属于同一类定时任务功能,但使用入口不同。
| 限制 | 实际含义 |
|---|---|
| 每个会话最多 50 个 | 同一会话不能无限创建定时任务 |
| 任务属于当前会话 | 会话结束后,任务会被清除 |
| 重复任务 3 天后自动过期 | 不是创建一次就永久运行 |
| 只有 Claude Code 运行时才触发 | Claude Code 没有运行时,任务不会执行 |
Claude Code 的这类定时任务适合会话内的临时自动化,不适合要求准点执行、错过后补跑或重启后自动恢复的关键生产任务。
- Permission Modes
权限模式控制claude在未经明确批准的情况下可以执行哪些操作。
| Mode | Behavior |
|---|---|
manual |
只读取文件;其他所有操作都会询问用户。v2.1.200 起由 default 更名而来,default 仍可作为别名使用 |
acceptEdits |
可以读取和编辑文件;执行命令时需要询问用户 |
plan |
只读取文件,用于研究/规划模式,不进行编辑 |
auto |
所有操作都会执行,并由后台安全分类器进行检查。需要符合条件的模型和 Provider |
bypassPermissions |
执行所有操作,不进行权限检查(危险) |
dontAsk |
只有预先批准的工具可以执行;其他工具全部拒绝 |
每个版本可能默认的permission mode是不同的,需要自己注意
从v2.1.284, 如果你没有配置 permissions.defaultMode,那么交互式 Terminal 和 VS Code 会话默认启动在 auto. Plan Mode 虽然不能修改文件,但是执行某些 Shell 命令时,现在可以交给 Auto Mode 的安全分类器判断。
acceptEdits 也不是“所有文件都可以随便写”, 实际上有一些特殊文件,即使在 acceptEdits 下,Claude Code 也会再次询问你, .zshenv, .zlogin, .bash_login, ~/.config/git/
启动的方式有下面的几种
# Keyboard shortcut
Shift + Tab  # Cycle through all 6 modes

# Slash command
/plan                  # Enter plan mode

# CLI flag
claude --permission-mode plan
claude --permission-mode auto

# setting
{
  "permissions": {
    "defaultMode": "auto"
  }
}- Headless Mode
Headless = 无头模式 / 无交互模式, 意思不是“不需要 Claude”,而是:不需要人坐在终端前和 Claude 交互。
- Claude Code 的 Print Mode(打印模式)
让 Claude Code 不进入交互式对话,而是直接在命令行里执行一次任务并输出结果。
最重要的用途
- 自动化脚本
- CI/CD
- 批量处理
- 配合定时任务
Print Mode 是“让 Claude 能被程序调用”
- Running in Print Mode (Non-Interactive)
# Run specific task
claude -p "Run all tests"

# Process piped content
cat error.log | claude -p "Analyze these errors"

# CI/CD integration (GitHub Actions)
- name: AI Code Review
run: claude -p "Review PR"- Additional Print Mode Usage Examples
# Run a specific task with output capture
claude -p "Run all tests and generate coverage report"

# With structured output
claude -p --output-format json "Analyze code quality"

# With input from stdin
echo "Analyze code quality" | claude -p "explain this"- Print Mode Configuration
Print mode (claude -p) supports several flags for automation:
# Limit autonomous turns
claude -p --max-turns 5 "refactor this module"

# Structured JSON output
claude -p --output-format json "analyze this codebase"

# With schema validation
claude -p --json-schema '{"type":"object","properties":{"issues":{"type":"array"}}}' \
  "find bugs in this code"

# Disable session persistence
claude -p --no-session-persistence "one-off analysis"
10 .Safe Mode
Claude Code 的 Safe Mode(安全模式),它主要不是为了“安全地运行代码”,而是为了排查 Claude Code 本身或你的配置到底是谁出了问题
claude --safe-mode| 功能 | Safe Mode |
|---|---|
CLAUDE.md |
❌ 不加载 |
| Plugins | ❌ 关闭 |
| Skills | ❌ 关闭 |
| Hooks | ❌ 关闭 |
| MCP Servers | ❌ 关闭 |
核心目的是让 Claude Code 尽可能回到一个没有用户自定义扩展的基础状态。
- Session Management
有效管理多个 Claude Code 会话。
- 管理对话
| Command | Description |
|---|---|
/resume |
根据会话 ID 或名称恢复一个会话 |
/rename |
为当前会话命名 |
/fork [prompt] |
将当前对话复制到一个新的、独立的后台会话,并继续在当前会话中工作(v2.1.212+) |
/subtask <task> |
创建一个继承完整对话上下文的 forked subagent,完成任务后将结果返回当前会话(v2.1.212+) |
/branch [name] |
从当前对话节点创建一个副本并切换过去,同时保留原始对话 |
claude -c |
继续最近一次会话 |
claude -r "session" |
根据会话名称或 ID 恢复指定会话 |
subtask <任务>会生成一个分支子代理,该子代理继承完整的对话并在你继续工作的同时处理任务——它在 Claude 代理中拥有自己的一行,完成后结果会返回到你的对话中:/subtask Investigate why the auth tests are flakyfork [提示]会将对话复制到一个新的后台会话中。副本会从当前对话开始,并独立运行——不会与当前对话有任何关联:/fork Try the OAuth approach end to end要切换到副本而不是完全委托他人,请使用
/branch [name],它会保留原始分支,并允许您使用/resume返回到该分支:/branch try-oauth-instead
# Continue last conversation
claude -c

# Resume specific session by name or ID
claude -r "auth-refactor"

# Resume and fork for experimentation
claude --resume auth-refactor --fork-session "alternative approach"- 总结会话
当你离开一个 Claude Code 会话一段时间后,再回来继续这个会话,Claude 可以先给你一个简短的“上次做了什么”的总结
/recap                                 # manually trigger a recap
/config # toggle auto-recap on/off- Interactive Features
- 交互快捷键
| Shortcut | Description |
|---|---|
Ctrl+C |
取消当前输入或正在进行的生成 |
Ctrl+D |
退出 Claude Code |
Ctrl+G |
在外部编辑器中编辑当前计划(Plan) |
Ctrl+L |
重绘屏幕(仅重新渲染界面;v2.1.238 起,双击 /clear 的快捷方式已移除) |
Ctrl+O |
切换详细输出(查看 reasoning) |
Ctrl+R |
反向搜索历史记录。默认搜索所有项目中的所有提示词(v2.1.129+);在搜索选择器中按 Ctrl+S 可缩小到当前项目。更早版本默认仅搜索当前项目 |
Ctrl+T |
切换任务列表视图 |
Ctrl+B |
将正在运行的任务放到后台 |
Esc+Esc |
回退代码/对话(Rewind) |
Shift+Tab / Alt+M |
切换权限模式 |
Option+P / Alt+P |
切换模型 |
Option+T / Alt+T |
切换扩展思考(Extended Thinking) |
Option+O / Alt+O |
切换快速模式(Fast Mode,即 /fast) |
Ctrl+X Ctrl+K |
停止所有后台 Subagent |
Ctrl+Enter(或 Ctrl+X Ctrl+S) |
立即发送——一次性发送所有排队的消息。v2.1.281 起,正在运行的工具和 Subagent 会转入后台,而不是取消当前轮次。已发送和排队的消息在模型真正接收到之前会保持灰色(v2.1.275) |
Ctrl+S |
暂存当前 Prompt;再次按下可恢复 |
Ctrl+_ |
撤销对 Prompt 输入框的上一次编辑 |
: |
在单词开头输入 :,打开 Emoji shortcode 补全,例如 :heart:(v2.1.217+) |
同样也可有类似linux的按键
| Shortcut | Action |
|---|---|
Ctrl + A |
移动到行首 |
Ctrl + E |
移动到行尾 |
Ctrl + K |
删除从光标到行尾的内容 |
Ctrl + U |
删除从光标到行首的内容 |
Ctrl + W |
向后删除一个单词 |
Ctrl + Y |
粘贴(Yank) |
Tab |
自动补全 |
↑ / ↓ |
浏览命令历史 |
- Accessibility
屏幕阅读器模式(v2.1.208+)会将 CLI 切换到专为屏幕阅读器设计的纯文本渲染模式。可通过 CLI 标志、环境变量或设置键启用此功能:
claude --ax-screen-reader启动之后类似命令行,没有各种图像,就是最基础的使用
- Customizing keybindings
运行 /keybindings 即可创建自定义键盘快捷键,该命令会打开 ~/.claude/keybindings.json 进行编辑(v2.1.18+)。
Claude Code 的快捷键功能,按照“当前所在界面”分组
| Context | 简单理解 |
|---|---|
Chat |
你正在和 Claude 聊天、输入 Prompt |
Confirmation |
Claude 正在问你“允许执行吗?” |
Global |
无论在哪个界面都可以使用 |
Autocomplete |
正在看自动补全菜单 |
HistorySearch |
正在搜索历史 Prompt |
Settings |
正在设置页面 |
Tabs |
正在管理 Tab |
Help |
正在看帮助页面 |
多行输入
User: \
> Long complex prompt
> spanning multiple lines
> \end- Vim Mode
启用 Vi/Vim 文本编辑快捷键:
可通过 /config(切换“编辑器/Vim 模式”)或在 ~/.claude/settings.json 文件中将 editorMode 设置为“vim”来启用。
使用 Esc 键切换模式为 NORMAL,使用 i/a/o 键切换模式为 INSERT,使用 v 键切换模式为 VISUAL,使用 V 键切换模式为 VISUAL-LINE(v2.1.118+)
- Output Styles
Output Style 改变的是 Claude “怎么回答”,而不是 Claude “知道什么”。
| Style | Behavior |
|---|---|
| Default | 标准系统提示词,针对高效完成软件工程任务进行了优化。 |
| Proactive | Claude 会立即执行,并对常规决策做出合理假设,而不是频繁停下来询问。它提供的自主执行指导比 Auto mode 更强,但不会改变权限模式——需要权限时,你仍然会看到权限确认提示。 |
| Explanatory | 在执行步骤之间增加教学性的 Insights,解释实现选择以及代码库中的模式和设计。 |
| Learning | 协作式“边做边学”。Claude 会分享 Insights,同时留下 TODO(human) 标记,让你亲自完成一些小而关键的实现部分。 |
| Concise (v2.1.237) | Claude 直接给出结果,省略前言和过程性叙述。不会降低回答的完整程度,只是减少结果之外的铺垫。可以通过 /config → Output style 选择,或者设置 "outputStyle": "Concise"。 |
- 如何设置风格
运行 /config 并选择“输出样式”,或者运行 /output-style <样式> 直接切换——不带参数会列出可用样式并标记当前样式。无论哪种方式,选择都会保存到 .claude/settings.local.json 文件中。要不使用菜单进行设置,可以直接编辑设置:
{
  "outputStyle": "Explanatory"
}
同样可以在claude code中使用
/output-style去修改
- 自定义输出风格
自定义样式是一个带有 frontmatter 的 Markdown 文件,可以保存为以下三个级别之一:
- 用户:
~/.claude/output-styles/ - Project:
.claude/output-styles/ - Managed policy:
.claude/output-styles/inside the managed settings directory
---
name: Diagrams first
description: Lead every explanation with a diagram
keep-coding-instructions: true
---

When explaining code, architecture, or data flow, start with a Mermaid diagram
showing the structure, then explain in prose.| Frontmatter | Purpose | Default |
|---|---|---|
name |
Style 名称。如果没有指定,则使用文件名作为 Style 名称。 | 继承自文件名 |
description |
显示在 /config 的 Output Style 选择器中,用于描述该 Style。 |
None |
keep-coding-instructions |
是否保留 Claude Code 内置的软件工程相关指令。设置为 true 时,Output Style 不会移除这些默认的 coding instructions。 |
false |
force-for-plugin |
仅适用于 Plugin Style:当 Plugin 被启用时,自动应用该 Style,并覆盖用户当前设置的 outputStyle。 |
false |
- Status Line
状态栏是一个自定义命令,其输出会显示在会话底部。可以使用 /statusline 命令进行配置,也可以直接设置:
{
  "statusLine": {
    "type": "command",
    "command": "~/.claude/statusline.sh",
    "padding": 0
  }
}
padding 默认值为 0,留白。Claude Code 通过 stdin 将 JSON 对象传递给命令,因此脚本决定显示什么。
Claude Code 会把当前会话的一些信息,以 JSON 的形式传给脚本,然后脚本决定显示什么, 当前模型、当前目录、Git 分支、Context 使用率、Token、费用、Session 信息等。
| Group | Fields |
|---|---|
| Session | session_id, session_name, prompt_id, transcript_path, cwd, version |
| Model | model.id, output_style.name, effort.level, fast_mode, thinking.enabled |
| Agent | agent.name, vim.mode |
| Cost | cost.total_cost_usd, cost.total_duration_ms, cost.total_api_duration_ms, cost.total_lines_added |
| Context | context_window.context_window_size, context_window.current_usage, context_window.remaining_percentage, context_window.total_input_tokens, context_window.used_percentage |
| Limits | rate_limits.five_hour.used_percentage, rate_limits.five_hour.resets_at |
| Repo | pr.number, pr.review_state, workspace.project_dir, workspace.added_dirs, workspace.git_worktree, workspace.repo.host |
| Worktree | worktree.name, worktree.branch, worktree.path, worktree.original_branch, worktree.original_cwd |
- TUI Mode (Fullscreen)
TUI(文本用户界面)模式以全屏方式渲染 Claude Code,输出无闪烁——非常适合 tmux 或 iTerm2 分屏等终端复用器。
/tui          # toggle from within a session
claude --tui  # start directly in TUI mode
/focus命令可以切换焦点视图——一种只显示最相关输出的无干扰显示模式。减少不重要的信息,让你更容易关注 Claude 的主要输出。
- Voice
/voice 语音输入要求使用 Claude.ai 账号认证;直接使用 Anthropic API Key 或通过部分云服务提供商接入时可能不可用。
- Channels
Channels 是一项研究预览功能,它通过 MCP 服务器将来自外部服务的事件推送到正在运行的 Claude Code 会话中。推送源包括 Telegram、Discord、iMessage 和任意 Webhook,使 Claude 能够对实时通知做出反应,而无需轮询。
| 集成方式 | 描述 |
|---|---|
| Discord | 在当前 Claude Code 会话中接收和回复 Discord 消息 |
| Telegram | 在当前 Claude Code 会话中接收和回复 Telegram 消息 |
| iMessage | 在当前 Claude Code 会话中接收 iMessage 通知 |
| Webhooks(网络钩子) | 在当前 Claude Code 会话中接收来自任意 Webhook 来源的事件 |
从 v2.1.128 起,Pro/Max OAuth 和 API Key(Console)认证均可使用
- MCP 服务器充当频道插件,负责连接 Telegram、Discord 等外部服务。
- 外部收到新消息或事件后,会主动推送到当前运行的 Claude Code 会话。
- Claude 可以结合当前会话上下文理解消息,并在获得相应工具和权限的情况下进行回复或执行操作。
- 频道插件必须经过管理设置 allowedChannelPlugins 的许可,才能被允许使用。
- 不需要 Claude Code 定期主动查询消息;事件通过推送机制到达。
MCP Server是运行在Bun上,所以先安装
curl -fsSL https://bun.sh/install | bash先从官网安装MCP插件
/plugin install telegram@claude-plugins-official在Telgram上创建一个bot并获取token (Username — a unique handle ending in bot (e.g. my_assistant_bot). This becomes your bot’s link: t.me/my_assistant_bot.)
在claude code 中输入
/telegram:configure 123456789:AAHfiqksKZ8...使用频道标志重新启动。
claude --channels plugin:telegram@claude-plugins-official,或者加入设置"allowedChannelPlugins": ["discord"]配对, 在上一步运行 Claude Code 后,通过 Telegram 私信你的机器人——它会回复一个 6 位字符的配对码。如果机器人没有回复,请确保你的 Claude Code 会话已启用
--channels参数。/telegram:access pair <code>配对是为了获取ID。登录后,切换到允许列表,这样陌生人就不会收到配对码回复。你可以让Claude帮你操作,或者直接使用/telegram:access policy allowlist命令
- Chrome 整合
Chrome 集成功能可将 Claude Code 连接到您的 Chrome 或 Microsoft Edge 浏览器,实现实时 Web 自动化和调试。此功能为测试版,自 v2.0.73 及更高版本起可用(Edge 支持于 v1.0.36 及更高版本中添加)。
所有远端控制claude code的,都需要官方的订阅,三方转接是有各种bug出现的
12. Claude CLI
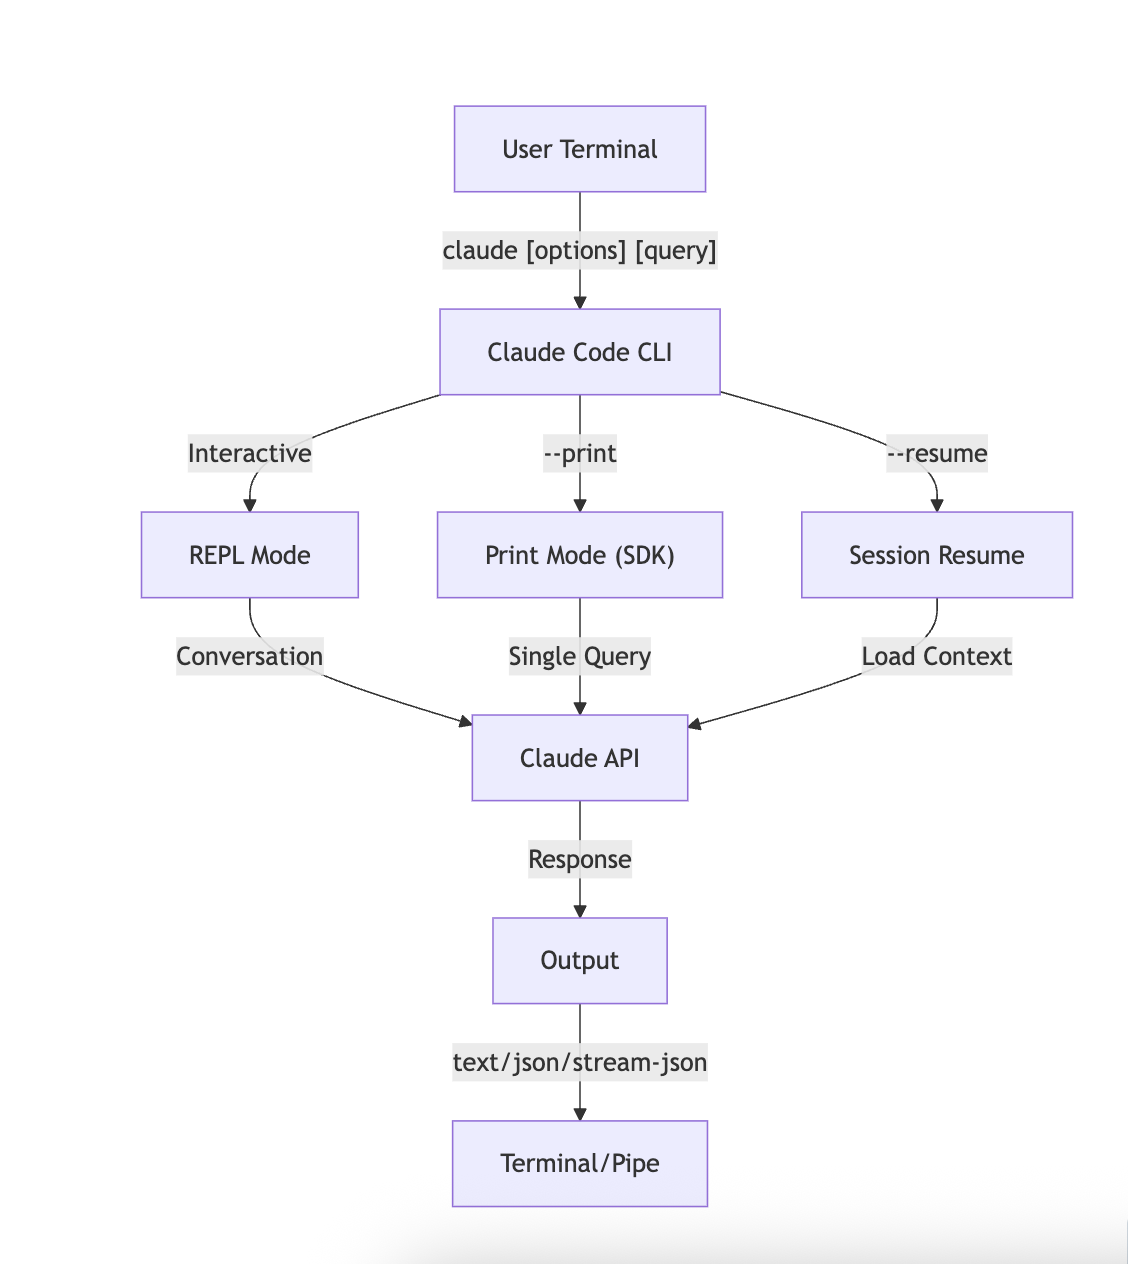
从 v2.1.113 开始,Claude Code CLI 会使用针对不同操作系统编译好的 native binary(原生二进制程序)
用户端的安装过程保持不变:npm install -g @anthropic-ai/claude-code 仍然有效,并且仍然是推荐的安装路径。在后台,npm 会为您的平台获取正确的本地二进制文件。
| CLI 命令 / 参数 | 作用 | 示例 |
|---|---|---|
claude |
启动 Claude Code | claude |
claude "prompt" |
启动并直接发送 Prompt | claude "分析这个项目" |
claude -p "prompt" |
Print mode,非交互执行并输出结果 | claude -p "解释这个函数" |
claude -c |
继续最近一次会话 | claude -c |
claude -r <session> |
恢复指定会话 | claude -r abc123 |
claude --continue |
继续最近会话 | claude --continue |
claude --resume |
恢复会话 | claude --resume |
claude --model <model> |
指定模型 | claude --model sonnet |
claude --fallback-model <model> |
指定 fallback 模型 | claude --fallback-model sonnet |
claude --effort <level> |
设置推理 effort | claude --effort high |
claude --system-prompt <prompt> |
设置系统 Prompt | claude --system-prompt "..." |
claude --append-system-prompt <prompt> |
在默认系统 Prompt 后追加内容 | claude --append-system-prompt "..." |
claude --tools <tools> |
指定允许使用的工具 | claude --tools "Bash,Read" |
claude --allowedTools <tools> |
指定允许自动执行的工具 | claude --allowedTools "Bash(git:*)" |
claude --disallowedTools <tools> |
禁止指定工具 | claude --disallowedTools "Bash" |
claude --add-dir <dir> |
添加额外工作目录 | claude --add-dir ../data |
claude --permission-mode <mode> |
指定权限模式 | claude --permission-mode plan |
claude --dangerously-skip-permissions |
跳过权限确认 | claude --dangerously-skip-permissions |
claude --verbose |
输出详细调试信息 | claude --verbose |
claude --debug |
开启 Debug 日志 | claude --debug |
claude --print / -p |
非交互 Print 模式 | claude -p "..." |
claude --output-format <format> |
指定输出格式 | claude -p --output-format json "..." |
claude --input-format <format> |
指定输入格式 | claude --input-format stream-json |
claude --include-partial-messages |
输出部分消息 | claude -p --include-partial-messages |
claude --json-schema <schema> |
指定结构化 JSON Schema | claude -p --json-schema '...' |
claude --mcp-config <file> |
指定 MCP 配置文件 | claude --mcp-config mcp.json |
claude --strict-mcp-config |
只使用指定 MCP 配置 | claude --strict-mcp-config |
claude --chrome |
启用 Chrome 集成 | claude --chrome |
claude --channels <channels> |
启用 Channels | claude --channels telegram |
claude --ide |
与 IDE 集成 | claude --ide |
claude --remote |
创建/连接远程会话 | claude --remote |
claude --worktree <name> |
使用 Git worktree | claude --worktree feature-x |
claude --tmux |
在 tmux 中运行 | claude --tmux |
claude --version / -v |
查看版本 | claude --version |
claude --help / -h |
查看 CLI 帮助 | claude --help |
核心应用还是CI/CD整合使用
- CI/CD 整合
在您的 CI/CD 流水线中使用 Claude Code,实现代码审查、测试和文档编写的自动化。
name: AI Code Review

on: [pull_request]

jobs:
  review:
    runs-on: ubuntu-latest
    steps:
      - uses: actions/checkout@v4

      - name: Install Claude Code
        run: npm install -g @anthropic-ai/claude-code

      - name: Run Code Review
        env:
          ANTHROPIC_API_KEY: ${{ secrets.ANTHROPIC_API_KEY }}
        run: |
          claude -p --output-format json \
            --max-turns 1 \
            "Review the changes in this PR for:
            - Security vulnerabilities
            - Performance issues
            - Code quality
            Output as JSON with 'issues' array" > review.json

      - name: Post Review Comment
        uses: actions/github-script@v7
        with:
          script: |
            const fs = require('fs');
            const review = JSON.parse(fs.readFileSync('review.json', 'utf8'));
// Process and post review comments- Script Piping
通过 Claude 处理文件、日志和数据以进行分析。
# Analyze error logs
tail -1000 /var/log/app/error.log | claude -p "summarize these errors and suggest fixes"

# Find patterns in access logs
cat access.log | claude -p "identify suspicious access patterns"

# Analyze git history
git log --oneline -50 | claude -p "summarize recent development activity"- Multi-Session Workflows
# Start a feature branch session
claude -r "feature-auth" "let's implement user authentication"

# Later, continue the session
claude -r "feature-auth" "add password reset functionality"

# Fork to try an alternative approach
claude --resume feature-auth --fork-session "try OAuth instead"

# Switch between different feature sessions
claude -r "feature-payments" "continue with Stripe integration"